
 Download the App
How to Join Granny Squares: 7 Easy Methods for Every Project
29 Sep, 2026
The easiest way to join granny squares is the slip stitch or single crochet join, both worked with a hook. For a flat, neat seam, use the flat slip stitch seam. To skip seaming altogether, use join-as-you-go. For an almost invisible seam, sew squares together with mattress stitch.
You've finished a mountain of granny squares, and now you need to turn them into a blanket, cardigan or bag. Joining granny squares means connecting the finished motifs edge to edge, and the method you choose changes the final look: raised or flat, bold or hidden, stiff or drapey. This guide covers seven ways to join crochet squares, with steps and advice on choosing one.
Terms note: this guide uses US terms. A UK double crochet is the same as a US single crochet. See our crochet abbreviations guide for a full conversion.
Plan Your Next Project with Yarnzy
 Download Yarnzy
Why Your Joining Method Matters
Joining is more than a finishing step. It's a design choice. The same set of squares can look like a soft, seamless fabric or a bold patchwork grid depending on how you connect them.
Three things change with each method:
• Visibility. Some joins disappear into the fabric, and others create a raised ridge or a lacy border.
• Drape and bulk. Hook joins are a little bulkier than sewn seams, while flat joins lie smoothly and drape well.
• Effort. Some methods are quick, while others take practice or planning before you make the squares.
There are plenty of ways to join granny squares, and no single best one. The right choice depends on your project, your yarn and how you want the finished piece to look. The comparison below helps you narrow it down.
Quick Comparison: All 7 Granny Square Joining Methods
| Method | Difficulty | Finish | Best for |
|---|---|---|---|
| Slip stitch join | Easy | Subtle; ridge on one side | Beginners, garments, quick projects |
| Single crochet join | Easy | Raised, textured ridge | Blankets with a contrast color |
| Flat slip stitch seam | Easy-Medium | Flat, neat, decorative | Blankets that need to lie smooth |
| Join-as-you-go | Medium | Seamless, no separate seaming | Planned layouts, fewer ends to weave in |
| Double crochet join | Easy | Bold, raised border | Chunky, structured projects |
| Flat braid join | Advanced | Lacy, braided, flat | Heirloom blankets |
| Sewn / invisible seam | Easy-Medium | Nearly invisible | Garments and blankets with no right side |
Method 1: Slip Stitch Join
The slip stitch join is a great starting point. It's quick, uses only a hook, and gives a subtle seam with a little flexibility. Worked in the same color as the squares' final round, it almost blends in. In a contrast color, it becomes a neat design line.
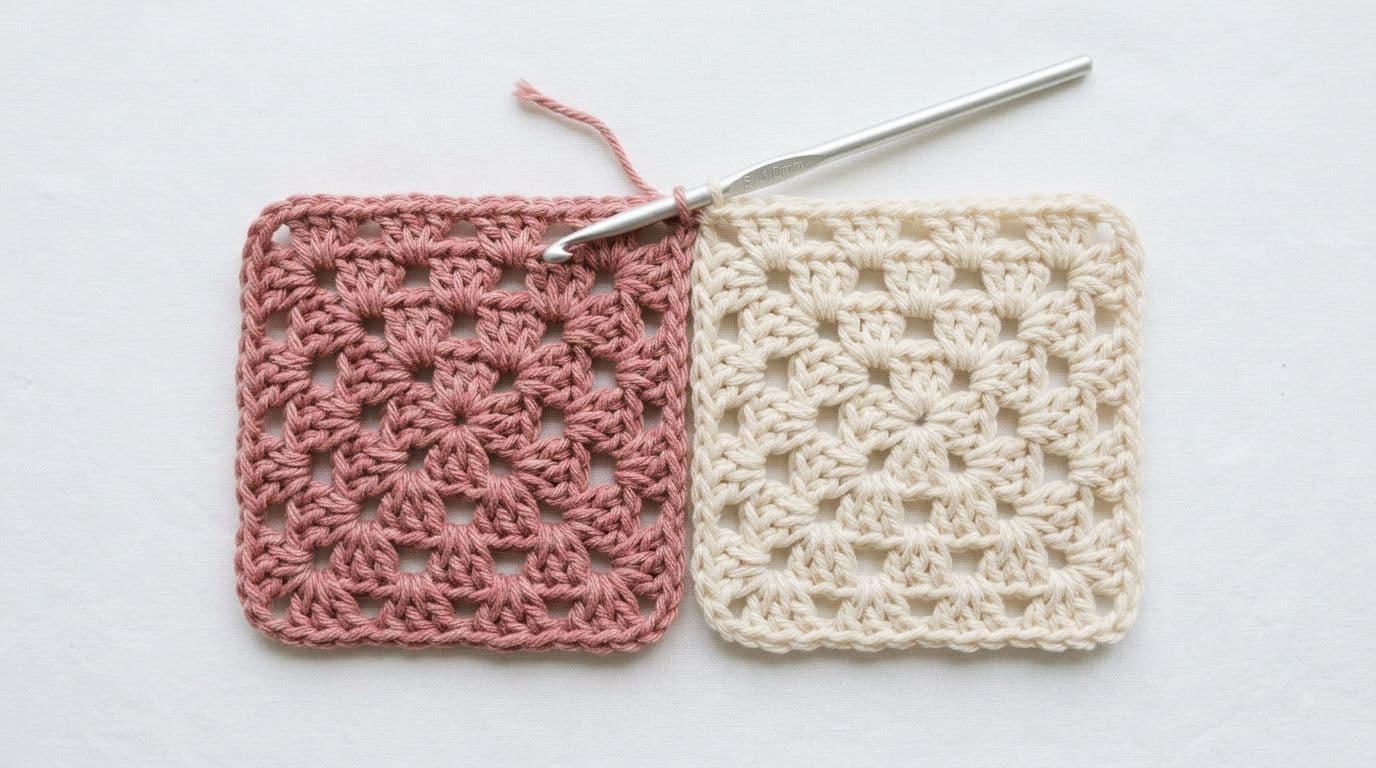
Where the ridge shows depends on how you hold the squares. With the right sides together, the seam sits on the back. With wrong sides together, the ridge shows on the front. It suits garments, bags and blankets where you want a light touch.
How to Do the Slip Stitch Join
1. Place two squares together and line up the corners and stitches.
2. Make a slip knot on your hook.
3. Insert the hook through the back loops of the corner stitch on both squares.
4. Yarn over and pull through both back loops and the loop on your hook.
5. Move to the next pair of back loops and repeat along the edge, keeping tension slightly looser than usual.
6. Fasten off at the corner and weave in the ends.
Method 2: Single Crochet Join
The single crochet join makes a statement. It creates a raised, textured ridge between squares, so it looks best in a contrasting or complementary color. It's sturdy and easy to learn. It's also called the double crochet join in UK terms.
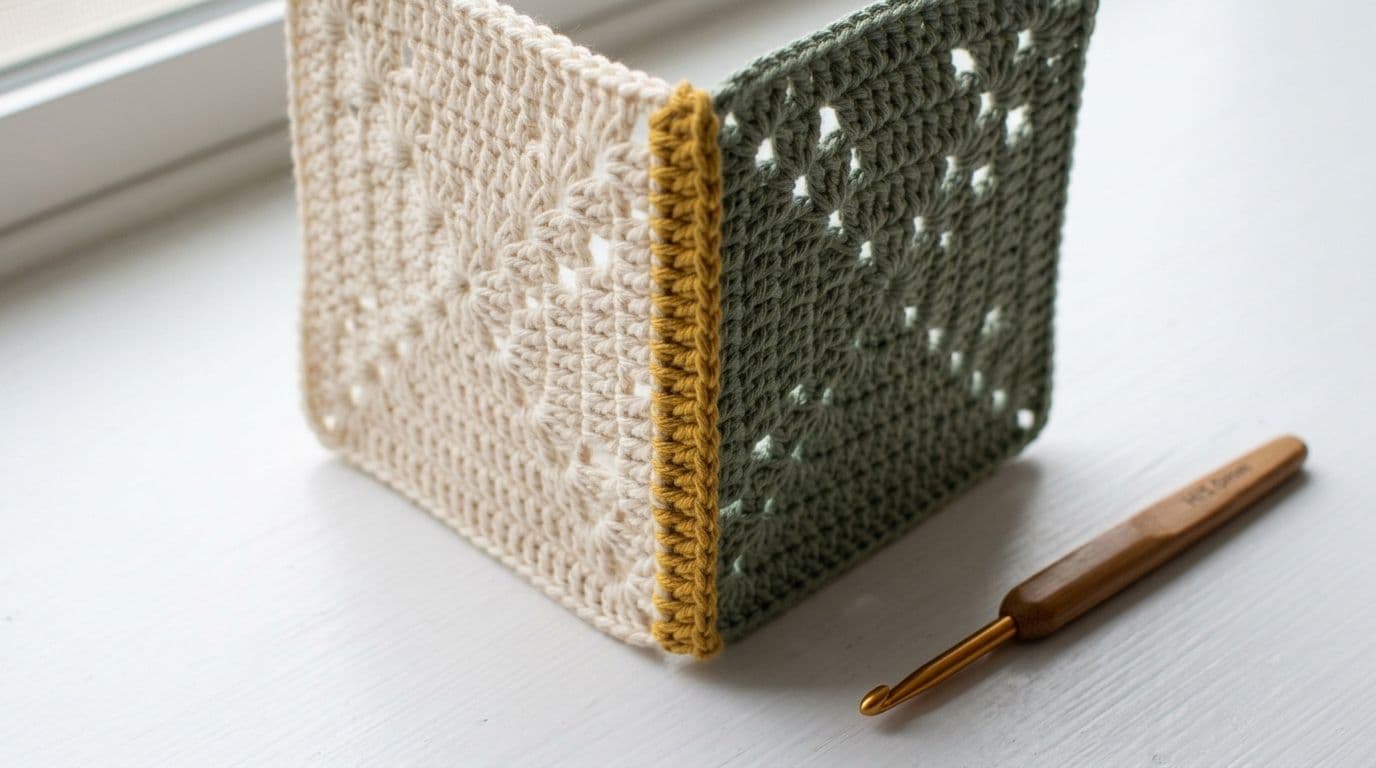
Because the ridge is visible, choose the yarn color deliberately. A matching color gives quiet texture, and a contrast color turns the seams into a grid.
How to Do the Single Crochet Join
1. Place two squares with wrong sides together and align the stitches.
2. Attach your joining yarn at a corner.
3. Insert the hook through the outer loops of the corner stitch on both squares.
4. Work a single crochet: yarn over, pull up a loop, yarn over, and pull through both loops.
5. Continue into each pair of stitches along the edge.
6. At intersections, work a single crochet across the seam where the joins meet.
Method 3: Flat Slip Stitch Seam (Flat Seam)
If you want a flat seam without sewing, this is the one. The squares are laid side by side and worked through back loops only, so the join lies smooth with a tidy, braid-like line. It works well in a contrast color and looks almost invisible in a matching one.
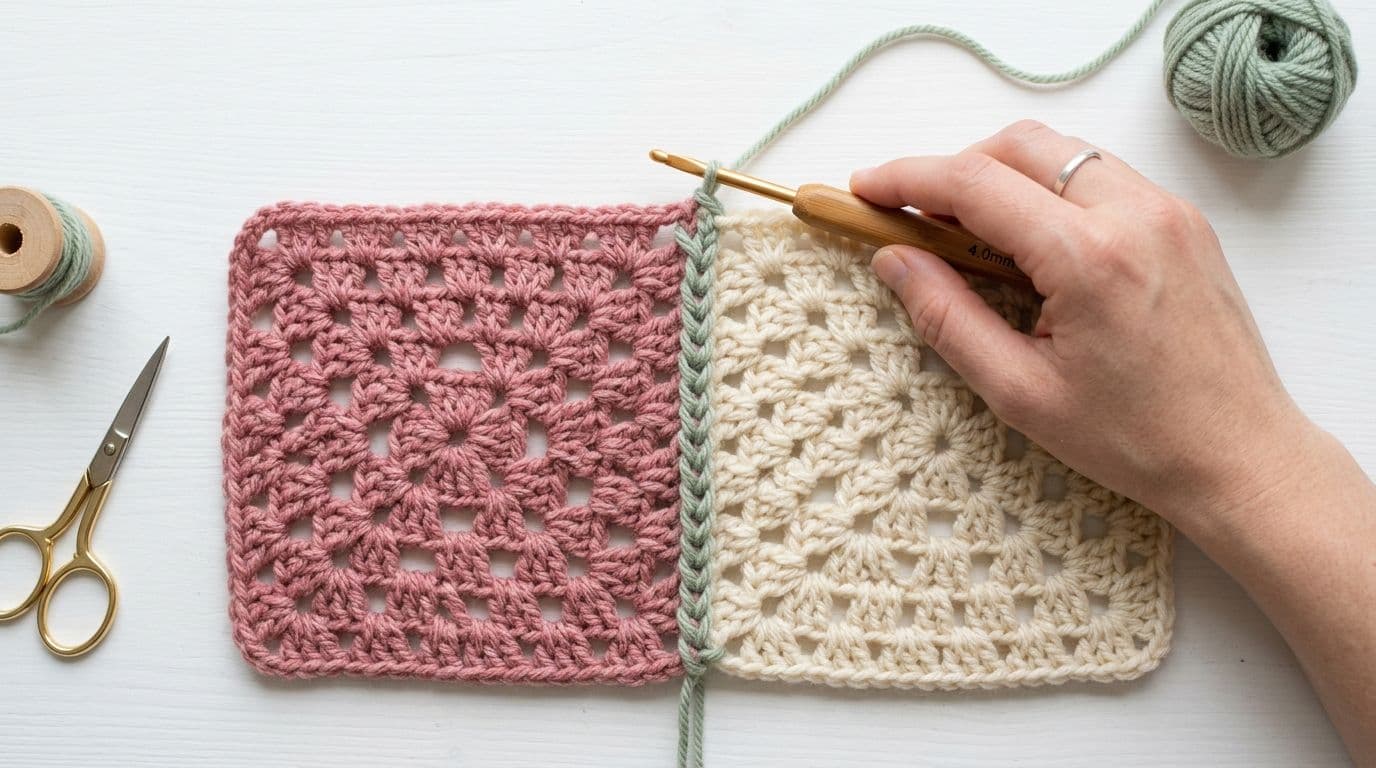
It takes a little practice because you move between the two squares with every stitch, but the result is worth it.
How to Do the Flat Slip Stitch Seam
1. Lay two squares side by side, right sides up, with your yarn kept at the back.
2. Insert your hook front to back into the back loop of the corner chain on the right square.
3. Insert it into the back loop of the matching stitch on the left square.
4. Pull the joining yarn through both loops to make the first slip stitch.
5. Alternate right square, left square along the edge, pulling through all loops each time.
6. At each corner, join the two corner chains, then continue with the next pair of squares.

Picking a Contrast Joining Color? The joining yarn changes the whole look of your project. Test color combinations with Yarnzy's Color Palette tool before you commit to a skein.
Method 4: Join-As-You-Go (JAYG)
Join-as-you-go connects squares during the last round, so there's no separate seaming step and far fewer ends to weave in. You crochet the final round of each new square and attach it to its neighbor with slip stitches in place of the usual chains.
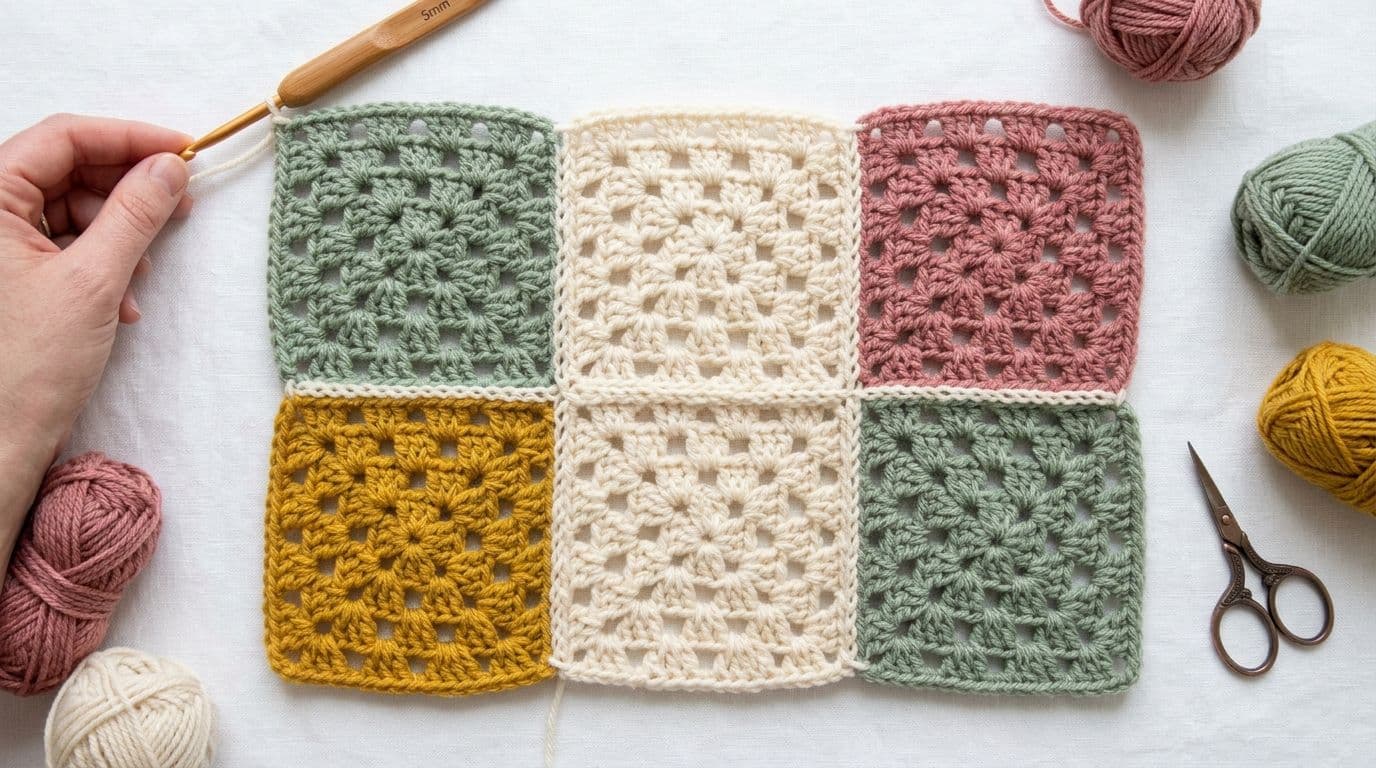
It takes forward planning because you need your layout and colors decided before you start. Many crocheters love that the blanket grows as they go.
How to Do the JAYG Method
1. Finish one square completely. Work the others up to the second-to-last round.
2. Join yarn at a corner of an unfinished square and work the first side as usual.
3. At the corner next to the finished square, work your corner cluster, then a slip stitch into the finished square's corner space.
4. Along the joining side, replace each chain between clusters with a slip stitch into the matching space on the finished square.
5. Where a corner touches two neighbors, use slip stitches for both corner chains.
6. Work any remaining sides as usual.
Lattice variation: the lattice method is a lacy, reversible join-as-you-go that uses chains and double crochets between squares.
Method 5: Double Crochet Join
The double crochet join gives the boldest border of the hook joins. It creates a raised, textured band between squares, which works well with a contrast color or on chunky projects that need structure.
It's a good pick when you want the seams to be part of the design. Test it on two spare squares first, because the ridge sits differently depending on which sides face you.
Steps: place squares together, attach yarn at a corner, work double crochet stitches through the back loops of both squares along the edge, and cross the intersections as with Method 2.
Method 6: Flat Braid Join
The flat braid join is a decorative, lacy method that lies flat and drapes beautifully. It's typically used for afghan squares, and it's one of the more advanced choices.
It needs preparation. You first work a loop border around each square, often single crochet with chain loops, and then interlace the loops of neighboring squares so the chains cross like a braid. It takes time, but the result looks handmade in the best way.
For a simpler alternative, try an alternating join: slip stitch into one square, chain 1, slip stitch into the other square, chain 1, and repeat. It gives a similar flat, decorative look with far less effort.

New to the Stitches Used in Joins? Every hook join here is built from slip stitches, single crochet and double crochet. If you'd like a refresher, our guide to crochet stitch types walks through each one.
Method 7: Sewn / Invisible Seam
If you'd rather sew, mattress stitch is the classic way to join granny squares invisibly. Worked with a tapestry needle, it pulls the loops of each square together like a zipper and the seam almost disappears from both sides. Whip stitch is a quicker sewn option, but it leaves visible dashes unless the yarn matches.
Sewn seams are less bulky than crocheted ones, which makes them a good choice for garments and for blankets with no distinct right side.
Quick steps: lay the squares side by side, thread a tapestry needle with matching yarn, and pass it through the loops on the first square, then the matching loops on the second. Work back and forth like a ladder, pulling the yarn taut every few stitches, then weave in the ends.
Which Joining Method Is Right for You?
Use this quick guide:
• Total beginner? Choose the slip stitch or single crochet join.
• Want a flat, smooth blanket? Choose the flat slip stitch seam.
• Hate weaving in ends? Choose join-as-you-go, and plan your layout first.
• Want the seams to disappear? Choose mattress stitch or a slip stitch in a matching color.
• Want the seams to be a feature? Choose the single or double crochet join in a contrast color, or the flat braid.
For a blanket, the flat slip stitch seam, the single crochet join and join-as-you-go are the most popular choices. If you're still unsure, join two spare squares with two methods and compare.
Tips for Joining Granny Squares Neatly
• Block first. Blocking makes squares the same size, so edges line up and the joined piece stays flat.
• Check your stitch counts. Every square should have the same number of stitches per side.
• Lay everything out. Arrange your squares before you join anything. The Square Planner helps you spot color clashes early.
• Join in strips. Join squares into rows first, then join the rows together.
• Keep tension loose. Tight joining stitches make the seam pucker. If your work curls, see why crochet curls.
• Match your materials. Use the same yarn weight as your squares, and check the hook size chart if you change hooks.
• Test first. Try any new join on two spare squares before committing to the whole project.
Conclusion
Now you know how to join granny squares in seven ways, from the quick slip stitch join to the decorative flat braid. Choose based on the look you want and how much effort you're willing to spend. For most projects, the flat slip stitch seam, the single crochet join or join-as-you-go are safe, attractive choices. Try a couple on spare squares, and use the same method throughout each project so the finished piece looks consistent.
Frequently Asked Questions
The single crochet join or the slip stitch join. Both use only a hook and basic stitches, and they're forgiving if your squares vary slightly in size.
Share this page
 X / Twitter
 Facebook
 Reddit
Related articles
How to Fix a Dropped Stitch in Knitting: Step-by-Step for Every Stitch Type

Why Is My Crochet Curling? 6 Causes, Easy Fixes, and How to Stop It for Good
How Much Yarn Do I Need? Yardage Chart + Free Yarn Calculator

Yarnzy: #1 Crochet & Knitting App
Track knitting and crochet projects with a timer & row counter, Import Patterns from Anywhere, Manage Stash & more all in one place.


Free to start · iOS, Android & Web
Scan to Download the App

Start your next project with confidence