
 Download the App
Free Stitch Calculator for Knitters & Crocheters: Gauge & Stitch Count Explained
3 Jul, 2026
A stitch calculator is a tool that converts your gauge (stitches per inch) into exact cast-on stitch counts and row counts for finished pieces at any width and height you want. Measure your gauge swatch (stitches and rows in 4 inches), enter that into the calculator along with your target dimensions, and the calculator multiplies to tell you exactly how many stitches to cast on and rows to work..
The Yarnzy stitch calculator works for both crochet and knitting, handles inches or centimeters, and even accounts for pattern repeats so you don't end up short one stitch on your final row.
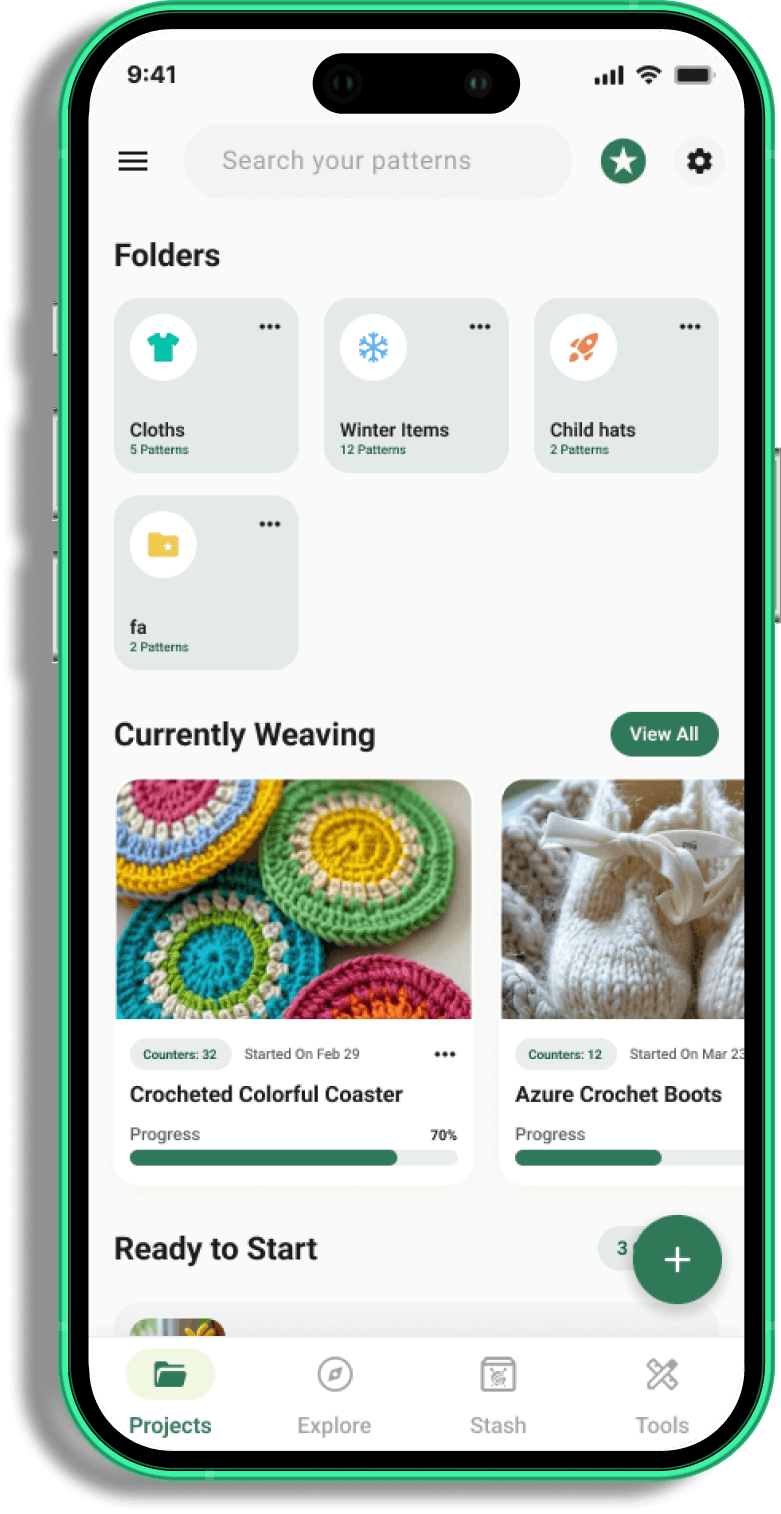
Try It Now: Calculate Your Stitch Count
 Open the Stitch Calculator
What Is a Stitch Calculator?
A stitch calculator is a tool that converts your gauge (stitches per inch or stitches per centimeter) into a cast-on stitch count and row count for a finished piece at any width and height you want.
Think of it as a translator. Gauge tells you how dense your stitches are. A target dimension tells you how big you want your piece to be. The stitch calculator bridges the gap, giving you the exact number of stitches and rows you need to reach that size.
This matters because every knitter and crocheter's hands are different. Two people following the same pattern with the same yarn can get completely different gauges. If you don't adjust the stitch count to your actual gauge, your finished project will be the wrong size.
Why Gauge Matters Before You Start
Gauge is the foundation of everything in this post. If you skip it, the stitch calculator (and your project) fails.
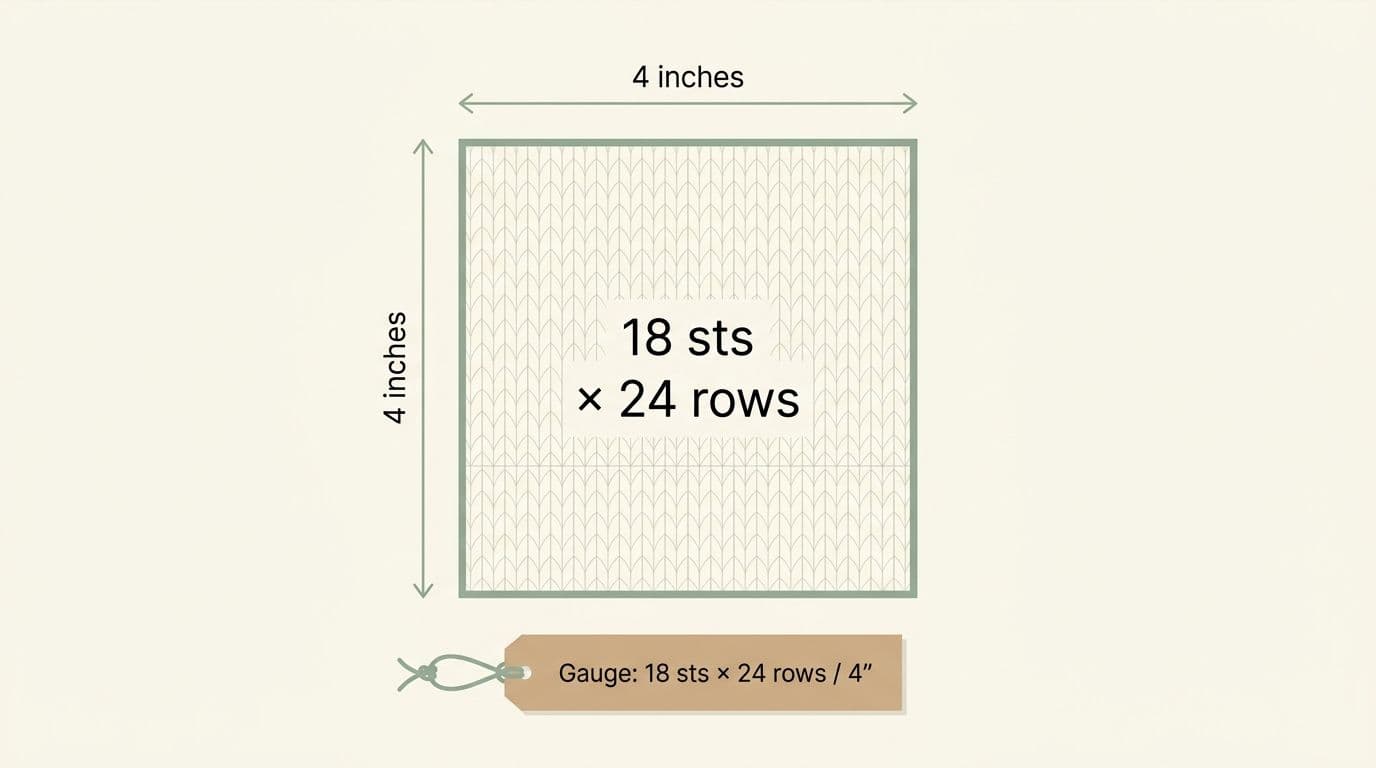
Gauge is the number of stitches and rows in a 4-inch (or 10-cm) swatch worked in your actual pattern stitch, with your actual yarn and needle size. It tells you how many stitches you'll stack into one inch of fabric.
Say a pattern calls for size US 7 needles and an expected gauge of 18 stitches over 4 inches in stockinette stitch. But when you swatch with your hands and your yarn, you get 20 stitches in 4 inches. Your gauge is tighter. That means if you cast on the pattern's original stitch count, your finished piece will be smaller than designed.
The stitch calculator fixes this. Input your 20-stitch gauge instead of the pattern's 18, and it will increase your cast-on count to compensate, giving you the intended finished width.
What Is a Gauge Swatch?
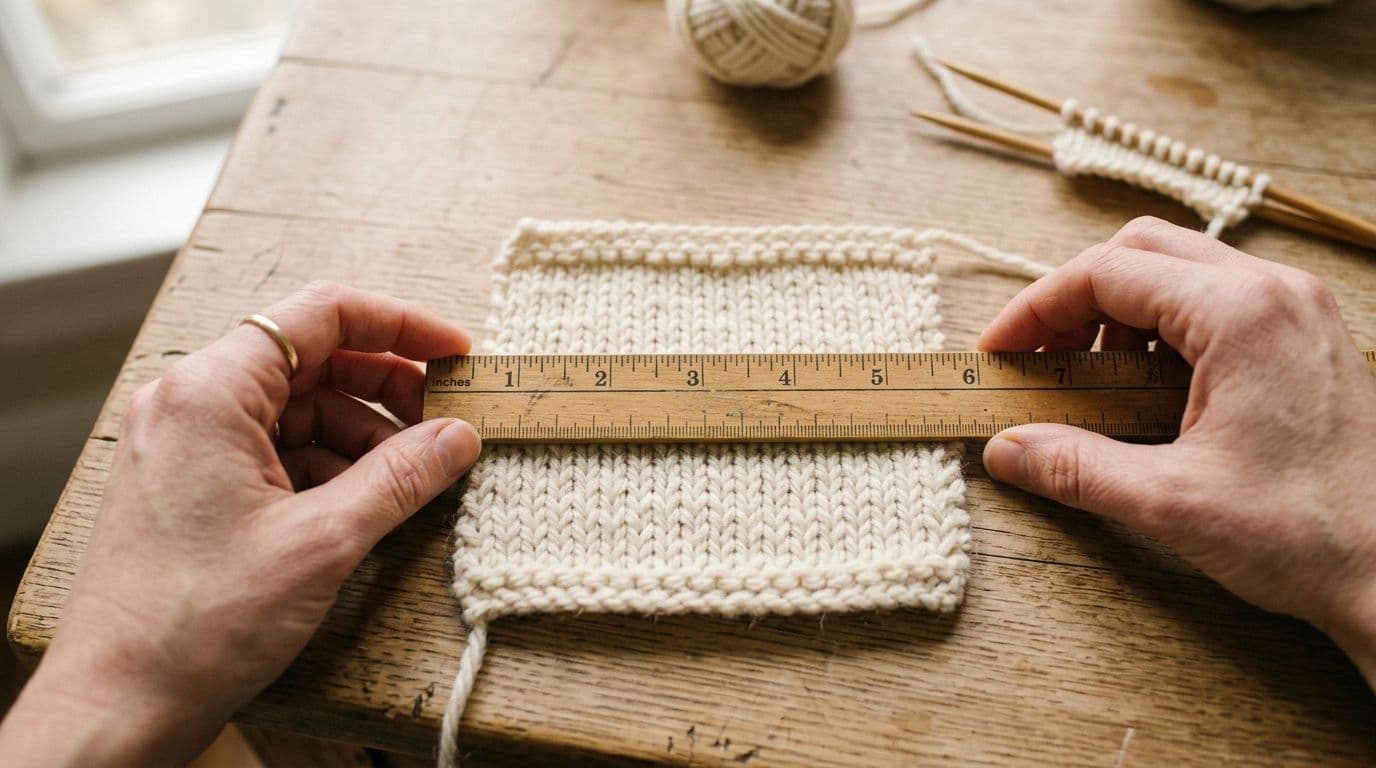
A gauge swatch is a small practice piece, usually 4×4 inches (or 10×10 cm), that you knit or crochet specifically to measure how tight or loose your stitches are.
Don't skip this. I know it feels like wasted yarn and time it's not. Swatching prevents frogging an entire sweater.
Cast on enough stitches to make at least 5–6 inches wide (this gives you a comfortable measuring area in the middle). Work until you have at least 5–6 inches of rows. Then bind off or fasten off, wash it if the pattern calls for that (blocking before measuring can change gauge), dry it flat, and measure.
How Big Should Your Gauge Swatch Be?
The practical minimum is 4×4 inches (10×10 cm), but bigger is more accurate.
A 4×4 swatch gives you enough stitches and rows to measure. But if you're neurotic about accuracy (and crocheters especially should be, since single crochet stitches can be tiny), a 6×6 swatch is better. More stitches = less impact from one wobbly edge stitch throwing off your count.
Place a ruler or measuring tape horizontally across your swatch, count the stitches between the 1-inch and 2-inch marks (or 2-cm and 6-cm marks, if you're using metric), then multiply by 4 (or 5, depending on your measurement). Do the same vertically for row count. If you get different numbers across different parts of the swatch, take an average.
How to Use the Stitch Calculator (Step by Step)
The Yarnzy stitch calculator runs through four simple steps. You don't need to be good at math just honest with your measurements.
Step 1: Measure Your Gauge
Lay your gauge swatch flat on a table. Grab a ruler and measure horizontally across the widest, most consistent part of your swatch, away from the edges (where stitches are often distorted).
Count the stitches in exactly 4 inches (or 10 cm). If you're measuring 4 inches and you count 18 stitches, your gauge is 18 stitches per 4 inches, or 4.5 stitches per inch.
Do the same for rows vertically. Count the row bumps between two points exactly 4 inches apart (or 10 cm). Record this too you'll need it to calculate row count.
Pro tip: Use the ruler's edge. Don't estimate. A quarter-inch difference compounds quickly across a sweater body.
Step 2: Enter Stitches & Rows
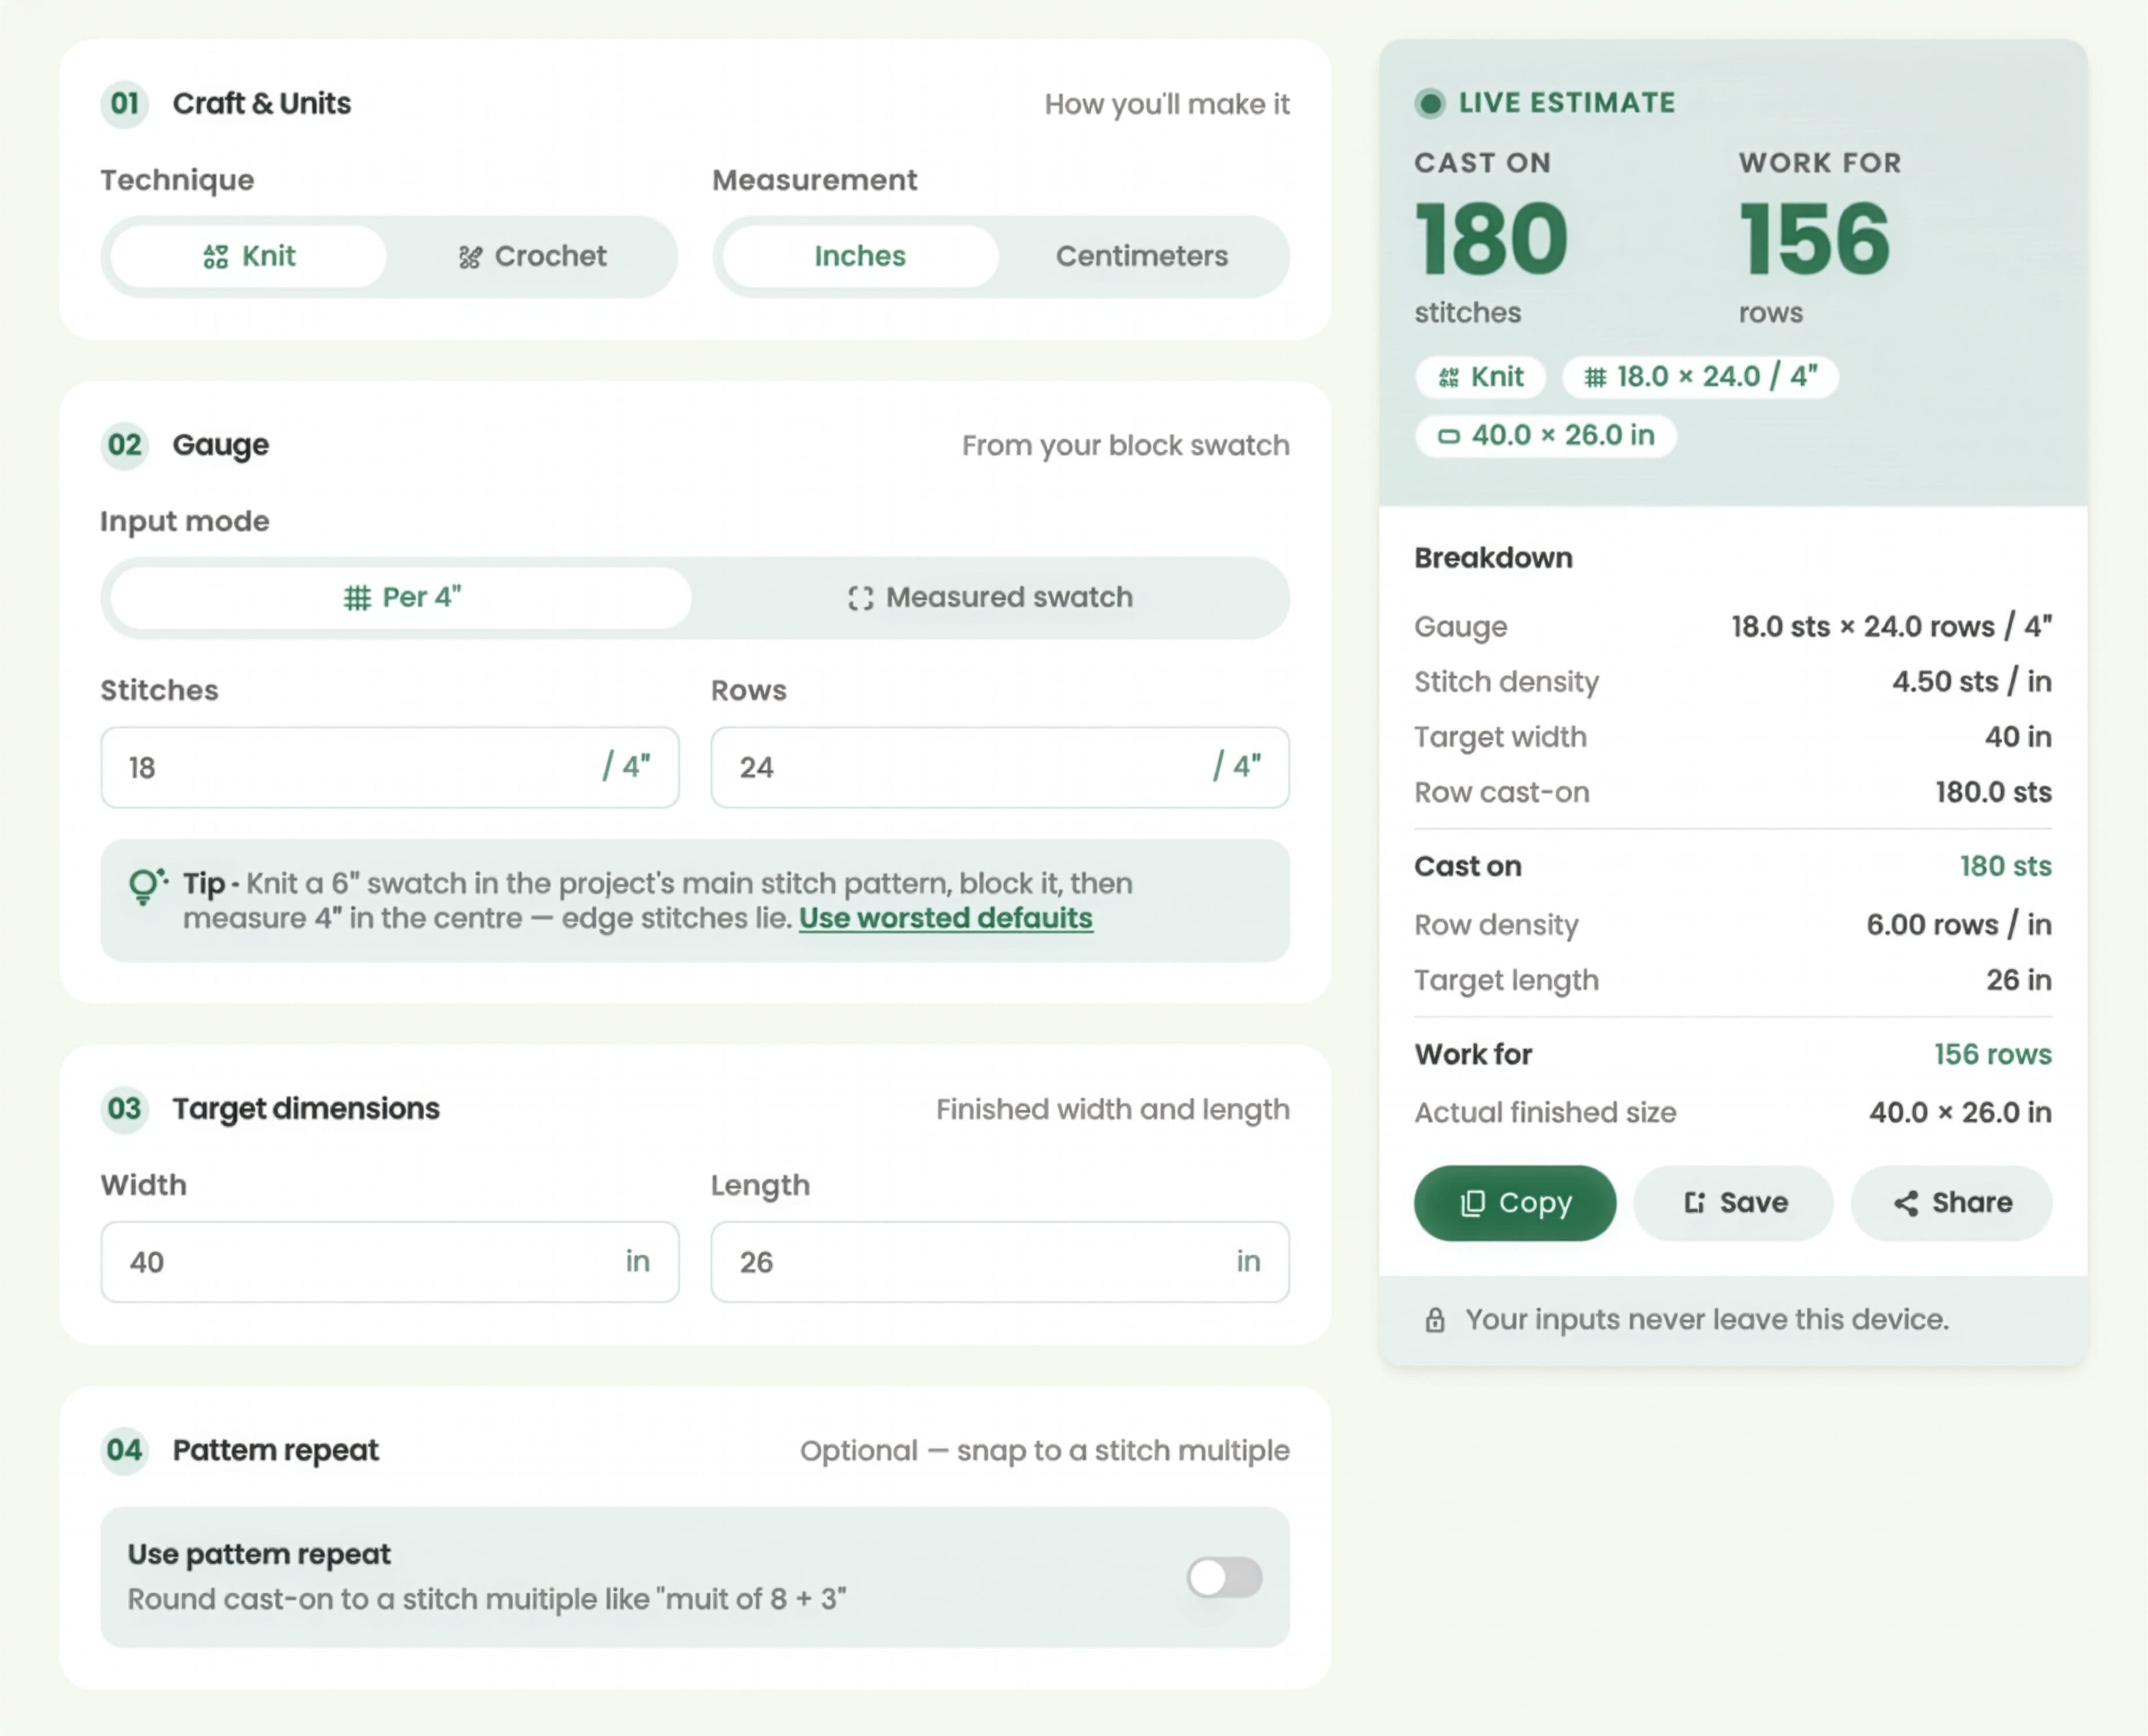
Now you're in the calculator. Input your measured gauge for stitches per inch (or per centimeter) and rows per inch.
If you counted 18 stitches in 4 inches, that's 4.5 stitches per inch. Enter 4.5. If you counted 22 row bumps in 4 inches, that's 5.5 rows per inch. Enter 5.5.
The calculator will store these and use them to do the math in the next step.
Step 3: Set Your Target Width & Length
Now tell the calculator how wide and how tall you want your finished piece to be.
Say you're making a baby blanket and you want it to be 30 inches wide and 36 inches long. Or a sweater back panel that should be 18 inches wide and 24 inches tall. Enter your target dimensions, and the calculator multiplies them by your gauge to get the stitch count and row count.
30 inches × 4.5 stitches per inch = 135 stitches to cast on. 36 inches × 5.5 rows per inch = 198 rows to work. Done.
Step 4: Apply a Pattern Repeat (Optional)
Here's where the Yarnzy calculator does something most competitors don't: it snaps your cast-on count to a pattern repeat.
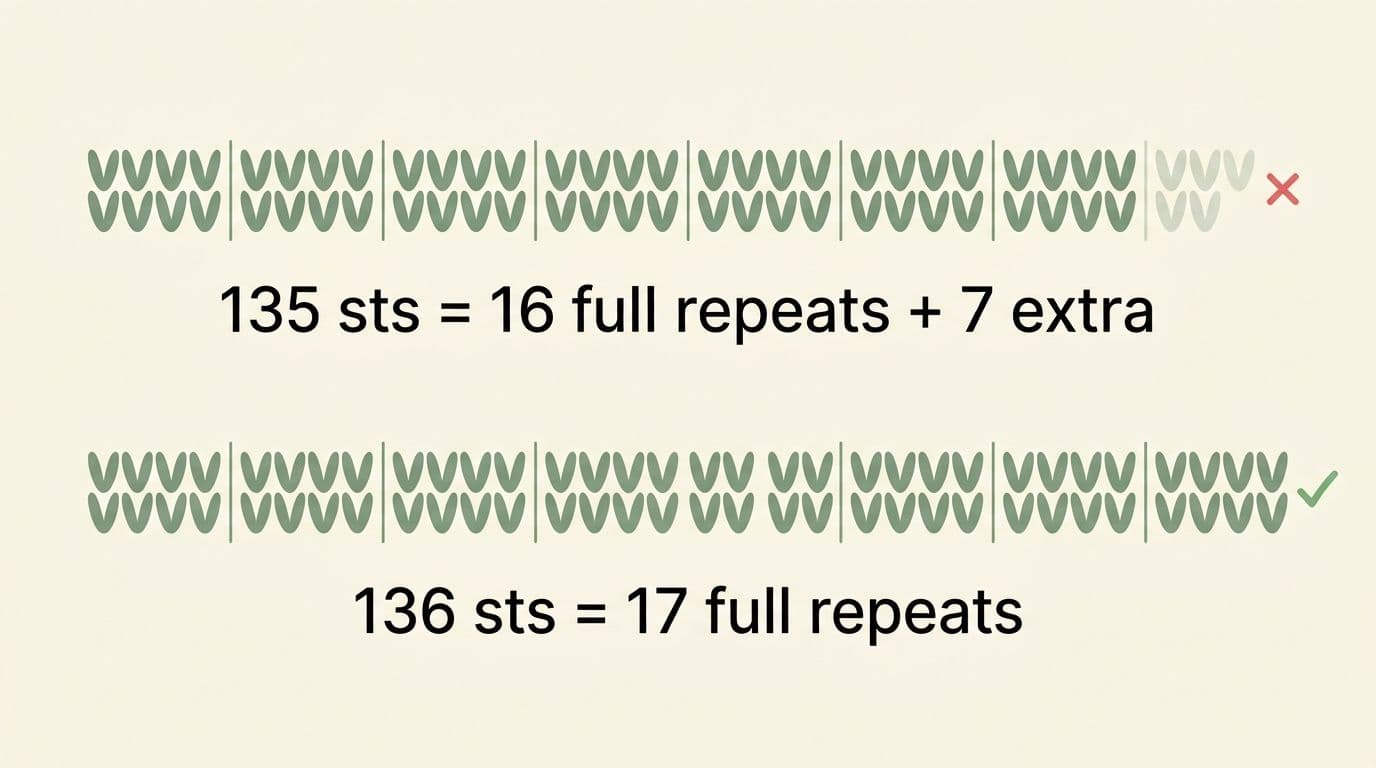
A lot of stitch patterns repeat every 6, 8, 10, or 12 stitches. If your math says "cast on 135 stitches" but your stitch pattern repeats every 8, you'll have 135 ÷ 8 = 16.875 repeats. You can't knit a fractional repeat.
Instead, tell the calculator your stitch multiple. It will round your cast-on count up or down to the nearest whole repeat, so you get clean edges and no pattern interruption.
Cast on 136 stitches instead of 135? Your blanket is 0.3 inches wider. Unnoticeable. Worth it for a stitch pattern that knits cleanly.
Quick tip: New to crochet or knit abbreviations? Look up any stitch abbreviation in the Stitch Dictionary it's saved me dozens of times mid-pattern.
Worked Example: From Gauge to Finished Project
Let's walk through a real example so you can see how the numbers play out.
You're knitting a baby sweater back panel. The pattern says:
• Needle size: US 6
• Gauge: 20 stitches and 28 rows over 4 inches in stockinette stitch
• Finished width: 16 inches
• Finished length: 12 inches
You swatch with US 6 needles and the recommended yarn. You get 22 stitches and 30 rows in your 4-inch swatch. Your gauge is tighter.
Stitch gauge: 22 stitches ÷ 4 inches = 5.5 stitches per inch Row gauge: 30 rows ÷ 4 inches = 7.5 rows per inch
Now you enter this into the stitch calculator:
• Stitches per inch: 5.5
• Rows per inch: 7.5
• Target width: 16 inches
• Target length: 12 inches
The calculator does the math:
• 16 inches × 5.5 stitches per inch = 88 stitches to cast on
• 12 inches × 7.5 rows per inch = 90 rows to work
The pattern originally called for 80 stitches (16 × 5 stitches per inch, using its gauge). You're casting on 88 instead of 8 extra stitches to account for your tighter gauge. If you'd ignored gauge and cast on 80, your sweater back would be only 14.5 inches wide instead of 16.

Ready to Stop Doing Math By Hand? This is exactly what the stitch calculator is built for. Input your gauge, set your dimensions, and it handles the multiplication.
How to Count Stitches in Crochet vs Knitting
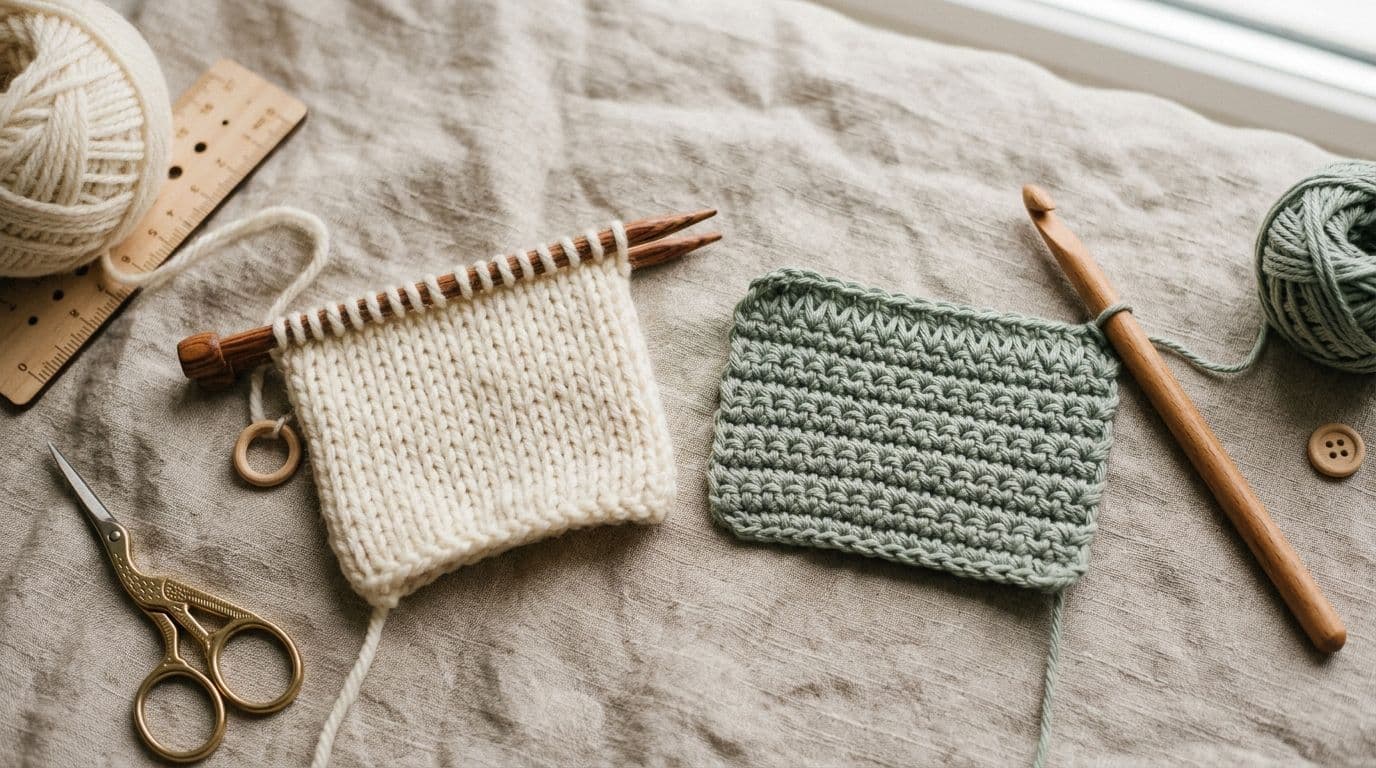
Counting stitches for your gauge swatch looks different depending on what you're making.
Knitting
In knitting, you're counting the vertical loops (the "V" shapes) on your needle or needles.
Lay your swatch flat. Place a ruler horizontally. Count the number of complete V-shaped stitches between two points 4 inches apart. Don't count partial stitches at the edges as they're distorted. Count only the clear, full stitches in the middle of your swatch.
For rows, count the horizontal bumps (the purl-side bumps are easiest to see). Each bump is one row.
Crochet
In crochet, you're counting the "V" shapes at the top of the chain or previous row.
Lay your swatch flat. Place a ruler horizontally across the tops of your stitches (usually the row you just finished or bound off). Count the V-shapes between two points 4 inches apart.
For rows, count the chain spaces or row-ends on the side of your swatch. It's a bit easier than knitting if your edges are neat and this is why consistent edges matter.
The key difference: knitting stitches sit on your needle until you bind off, so they're visible. Crochet stitches are finished, so you're reading the texture of the fabric itself. In both cases, measure away from the edges where distortion happens.
What If Your Gauge Doesn't Match?
Gauge mismatch is the number-one reason projects come out the wrong size. It's also the easiest problem to fix with the stitch calculator.
First, figure out which direction you're off. Measure your swatch three or four times in different spots. If you consistently get 2 stitches off from the pattern's gauge, that's real. If you get different numbers each time, your swatch isn't even enough to remake it or measure more carefully.
Then ask yourself: am I loose or tight? If the pattern expects 20 stitches per 4 inches and you got 18, you're loose. If you got 22, you're tight. Neither is wrong, it's just your personal gauge.
Now, do you want to change needle size to match the pattern's gauge, or do you want to adjust your stitch count for your actual gauge?
Option 1: Go down a needle size (if you're loose) or up a needle size (if you're tight) to try to match the pattern's gauge more closely. Reswatch. See if you're closer. (This is what most patterns ask you to do.)
Option 2: Keep your needle size and use the stitch calculator to adjust the pattern to your gauge. Cast on more stitches if you're loose, fewer if you're tight. This is faster and it works just as well.
If you're swapping yarn, which changes gauge, the stitch calculator becomes essential. Figure out how much yarn you'll need next with the Yarn Calculator, then reswatch the new yarn and recalculate your stitch count.
Troubleshooting: If your gauge is off by 2 stitches but the pattern won't give you the flexibility to adjust cast-on count, try a half-size smaller or larger needle before you reswatch. Sometimes

Find Every Stitch in Seconds Look up crochet and knitting stitches, understand abbreviations, and learn how each stitch works with Yarnzy's Stitch Dictionary.
Explore the Stitch Dictionary
Common Stitch Calculator Mistakes to Avoid
I've seen knitters and crocheters use the calculator perfectly, then tank their projects with one wrong move afterward. Here are the pitfalls.
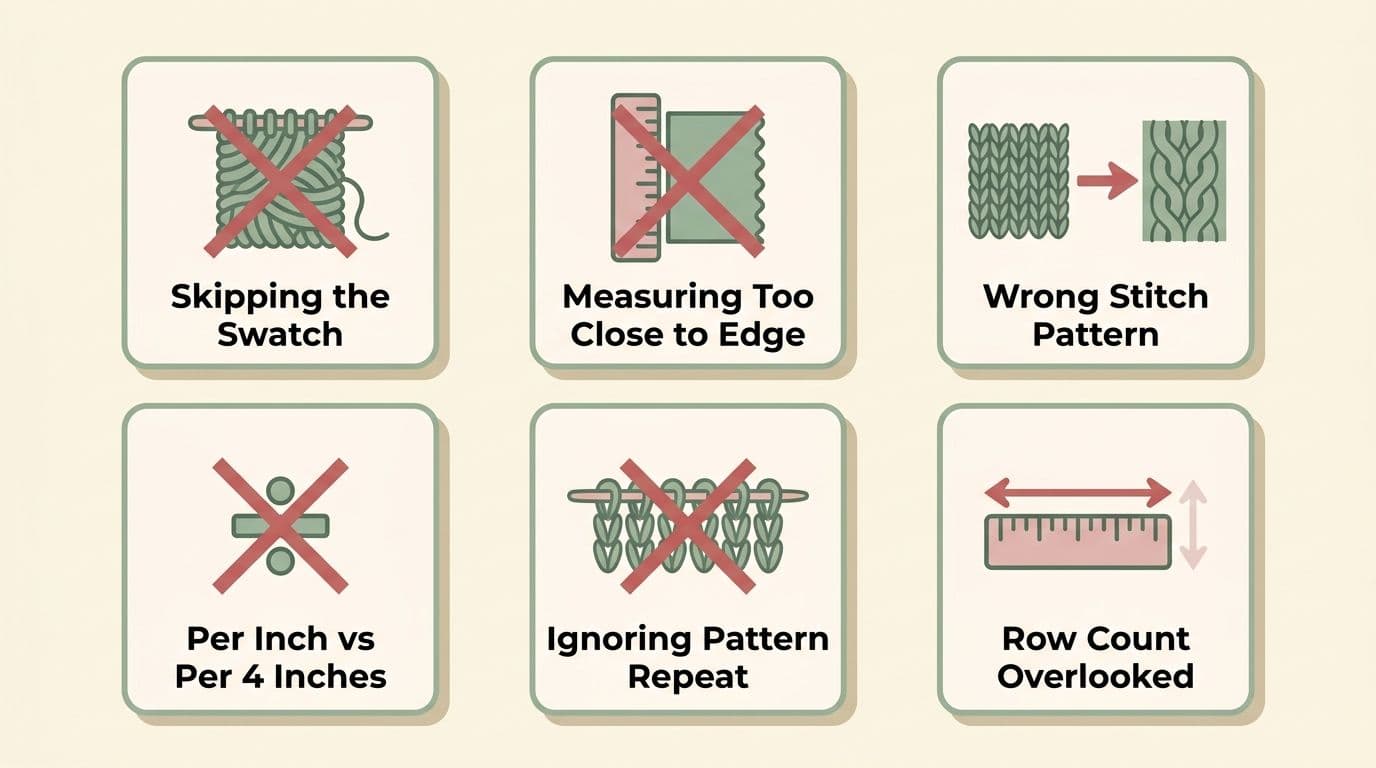
1: Not swatching at all.
You eye-balled your gauge or you used someone else's. Your project comes out wrong. Swatch. Wash it if the pattern says to. Measure it. That's 30 minutes of insurance on a 20-hour project.
2: Measuring your swatch too close to the edges.
Edge stitches are always wonky. Your first row might be loose, your bind-off might pull tight. Measure in the middle. The true gauge lives there.
3: Forgetting to account for the stitch pattern.
If you're swatching in stockinette but the final project uses a cable or lace pattern, reswatch in that pattern. Cable stitches pull tight. Lace stitches spread open. Different patterns, different gauges.
4: Mixing up stitches per inch and stitches per 4 inches.
The calculator asks for stitches per inch. If you counted 18 stitches in 4 inches, that's 4.5 stitches per inch, not 18 per inch. Do the division. (Conversely, if you see a gauge written as "20 stitches over 4 inches" in a pattern, divide by 4 before entering it.)
5: Ignoring the pattern repeat snap.
You get 135 stitches, your stitch pattern repeats every 6, and you cast on 135. One row in, your pattern is off by one stitch. Use the pattern repeat feature. It takes 10 seconds and saves you from ripping.
6: Assuming row count is as critical as stitch count.
Stitch count (width) is make-or-break. Row count (length) is more forgiving you can try on as you go and adjust. But for pieces where you're hitting a specific length (like sleeves), the stitch calculator row count is your starting point. Adjust as you knit.
Conclusion
Once you've got your stitch count locked in, there's more to plan.
Before you swatch, picking the right yarn matters too yarn weight, fiber, and dye lot all influence the gauge. Start there if you're new to swatching.
If you're swapping yarn or substituting, your gauge will change. Check out the Yarn Substitution Guide before you commit to a new yarn for a project you've already calculated.
Planning a granny square project? The Square Planner takes the guesswork out of planning repeats and color changes.
And once you've cast on and you're halfway through? Measure again. If your gauge is drifting, now's the time to catch it before you're too deep.
Frequently Asked Questions
Measure your gauge (stitches and rows in 4 inches), enter that into the calculator along with your target width and length, and the calculator tells you how many stitches to cast on and rows to work.
Share this page
 X / Twitter
 Facebook
 Reddit
Related articles
Bernat Yarn Substitutes: What to Use Instead of Blanket, Maker, Pipsqueak & Bundle Up

How to Crochet a Pumpkin: Free Patterns for Fall & Halloween Decor
How to Read Crochet Patterns: A Beginner's Guide

Yarnzy: #1 Crochet & Knitting App
Track knitting and crochet projects with a timer & row counter, Import Patterns from Anywhere, Manage Stash & more all in one place.


Free to start · iOS, Android & Web
Scan to Download the App

Start your next project with confidence