
 Download the App
How to Read a Knitting Pattern - Yarnzy Beginner Cheat Sheet
10 Jul, 2026
Knitting patterns use shorthand abbreviations (K for knit, P for purl, K2tog for decrease, Yo for yarn over) to save space. Start by reviewing the Abbreviations section to decode the terms. Read instructions row by row in order. Asterisks (*) indicate repeated sequences, repeat from * to end means to complete that stitch pattern repeatedly. Multi-size patterns use brackets [like this] for sizes. Highlight your size first. Once you understand abbreviations and brackets, patterns become manageable. Tools like Yarnzy stitch dictionary help decode unfamiliar terms instantly.
• K = Knit
• P = Purl
• K2tog = Knit two together (decrease)
• Yo = Yarn over (increase)
• RS/WS = Right/Wrong side
• CO = Cast on
• BO = Bind off
• Inc = Increase
• Dec = Decrease
• M1 = Make one stitch
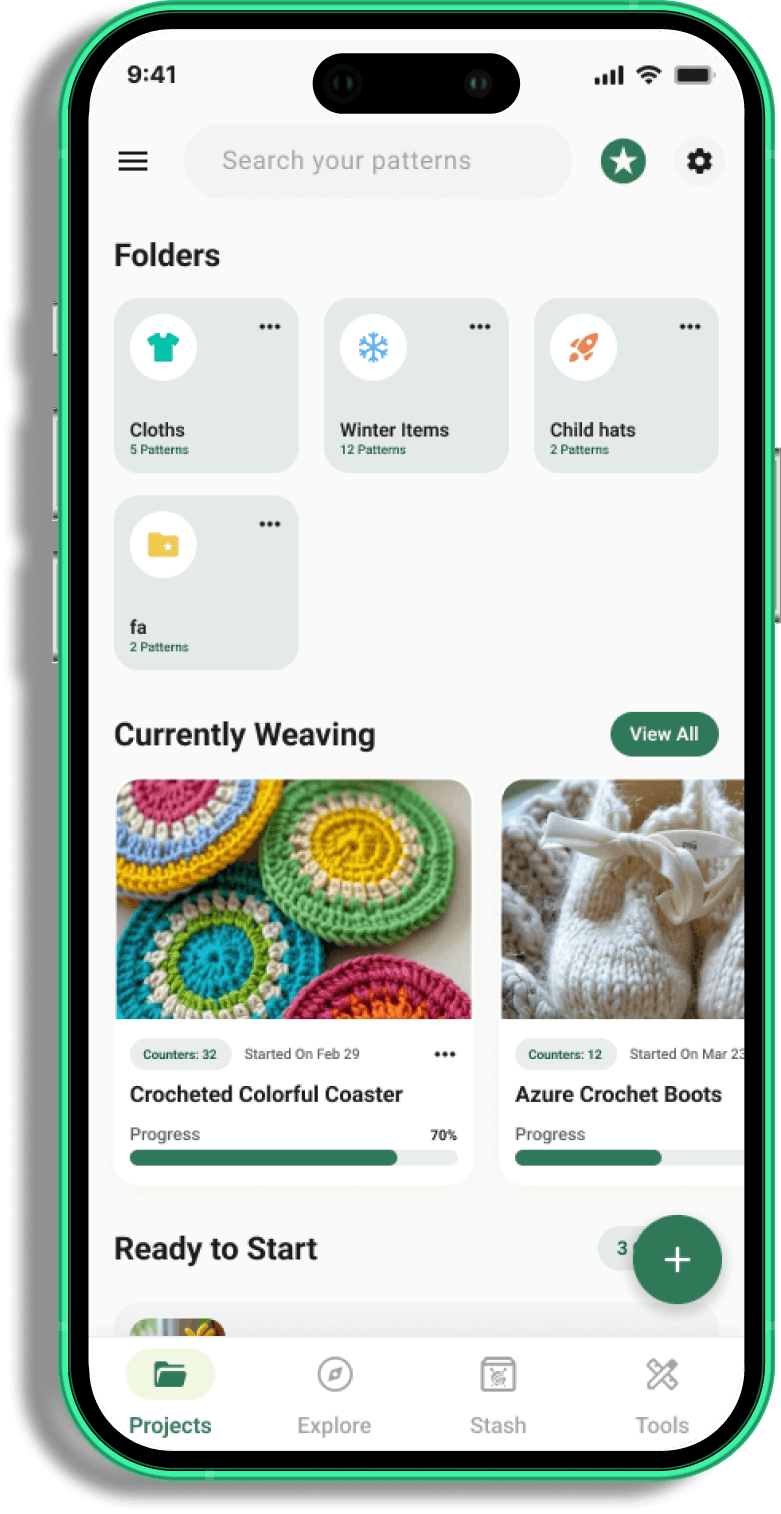
Tired of losing your place mid-row?
 Download Yarnzy
What Is a Knitting Pattern, Exactly?
A knitting pattern is a set of written or charted instructions that tells you exactly how to turn yarn and needles into a finished object: a sweater, hat, sock, blanket, whatever it is. Every pattern, regardless of the designer or the garment, is built from the same handful of building blocks: information about the finished piece, a materials list, a gauge, an abbreviations key, and step-by-step instructions (sometimes written out in words, sometimes shown as a chart, often both).
Learning to read a pattern is really learning to recognize these blocks and understand the shorthand each one uses.
The Anatomy of a Knitting Pattern
Almost every well-written pattern free or paid follows this same structure.
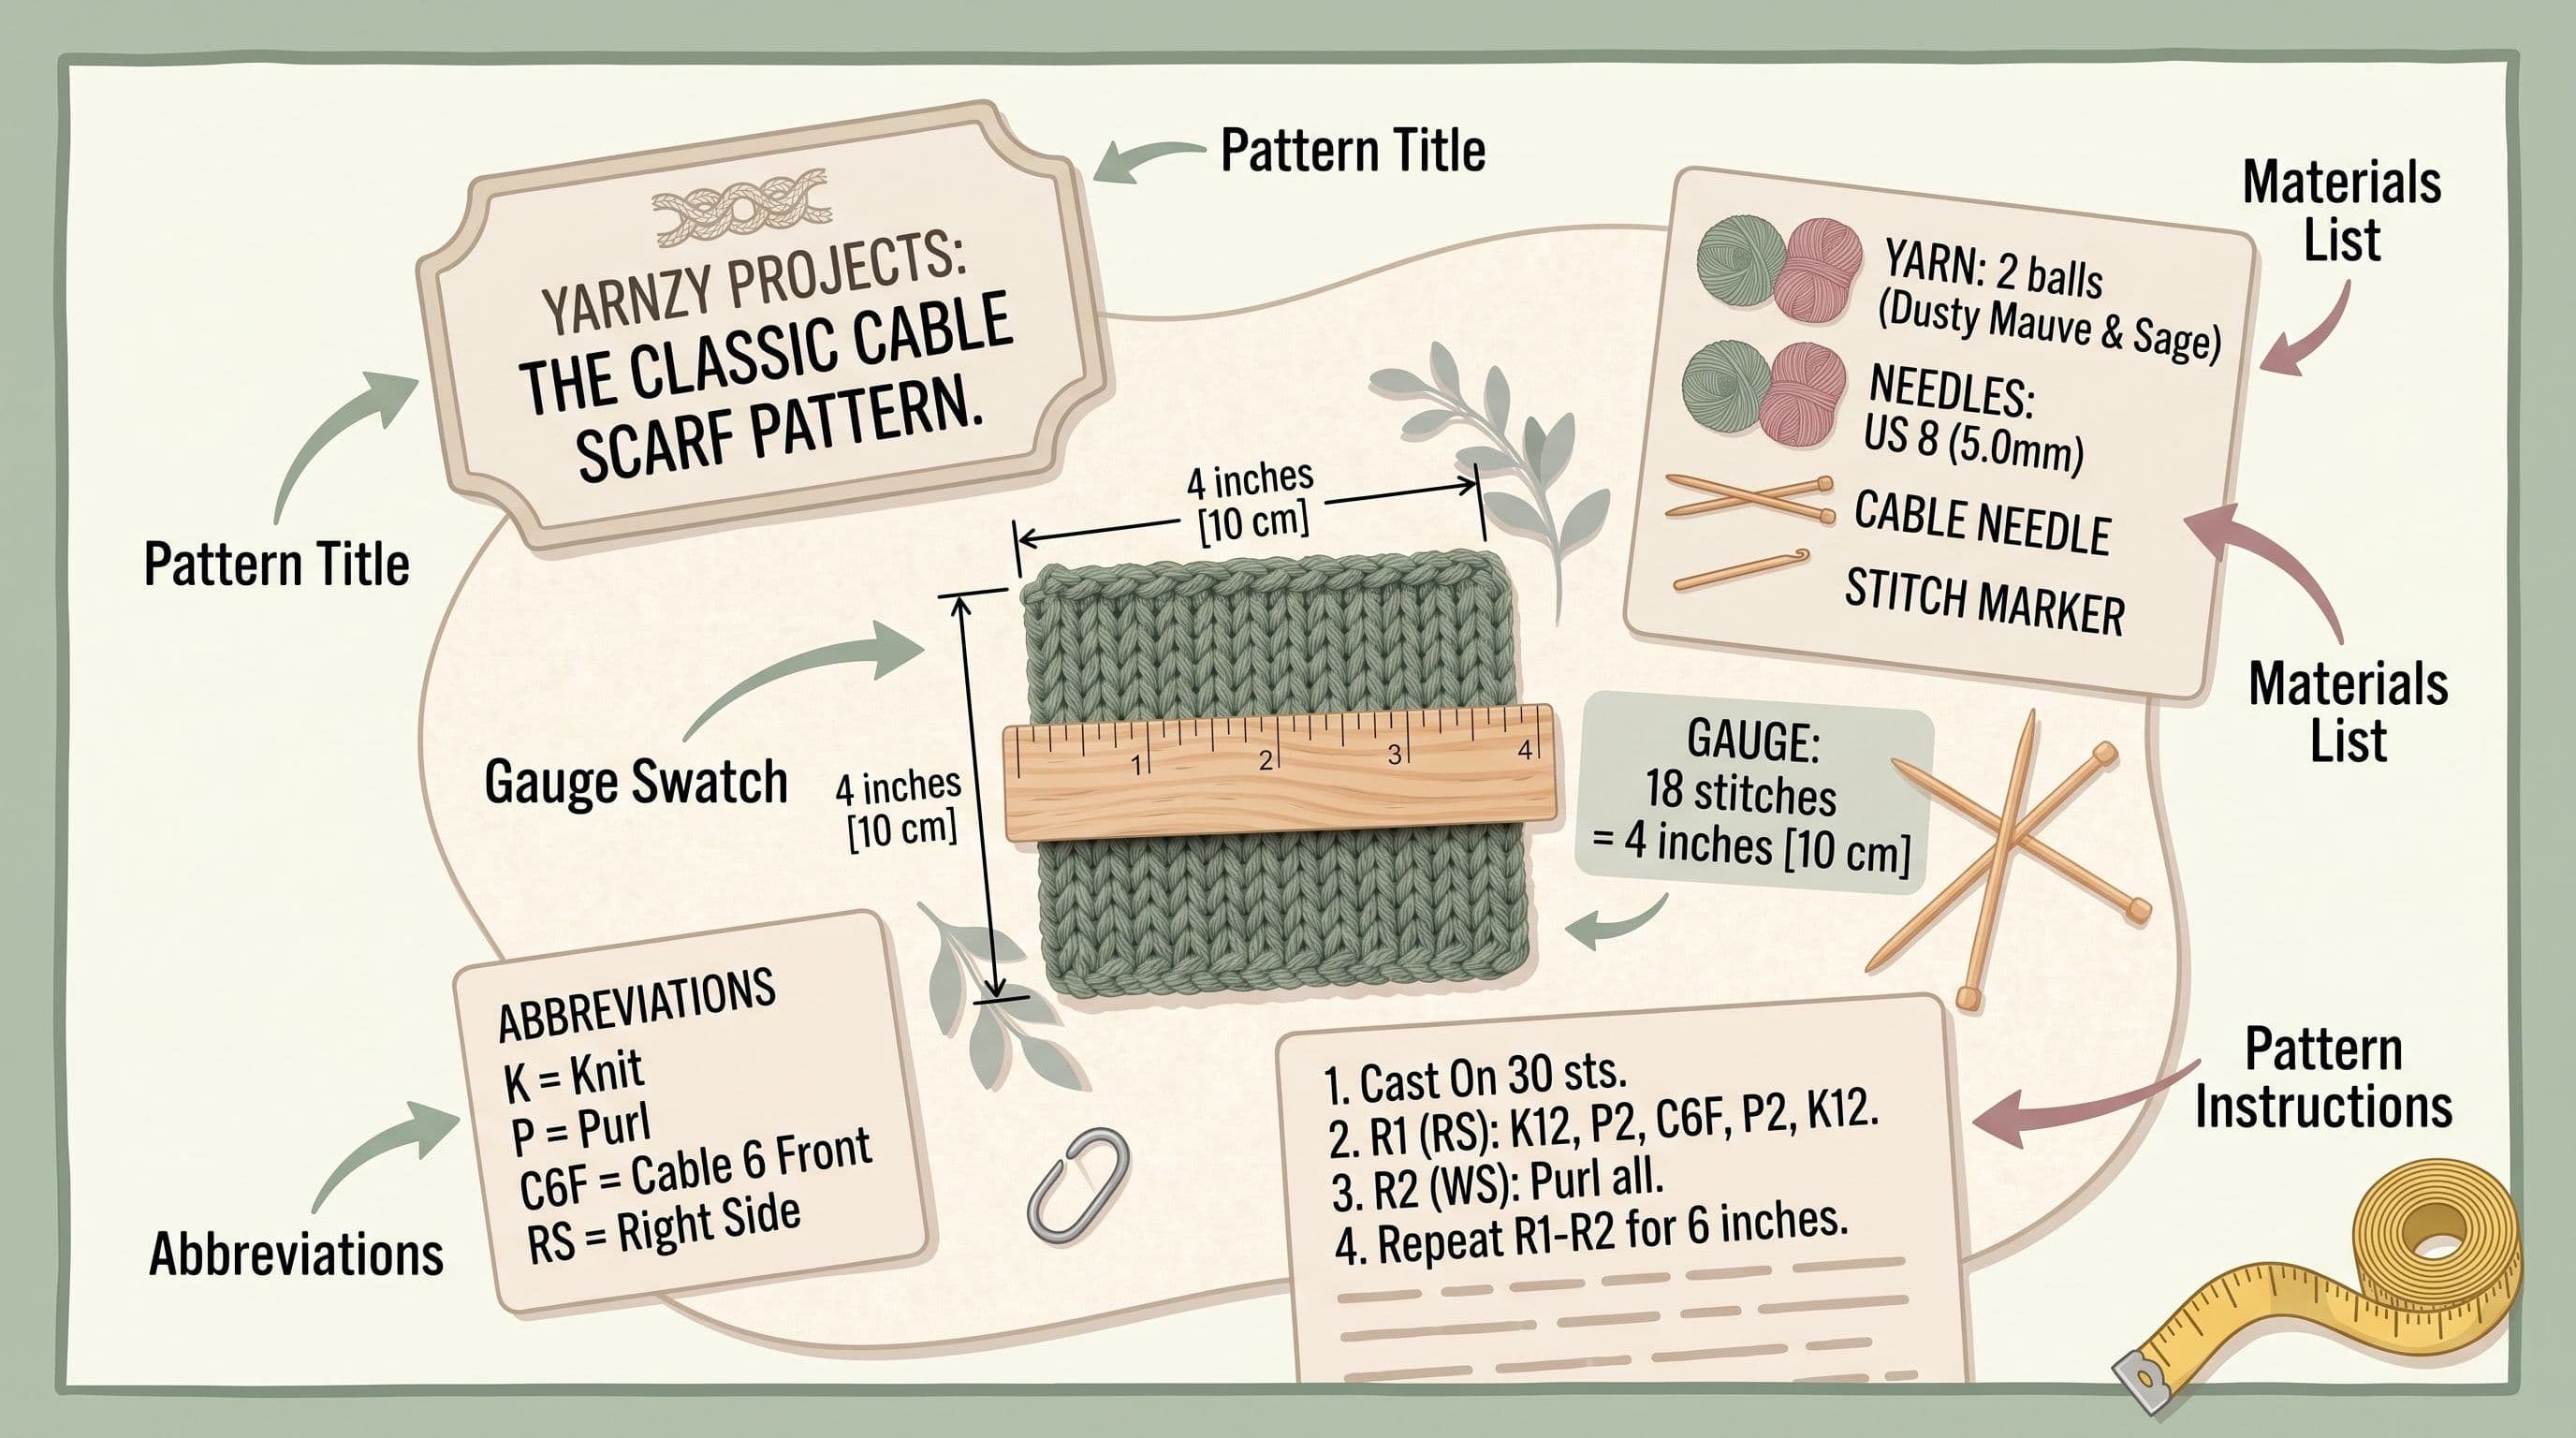
Pattern Title, Designer & Skill Level
This tells you what you're making and, usually, how difficult it is. Skill levels aren't perfectly standardized across the industry, so treat them as a rough guide rather than gospel (more on this below).
Sizes and Finished Measurements
Patterns for garments almost always list multiple sizes, shown as a range like this:
S (M, L, XL, 2XL)
Whichever number comes first in your size applies to every instance of a number throughout the pattern. This is the single most important habit to build early: circle or highlight your size before you cast on, because that number will repeat dozens of times through the instructions.
Materials: Yarn, Needles & Notions
This lists the exact yarn weight, yardage, needle size, and any extras (stitch markers, tapestry needle, buttons). If you're substituting yarn, match the weight and yardage as closely as possible, not just the color, picking the right yarn from the start helps too. If a needle size is listed in a format you don't recognize, you can convert your needle size across US, UK, and metric in a few seconds instead of guessing.
Gauge
Gauge is the number of stitches and rows per inch (or 10cm) that the designer got when they knit the sample. It looks like this:
18 sts and 24 rows = 4 inches in Stockinette stitch
This one number determines whether your finished piece will actually be the size on the label. Skipping your gauge swatch is the single most common reason a finished sweater doesn't fit so even though it's tempting to skip straight to the fun part, don't.
Abbreviations & Special Stitches List
Every pattern includes a key defining the shorthand it uses. This is your dictionary for that specific pattern. Always check it, because not every designer abbreviates it the same way.
Pattern Notes / Special Instructions
Anything unusual, a special cast-on, a note about how a stitch pattern shifts, a warning about a tricky section usually lives here, right before the instructions start.
Instructions
The actual step-by-step directions, from cast-on through bind-off, are usually broken into labeled sections (Body, Sleeves, Neckband, Finishing).
Schematic Diagrams
A simple line drawing with measurements, showing you the finished shape and dimensions at each size is invaluable for checking your gauge swatch math or comparing against a garment you already own.
Charts
A grid-based, visual version of the stitch pattern used constantly for colorwork, lace, and cables, and covered in full detail below.
Understanding Knitting Skill Levels
Skill labels are inconsistent across the industry, and that inconsistency causes real frustration a pattern marked "beginner" on one site might assume skills that are genuinely intermediate elsewhere.
As a rough, useful standard:
• Beginner patterns use only knit and purl stitches, minimal shaping, and no charts.
• Easy patterns add basic increases/decreases and simple repeats, but nothing that requires tracking multiple things at once.
• Intermediate patterns introduce charts, basic cables, simple colorwork, and shaping that happens in more than one place at a time (this is where "at the same time" instructions usually show up).
• Advanced patterns combine multiple techniques simultaneously complex colorwork, lace with shifting repeats, steeks, or garment construction requiring you to hold several pieces of information in your head at once.
The best way to judge a pattern for yourself, regardless of its label, is to skim the abbreviations list and the chart legend before you buy. If you don't recognize more than one or two symbols, it's a stretch not necessarily a bad one, just know what you're signing up for.
Knitting Terms for Beginners: The Full Abbreviations Dictionary
If you're new to reading patterns, this is the section to bookmark, think of it as a crash course in knitting terms for beginners. Knitting terminology and knitting terms stay remarkably consistent across most English-language patterns, so once these are second nature, reading any pattern becomes almost automatic.
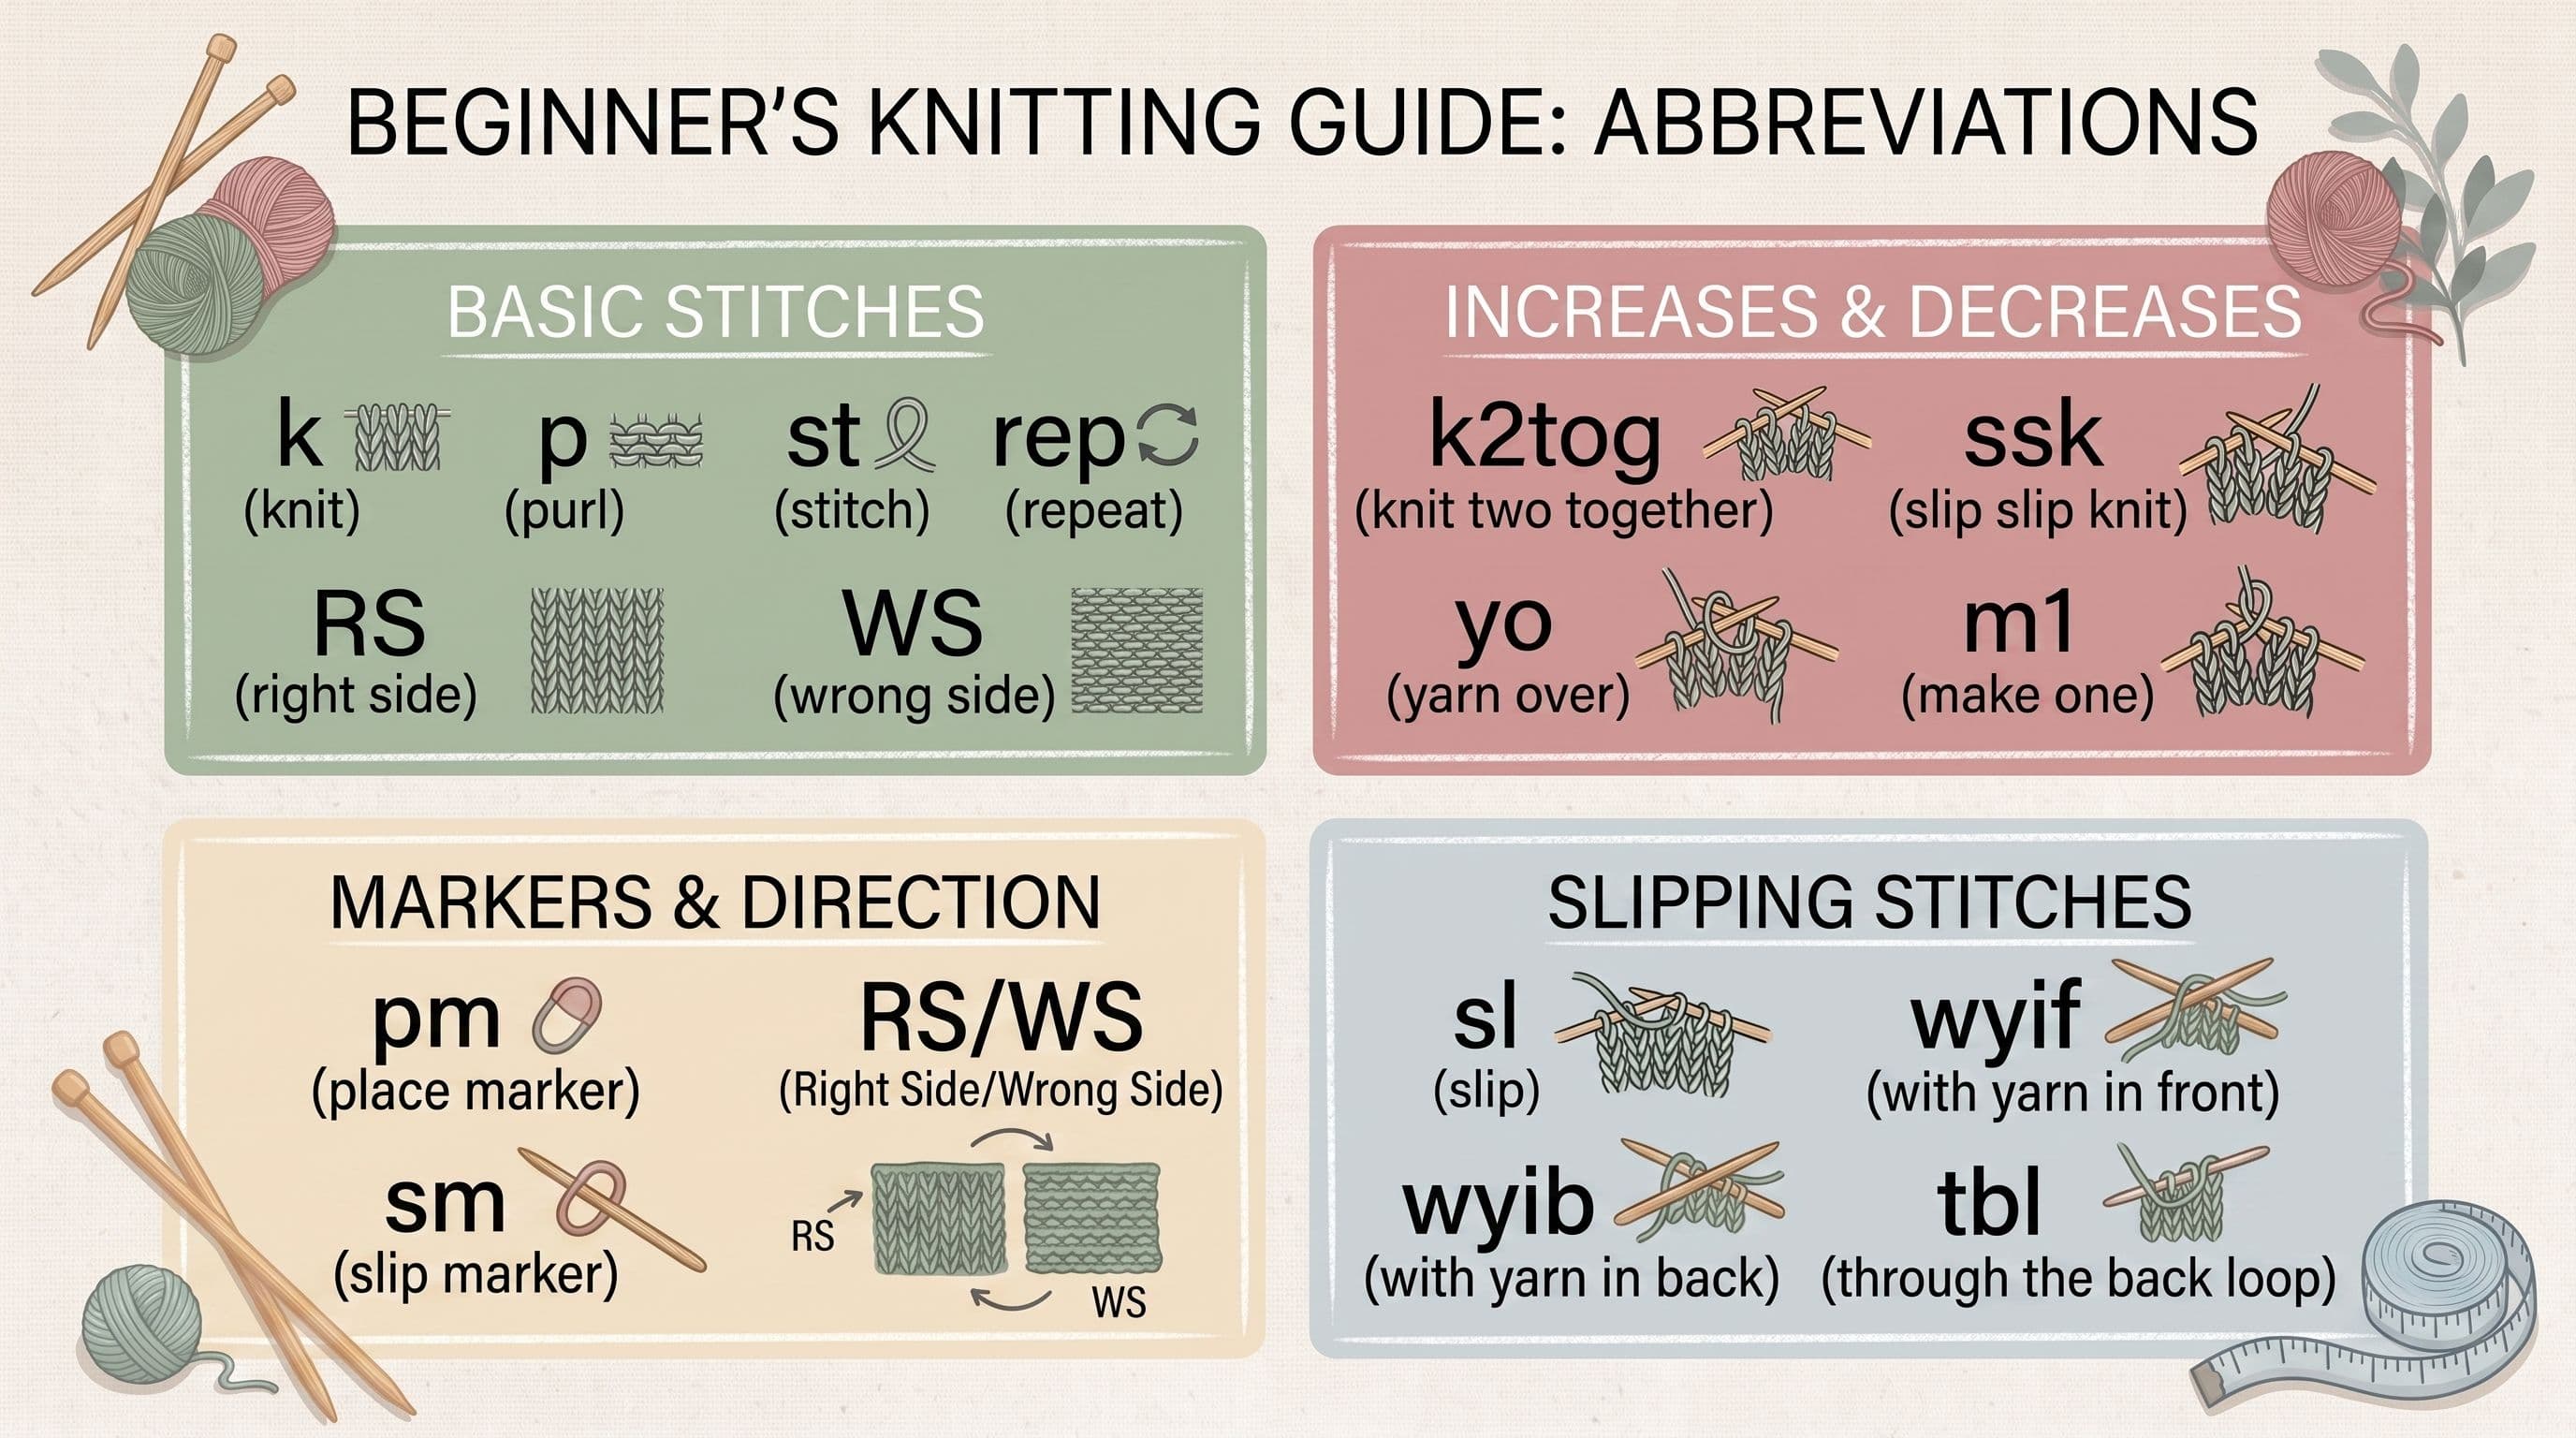
Basic Stitch Abbreviations
• K: knit
• p: purl
• st(s): stitch(es)
• rep: repeat
• RS: right side (the "public," outward-facing side of the fabric)
• WS: wrong side (the inside-facing side, this is what "what does ws mean in knitting" is asking: it simply tells you which side of the fabric is facing you for that row, which matters because some stitches look different depending on which side you're on)
• rnd(s): round(s), used for circular knitting
• CO: cast on
• BO: bind off (also called "cast off" in UK patterns)
Increases & Decreases
• k2tog: knit two together (a right-leaning decrease)
• ssk: slip, slip, knit (a left-leaning decrease)
• yo: yarn over (creates a new stitch and an eyelet hole, used in lace)
• m1, m1L, m1R: make one, make one left, make one right (increases with a slightly different lean)
• kfb: knit into the front and back of a stitch (another increase)
Markers, Sides & Direction
• pm: place marker. In knitting, pm simply means "put a stitch marker here" so you remember where a section, repeat, or shaping point begins.
• sm: slip marker (move the marker from the left needle to the right without knitting it)
• RS / WS: as above
Slipping Stitches
• sl: slip (move a stitch from one needle to the other without knitting it)
• wyif / wyib: with yarn in front / with yarn in back
• tbl: through the back loop
US vs. UK Knitting Terms: The Difference Nobody Explains Clearly
This trips up more knitters than anything else on this list, and almost no other guide addresses it directly. American and British patterns use different words for the exact same techniques:
| US Term | UK Term | Meaning |
|---|---|---|
| Bind off | Cast off | Finishing a row of stitches |
| Gauge | Tension | Stitches/rows per inch or cm |
| Yarn over (yo) | Yarn forward / yarn round needle | Creating an eyelet |
| Stockinette stitch | Stocking stitch | Knit RS, purl WS |
| Skein | Ball/hank | Yarn put-up |
If a pattern's terminology suddenly feels unfamiliar, check where the designer is based you may simply be reading the other dialect.
Where to Find a Full Knitting Abbreviations Dictionary
Beyond the standard abbreviations listed above, several knitting apps and pattern tools help knitters understand complex instructions and manage their projects.Other apps offer useful features such as pattern tracking, row counters, and stitch references. However, Yarnzy goes a step further by combining pattern understanding, row tracking, stitch explanations, project previews, and smart yarn tools in one place.

Want every stitch and abbreviation in one place? Our free Stitch Dictionary tool looks it up for you instantly no flipping between tabs.
How to Read the Symbols: Asterisks, Parentheses & Brackets
This is where patterns start to look like math, but the logic is simple once it clicks.
Asterisks (*) Repeat Sequences
An asterisk marks the start of a sequence you'll repeat. *"K2, p1, k3; rep from * to end" means: knit 2, then repeat "purl 1, knit 3" over and over until the row is finished.
Brackets [ ] Fixed-Number Repeats
Brackets tell you exactly how many times to repeat what's inside them. "[K1, p1] 4 times" means knit 1, purl 1, four times total, eight stitches worked.
Parentheses ( ) Sizes and Stitch Groups
Parentheses usually hold size-specific numbers, as covered above, but they're also used to group a short stitch sequence, similar to brackets.
Combining All Three (Worked Example)
"K3 (4, 5), [k2tog, yo] twice, k4; rep from * to the last 3 (4, 5) sts, k to end."
Read it in pieces: knit your size-specific starting number, then repeat the bracketed sequence following the asterisk instructions, until you reach the size-specific number of stitches remaining at the end.
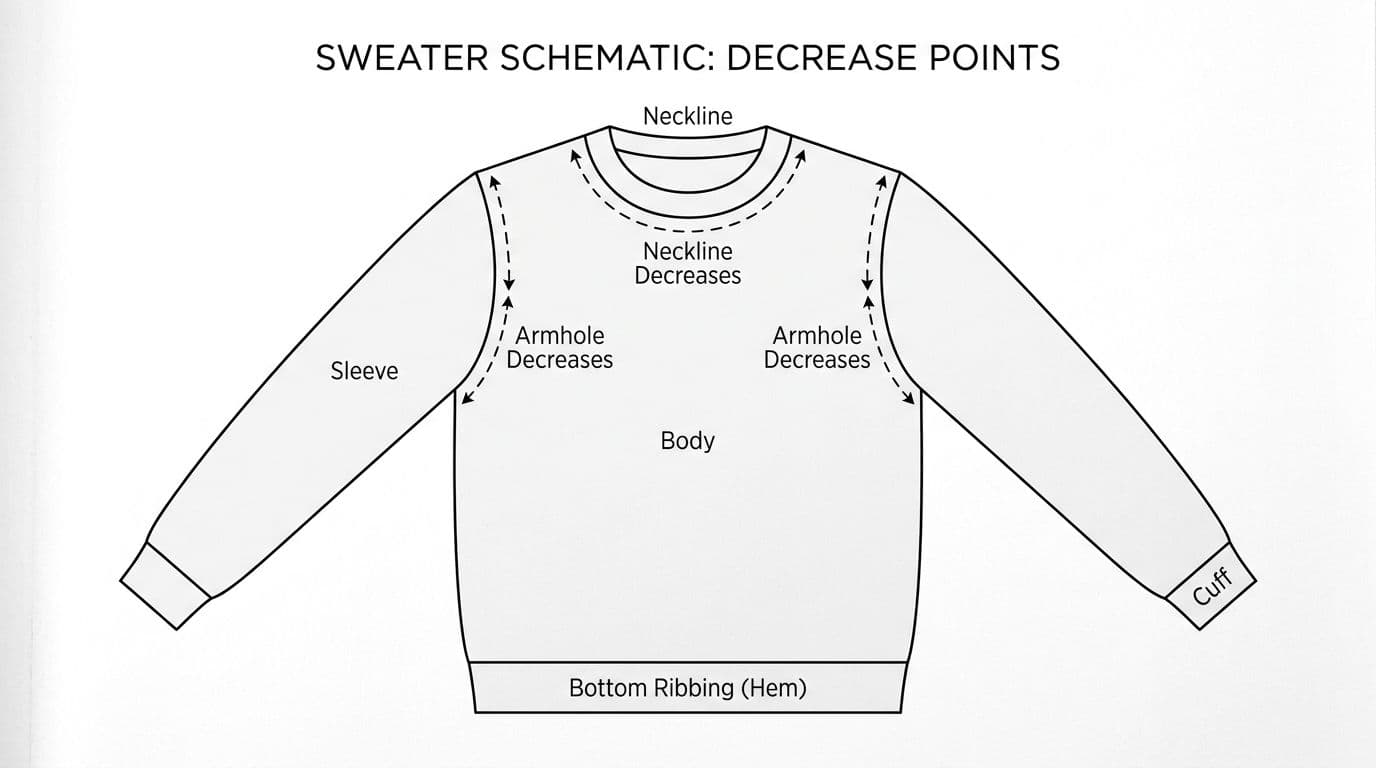
"At the Same Time" : The Phrase That Trips Up Beginners
When a pattern says "at the same time," it means two shaping instructions are happening simultaneously for example, shaping the neckline while also shaping the armhole. Read this instruction fully before starting the row, because it's easy to complete one shaping and accidentally forget the other is still running in the background.
Understanding Sizes, Measurements & Ease
How Multi-Size Patterns Are Written
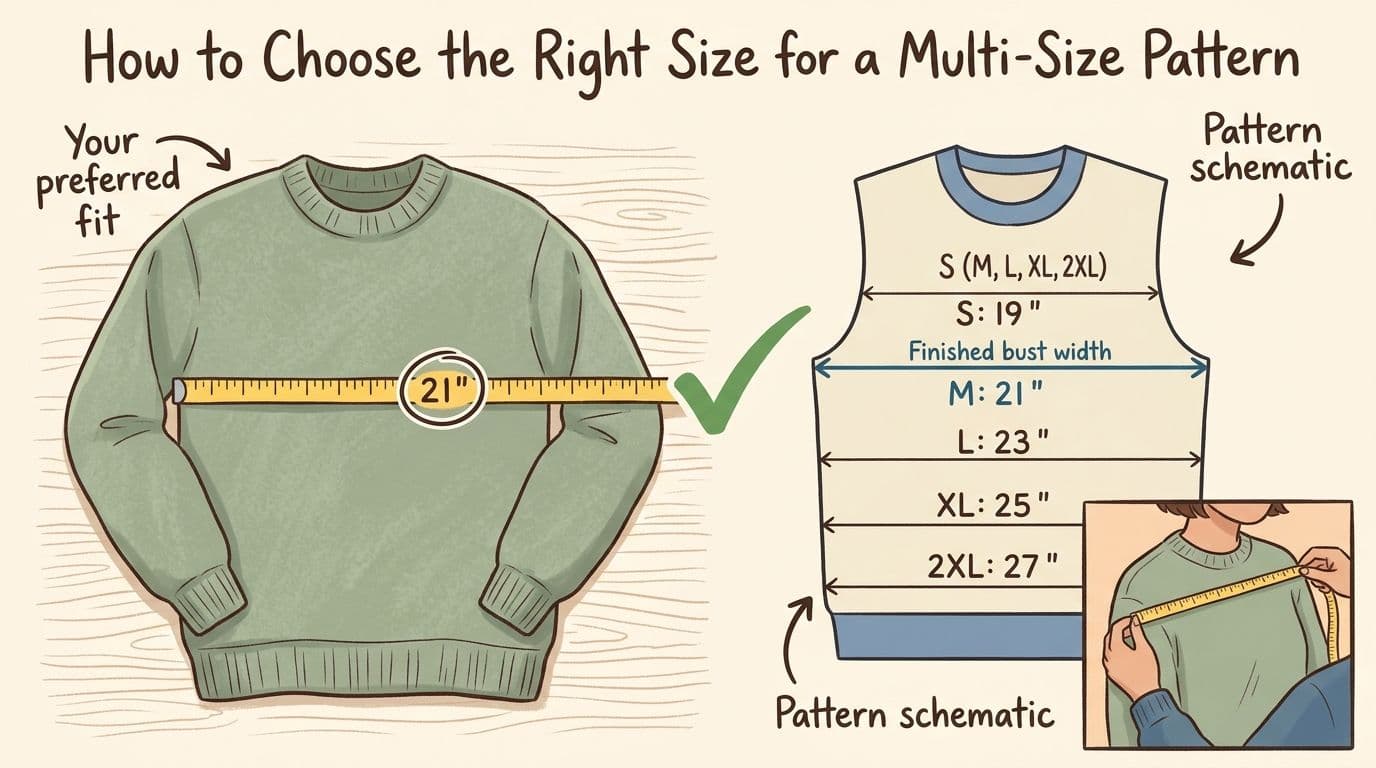
As covered above, every number that varies by size is written in the S (M, L, XL) format. Highlighting your size throughout the pattern before you start prevents the most common multi-size mistake: accidentally following the wrong number after a few rows.
Finished Measurements vs. Body Measurements
Finished measurements describe the garment, not your body. Your body measurement plus your chosen ease equals the finished measurement you should knit to.
What Is Ease? (Positive, Negative, and Zero Ease)
Ease is the difference between your body measurement and the garment's finished measurement.
• Positive ease: the garment is bigger than your body (a relaxed, loose fit)
• Negative ease: the garment is smaller than your body (a snug, stretchy fit common for socks and fitted sweaters)
• Zero ease: the garment matches your body measurement exactly
Choosing the wrong ease is one of the most common reasons a finished sweater "doesn't fit" even though the knitting itself was flawless.
Choosing Your Size Using a Garment You Already Own
Lay a sweater you already love the fit of flat on a table, measure its bust/chest width, and compare that number against the schematic's finished measurements. This is more reliable than measuring your body alone, since it accounts for the fit you actually prefer.
How to Read a Knitting Chart (Step by Step)
Knowing how to read a knitting chart or how to read a knitting pattern chart, if that's the term you searched, comes down to one core skill: reading knitting charts as a visual map instead of a written sentence. Once that clicks, most knitters find a knitting chart, sometimes shown as a knit stitch diagram, genuinely faster to follow than the same instructions written out in words. Each square represents one stitch, and each row of squares represents one row of knitting, so the chart shows you, at a glance, exactly what the finished fabric will look like.
What Each Symbol Means, RS vs. WS Rows
Every knitting chart comes with a legend translating its knitting symbols, sometimes called knitting pattern symbols or knitting chart symbols, somewhere on the page. Always check it first, since these symbols aren't 100% standardized between designers. That said, here are the ones you'll see almost universally:
• Blank square, knit (on RS)
• Dot, purl (on RS)
• Circle, yarn over
• Diagonal line (/ or \), decrease, leaning in that direction
• Shaded/colored square, colorwork stitch in that color
• Crossed lines, cable stitch
• Grey "no stitch" box, placeholder, not an actual stitch
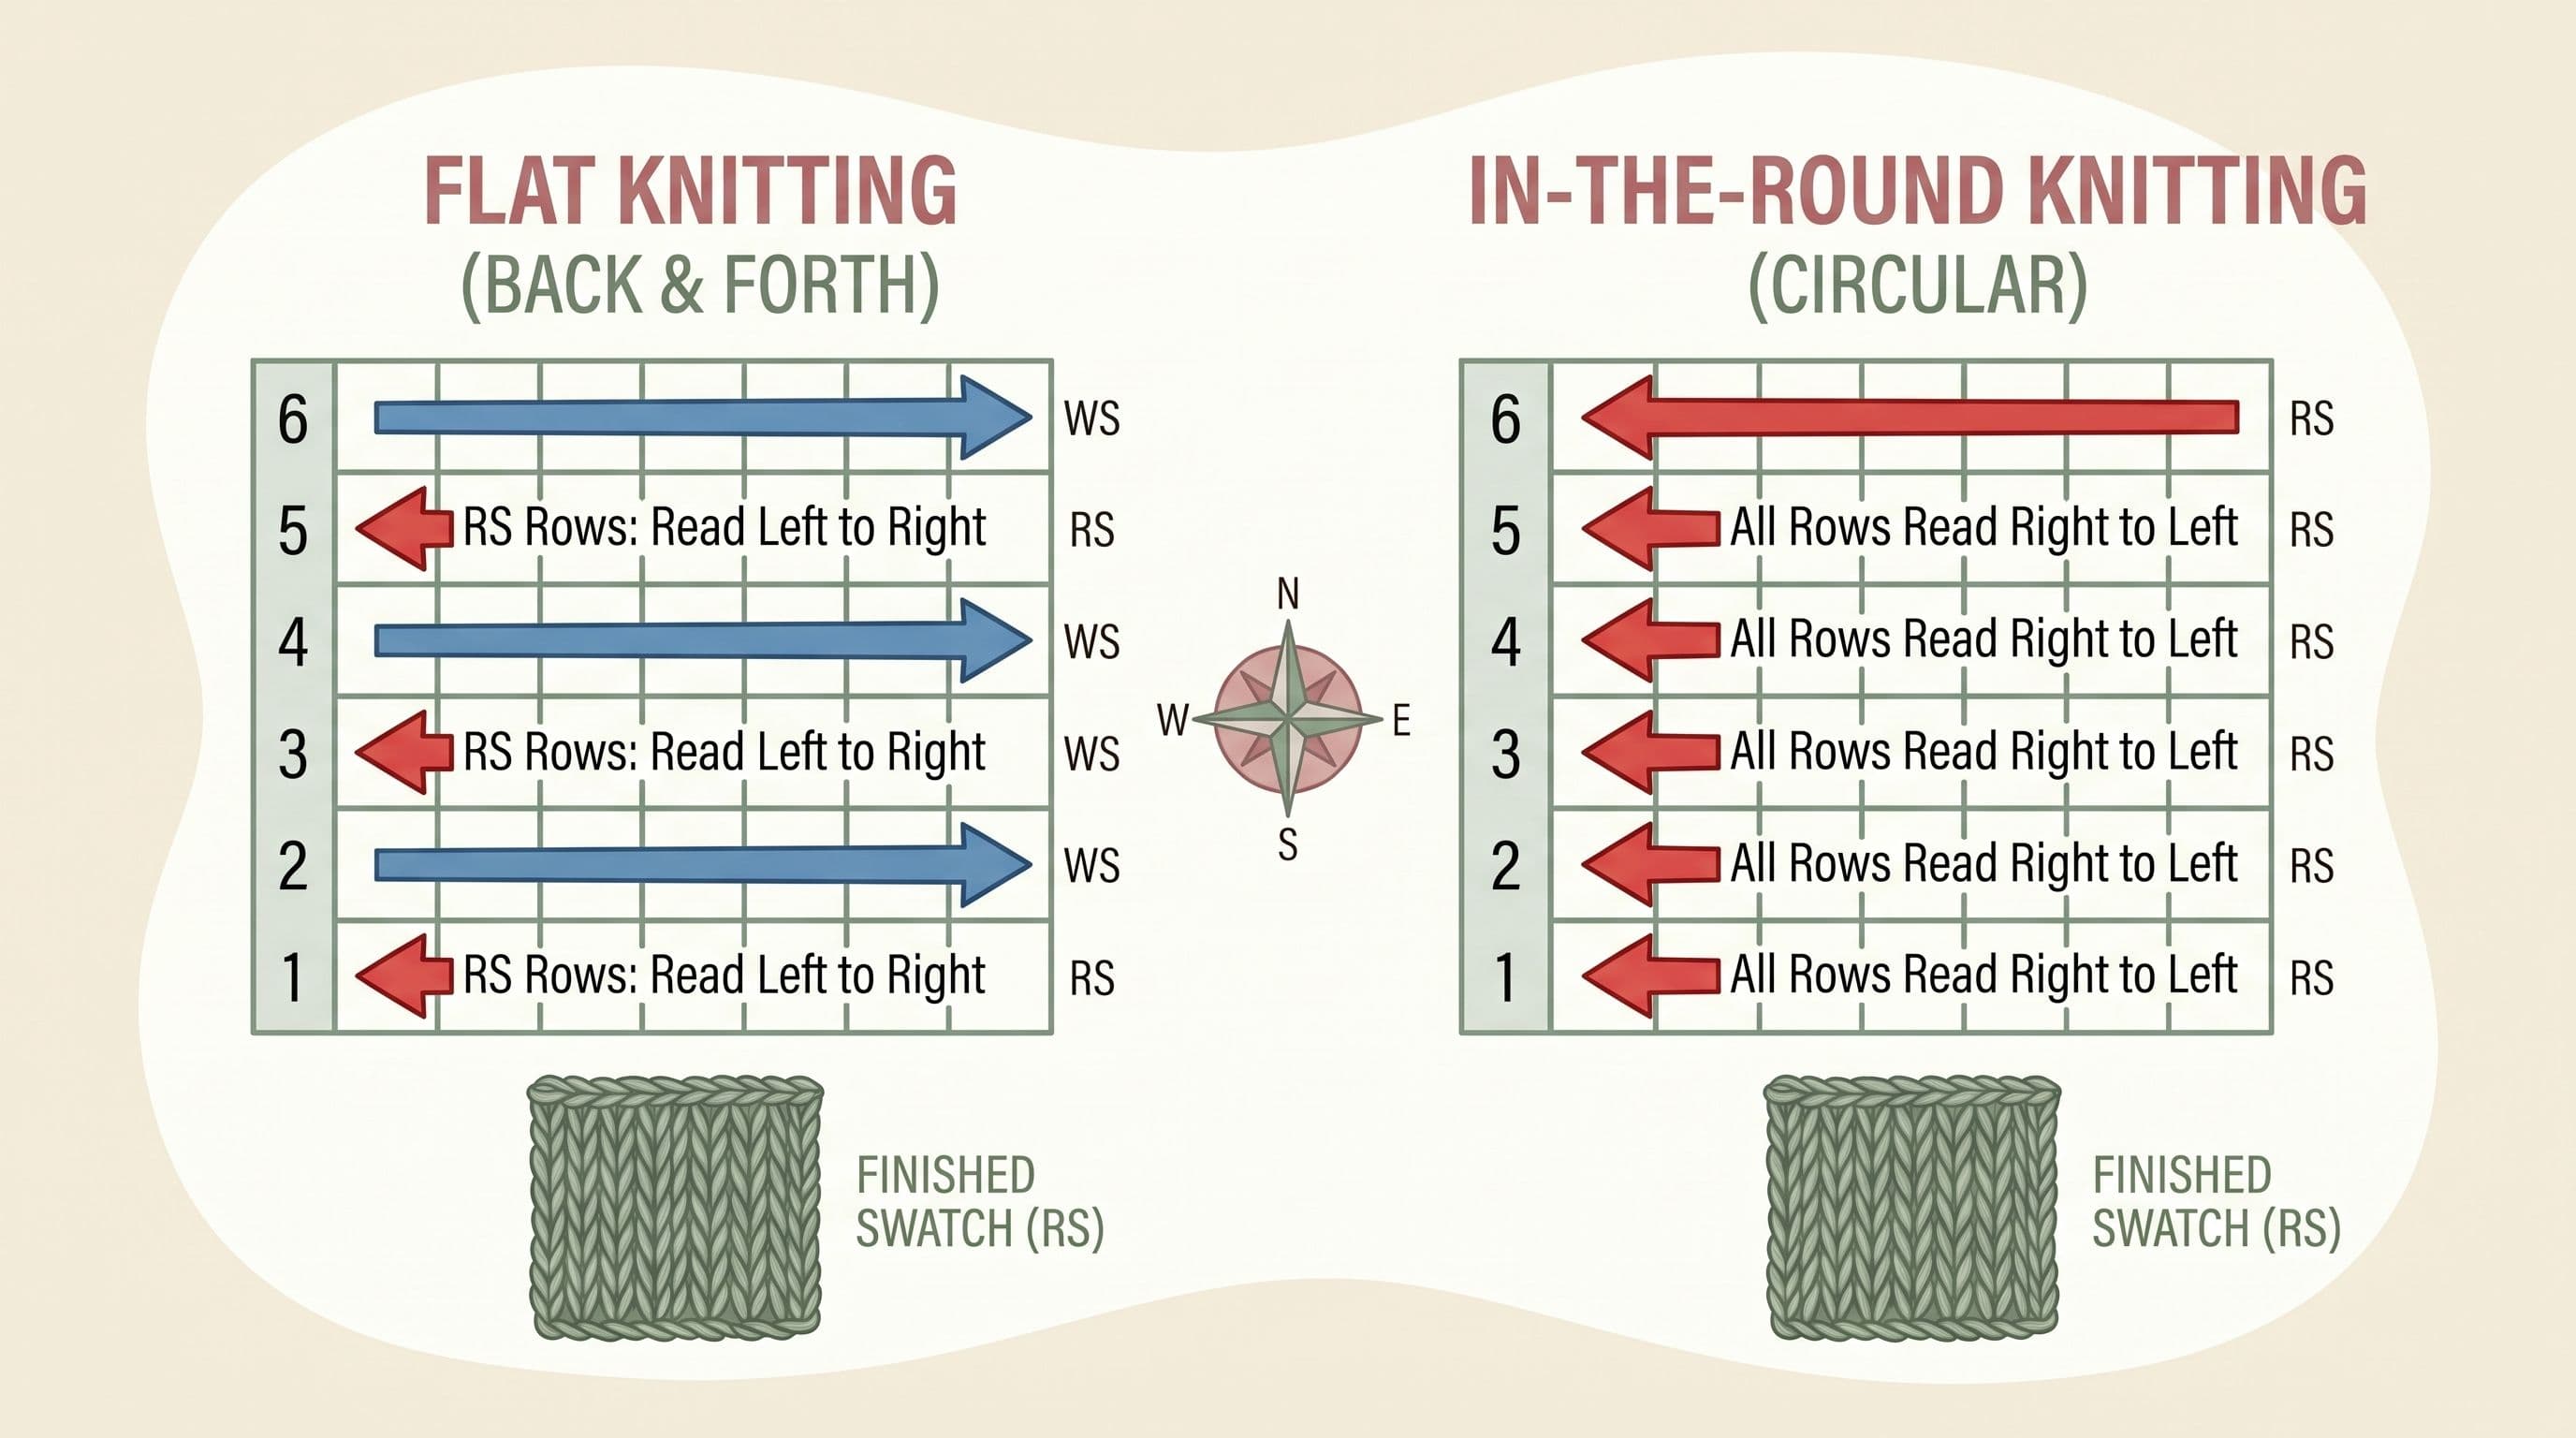
Here's the part that trips people up: a symbol means something different depending on which side you're reading. A blank square reads as "knit" on a right-side (RS) row, but the same blank square, worked on a wrong-side (WS) row, actually means "purl" because you're looking at the back of that same stitch. Charts show you what the front of the fabric will look like, not a literal instruction for every single row, so your brain has to "translate" the symbol depending on which side is facing you.
Reading Charts Flat vs. In the Round
For flat knitting, charts are read bottom to top. Right-side rows are read right to left; wrong-side rows are read left to right because you're literally turning the fabric around between rows. For knitting in the round, every row is a right-side row (you never turn your work), so every row is read right to left, bottom to top, with no side-switching to think about. This distinction is worth double-checking at the top of any chart before you start most charts note it directly.
What Does "No Stitch" Mean?
A grey or shaded "no stitch" box is one of the most common points of confusion for new chart-readers, and it's rarely explained clearly. It doesn't represent an actual stitch to work at all it's purely a placeholder, used to keep the chart's columns visually aligned when the stitch count changes across rows (common in lace and raglan shaping). When you hit a "no stitch" box, you simply skip over it and move to the next real symbol. If you try to work it as a stitch, your stitch count will be thrown off for the rest of the chart.
A magnetic chart keeper or a sticky note moved row by row can work in a pinch, but they still rely on you remembering to move them. Yarnzy solves this differently: its built-in row counter and chart tracker follow along with you automatically, so you always know exactly which row and which symbol you're on, without losing your place mid-chart.

Still finding chart symbols confusing? Our Pattern Symbols reference tool breaks down every symbol visually, just look it up and match it to your chart.
Reading Cable & Colorwork Charts
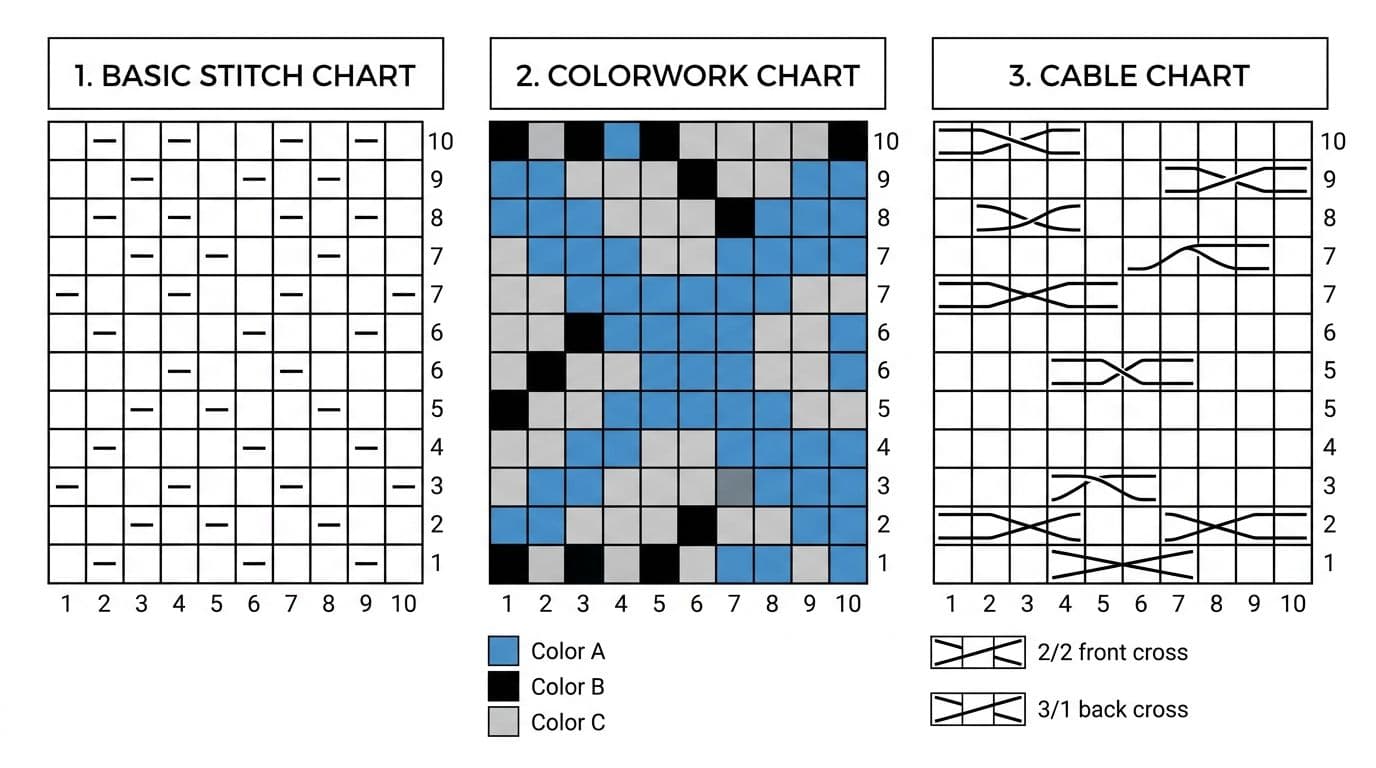
Once you know how to read cable knitting charts and colorwork charts, the rest is easy: cable chart knitting and knit colorwork chart reading both use the exact same grid system as any other chart. A knitting colorwork chart simply layers extra symbol logic for color or crossed stitches on top of that same grid.
Cable Chart Basics
Cable charts use specific symbols to show which stitches cross over which, and in what direction. A symbol angled to the right typically means the cable crosses to the right; angled left means it crosses left. Cable symbols also usually show how many stitches are involved in the cross (a 2-stitch cable looks different from a 6-stitch cable on the chart). Always check the chart's legend, since cable symbols aren't fully standardized between designers the same cross might be drawn slightly differently from one pattern to the next.
Colorwork Chart Basics
A colorwork chart uses a different color or symbol in each square to represent which yarn color that stitch is worked in. Fair Isle charts (stranded colorwork) usually use just two colors per row, carried across the back of the work; intarsia charts can use many colors across a row, each worked with its own separate strand of yarn rather than being carried. Reading direction works exactly the same as any other chart the color logic is just layered on top.
Common Pattern Phrases Decoded
Beyond abbreviations and symbols, patterns lean on a handful of stock phrases that aren't always defined anywhere in the pattern itself. Here's what the most common ones actually mean:
• "Work even" keeps knitting in the established stitch pattern without adding any new increases, decreases, or shaping. Essentially, "keep going as you are."
• "As established" continue whatever stitch pattern or shaping sequence you've already been working on, without it being re-explained row by row. If you've been decreasing every 4th row, "continue as established" means keep decreasing every 4th row.
• "At the same time" two shaping instructions are happening simultaneously, for example shaping the neckline while also shaping the armhole. Read the full instruction before starting the row, because it's easy to complete one shaping and accidentally forget the other is still running in the background.
• "Ending with a WS row" is an instruction telling you which row to finish a section on, so the next section starts on the correct side of the fabric. If your row count doesn't land you on a WS row naturally, you may need to add or skip a row to end up there.
• Increases and decreases at the edges shape the garment's silhouette overall sleeves, waists, necklines and armhole, neckline, and sleeve shaping instructions especially tend to combine several of the phrases above at once, so read the full paragraph before starting, not just the first sentence.
Worked Example: Decode a Real Pattern, Line by Line
Here's a simplified hat pattern, decoded exactly the way you'd read it in real life.
Materials: 1 skein worsted weight yarn, US 8 circular needle, stitch marker Gauge: 18 sts = 4 inches in Stockinette stitch, in the round
Instructions: CO 88 sts. Pm, join the knitting in the round, being careful not to twist. *Rnds 1–6: K2, p2; rep from * to end. (This is your ribbed brim knit 2, purl 2, repeated all the way around, for 6 rounds.) Rnd 7: Knit all sts. (Switch to plain stockinette.) Rep Rnd 7 until the piece measures 6 inches from the CO edge. *Decrease rnd: K6, k2tog; rep from * to end. (Every 8th stitch is decreased and this shapes the crown.) Knit 1 rnd even. Rep decreases rnd, working 1 fewer knit stitch between decreases each time, until 11 sts remain. Cut yarn, thread through remaining sts, pull tight, and weave in ends.
Read slowly, that's it every pattern, no matter how complex, is built from exactly this kind of layered shorthand.
Want your exact stitch count before you cast on? Once you know your gauge, our free Stitch Calculator turns it into an exact stitch count no mental math required.
Common Pattern-Reading Mistakes (and How to Avoid Them)
• Not reading the whole pattern first. Skim the entire pattern before casting on, so nothing catches you off guard mid-project.
• Losing track of your size in multi-size instructions. Highlight your number throughout before you start.
• Missing "at the same time" instructions. Read the full paragraph, not just the first sentence.
• Ignoring the gauge swatch. It takes fifteen minutes and prevents hours of unpicking a wrong-sized garment.
• Misreading chart direction. Double-check whether you're knitting flat or in the round before your first row.
• Confusing similar-looking abbreviations, like k2tog and ssk they look similar on paper but lean in opposite directions on the fabric.
Conclusion
Reading a knitting pattern is a skill, not an aptitude. Nobody is born knowing what "k2tog" means. Every abbreviation, symbol, and chart in this guide is something you'll recognize instantly after using it just a handful of times.
Start small: pick one section you found confusing abbreviations, charts, or sizing and reread it once more before your next project. Keep this page bookmarked as your reference, work through your pattern slowly, and within a project or two, what looks like a wall of code will read like a straightforward set of instructions.
Frequently Asked Questions
Start by locating the four core sections materials, gauge, abbreviations key, and instructions then work through the instructions one line at a time, checking any unfamiliar abbreviation against the key as you go.
Share this page
 X / Twitter
 Facebook
 Reddit
Related articles
Bernat Yarn Substitutes: What to Use Instead of Blanket, Maker, Pipsqueak & Bundle Up

How to Crochet a Pumpkin: Free Patterns for Fall & Halloween Decor
How to Read Crochet Patterns: A Beginner's Guide

Yarnzy: #1 Crochet & Knitting App
Track knitting and crochet projects with a timer & row counter, Import Patterns from Anywhere, Manage Stash & more all in one place.


Free to start · iOS, Android & Web
Scan to Download the App
Start your next project with confidence