
 Download the App
How to Start Crochet: A Complete Beginner's Guide (With Step-by-Step Basics)
1 Sep, 2026
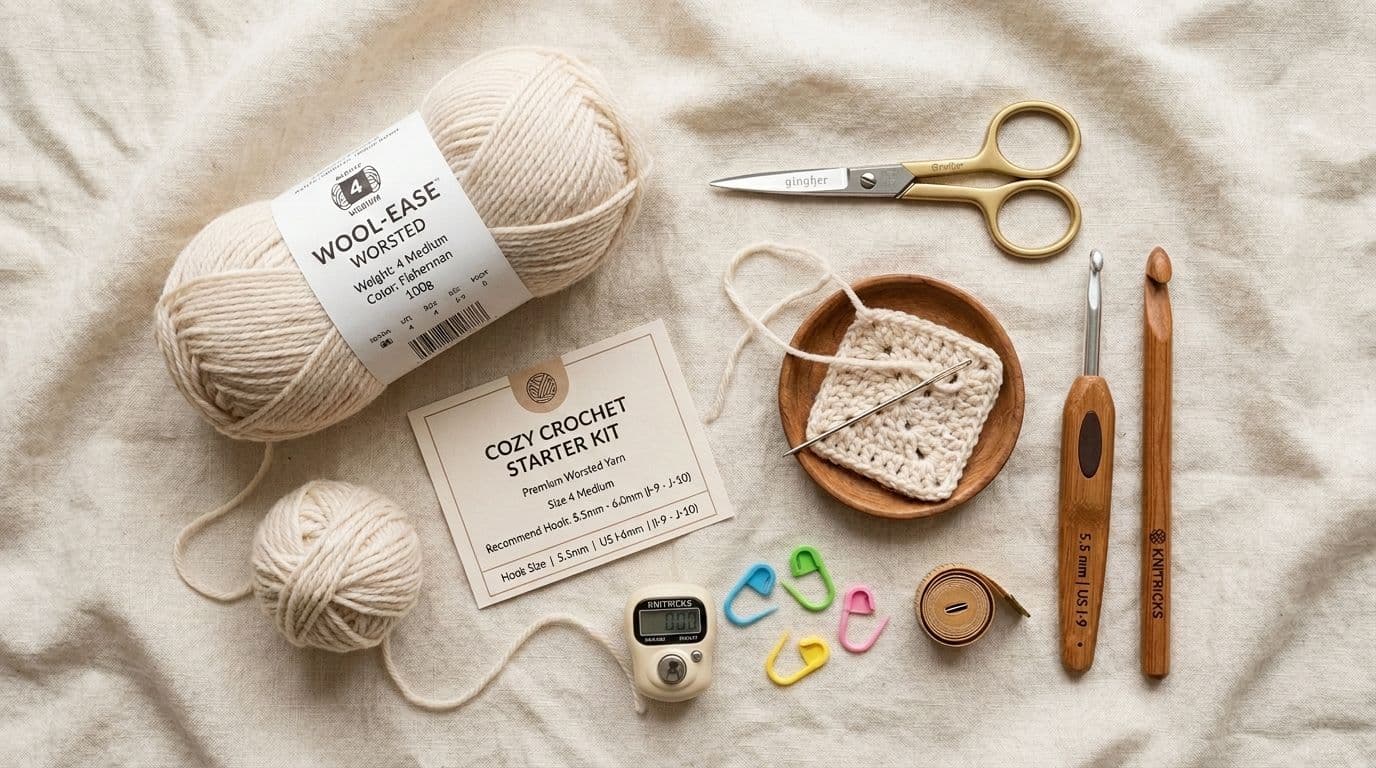
To start crocheting, gather a 5.5 mm crochet hook, light-colored medium-weight yarn, small scissors, and a yarn needle. Make a slip knot, place it on your hook, create a foundation chain, and learn the single crochet stitch. Once you can make these basic stitches and maintain even tension, you can start simple crochet projects for beginners.
Essential Supplies
• Yarn: Choose light-colored worsted or medium-weight yarn so your stitches are easy to see.
• Crochet Hook: A 5.5 mm crochet hook is a practical starting size for beginners.
• Scissors: Keep small scissors nearby for cutting yarn.
• Yarn Needle: Use a tapestry needle to weave in loose ends.
Basic Steps to Start Crochet
1. Make a slip knot and place it on your crochet hook.
2. Make a foundation chain by pulling yarn through the loop on your hook.
3. Learn single crochet, one of the basic crochet stitches for beginners.
4. Practice your tension so your stitches are not too tight or loose.
5. Count your stitches as you work to avoid adding or missing stitches.
6. Start a simple project, such as a dishcloth, bookmark, or small basket.
In This Guide
1. What You'll Need Before You Start
2. Understanding Hook Grip and Yarn Tension
3. Your First Technique: The Slip Knot
4. Creating Your Foundation: The Crochet Chain
5. Your First Stitch: Single Crochet
6. Beyond the Basics: Next Steps
7. Troubleshooting Common Beginner Problems
8. Getting Your First Project Started
9. FAQ
Keep Learning With Yarnzy
 Download Yarnzy
What You'll Need Before You Start
Here's the good news before anything else: a complete beginner crochet kit costs well under $20 and will last you months of practice. You don't need a big investment to find out whether you like this.
At the most basic level, you need three things: a crochet hook, some yarn, and a pair of scissors. That's genuinely enough to learn every technique in this guide. A tapestry needle for weaving in ends later is worth having too, but it won't slow you down if you don't have one on day one.
Choosing Your Yarn and Hook
For your first attempt at simple crochet, reach for a worsted weight (sometimes labeled "medium" or "size 4") acrylic yarn in a light, solid color. Acrylic is affordable, forgiving, and machine washable, which matters when your early swatches are, honestly, going to be practice pieces, not keepsakes. A light color matters more than you'd think too: it's much easier to see individual stitches on pale yarn than on a dark, busy, or fuzzy one, and being able to actually see your stitches is half the battle when you're learning.
Pair that yarn with a hook size in the 5.5mm to 6mm range (often labeled I-9 or J-10 on US packaging). This size is large enough that your stitches stay loose and visible while you're still building muscle memory, without being so bulky that it feels unwieldy in your hand.
If you already have yarn in your stash and aren't sure what hook goes with it, our Hook & Needle Chart will match the two in seconds rather than you guessing.
Why Yarn and Hook Matter
It might seem like any yarn and any hook should work fine when you're just learning the motions, but the combination genuinely affects how fast things click. Yarn that's too thin, too dark, or too textured (think fuzzy mohair or a highly variegated color) hides your stitches from you exactly when you need to see them most clearly. A hook that's too small forces tight, hard-to-work stitches before your hands have built any dexterity. Starting with the recommendation above isn't a rule, it's just removing friction you don't need yet.

Not Sure What Hook or Yarn to Buy? Match your yarn weight to the right hook size in seconds with our free Hook & Needle Chart.
Understanding Hook Grip and Yarn Tension
This is, honestly, the part that trips up more beginners than any actual stitch does. Here's the reassuring truth up front: there is no single correct way to hold your hook, and tension takes real practice to feel natural for absolutely everyone, not just you.
The Two Main Ways to Hold Your Hook
Most crocheters settle into one of two grips, and neither is more "correct" than the other:
Knife hold: grip the hook the way you'd hold a table knife, your hand wrapped over the top of the handle, thumb and fingers gripping the flat part. This grip tends to feel more natural to people coming from other hand crafts or who simply have a stronger, more controlled grip style.
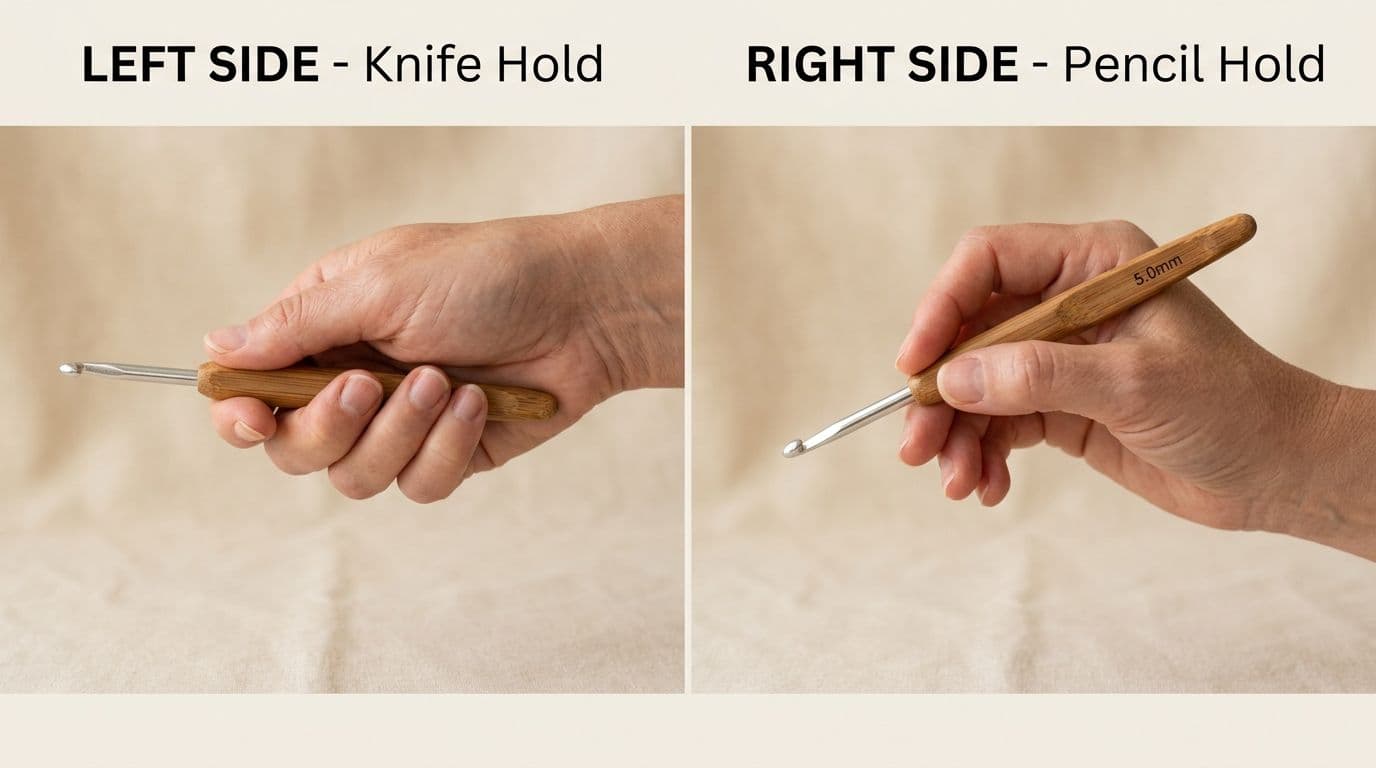
Try both for a few minutes each. Whichever feels less awkward after five minutes is the right one for you, full stop. Left-handed? Mirror every instruction in this guide and work right to left instead of left to right. Every principle here still applies exactly the same, you're just working the motion as a mirror image.
How to Hold Your Yarn
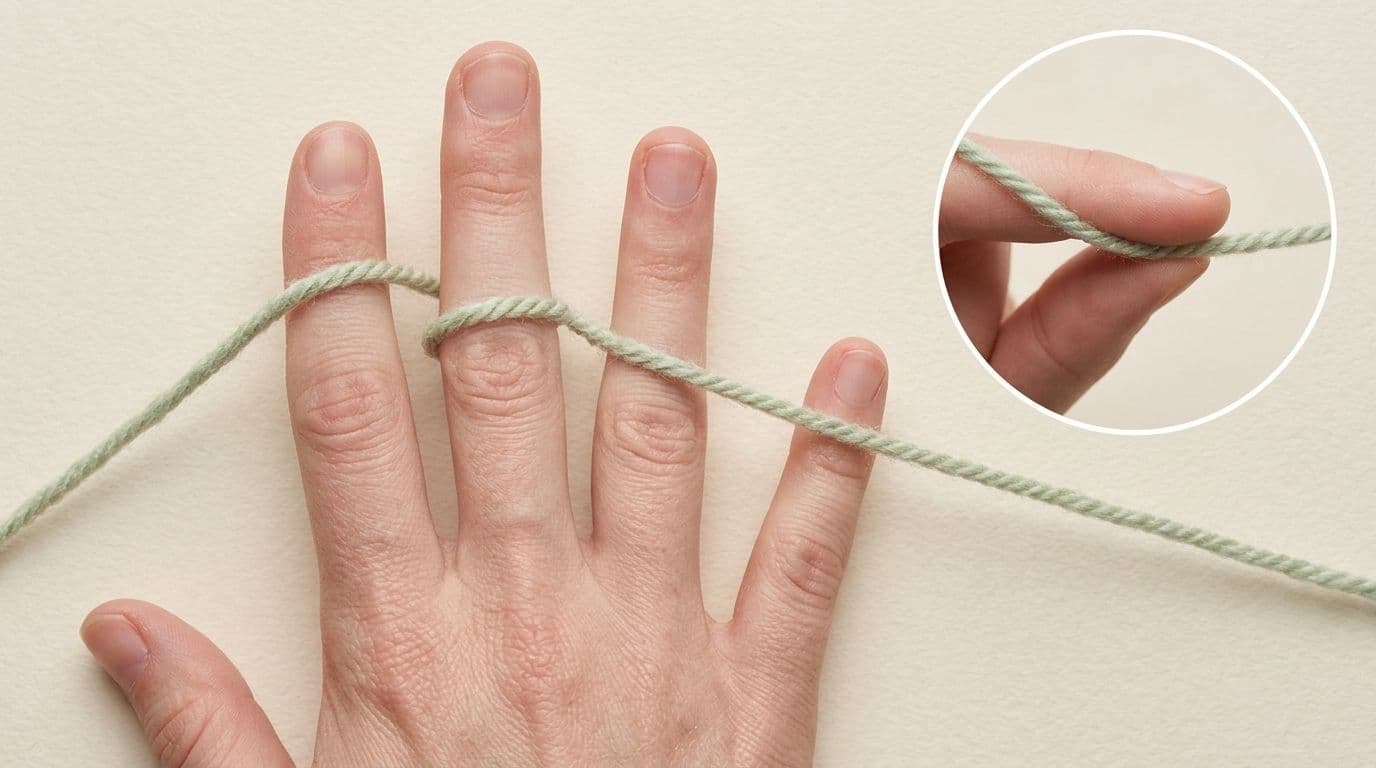
A common starting method: drape the yarn over your index finger, then weave it under your middle finger and over your ring finger, letting your pinky rest lightly against the working yarn to add just a touch of resistance. This isn't the only method, plenty of experienced crocheters wrap differently, but it gives most beginners a reliable, adjustable amount of tension to start with. Expect this to feel clumsy for your first several rows. That's completely normal and it evens out with repetition, not with finding some secret "correct" wrap.
Your First Technique: The Slip Knot
Every single crochet project, no exceptions, starts with a slip knot. It's a small, fiddly little knot, and it's worth taking slow the first few times you try it, since it sets the very first loop your entire project builds from.
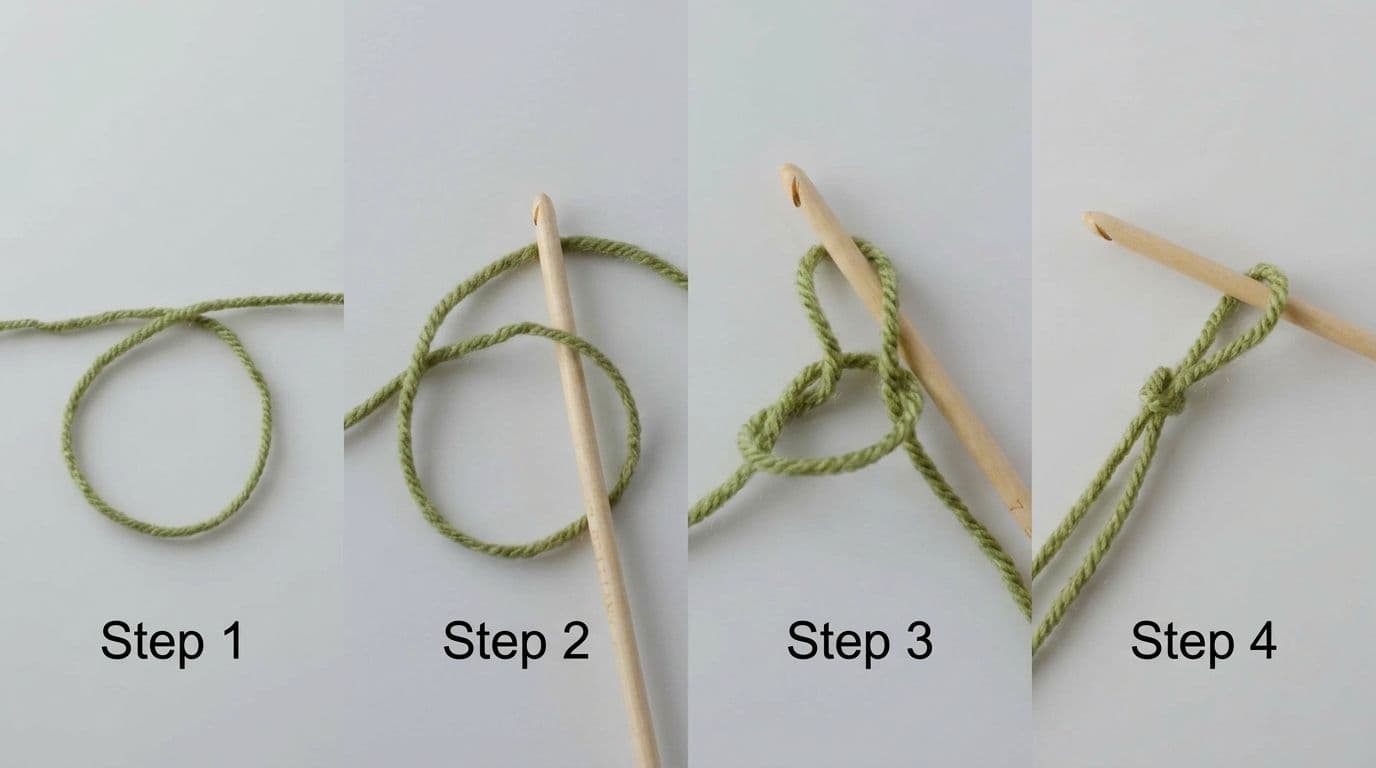
Step-by-Step Slip Knot Process
1. Pull out a tail of yarn about six inches long and make a simple loop with it, crossing the working yarn (the strand connected to your ball or skein) over the tail.
2. Reach through that loop with your hook, or your fingers if it's easier the first time, and catch the working yarn.
3. Pull that working yarn back through the loop, forming a second, smaller loop.
4. Gently pull both the tail and the working yarn to snug the knot down onto your hook, not tight, just snug enough that the loop sits securely on the hook without slipping off.
The most common first mistake here is pulling the knot too tight against the hook, which makes it nearly impossible to work your first chain through. If your slip knot feels rigid or stuck rather than able to slide slightly on the hook, loosen it and try again. This is completely normal on a first attempt, and it's a two-second fix, not a setback.
Creating Your Foundation: The Crochet Chain
The crochet chain is your foundation row, literally, it's the base every other row of stitches gets built on top of. Getting comfortable with a chain stitch is also where most of your early tension practice actually happens, since you'll be repeating this same motion dozens of times before you move on.
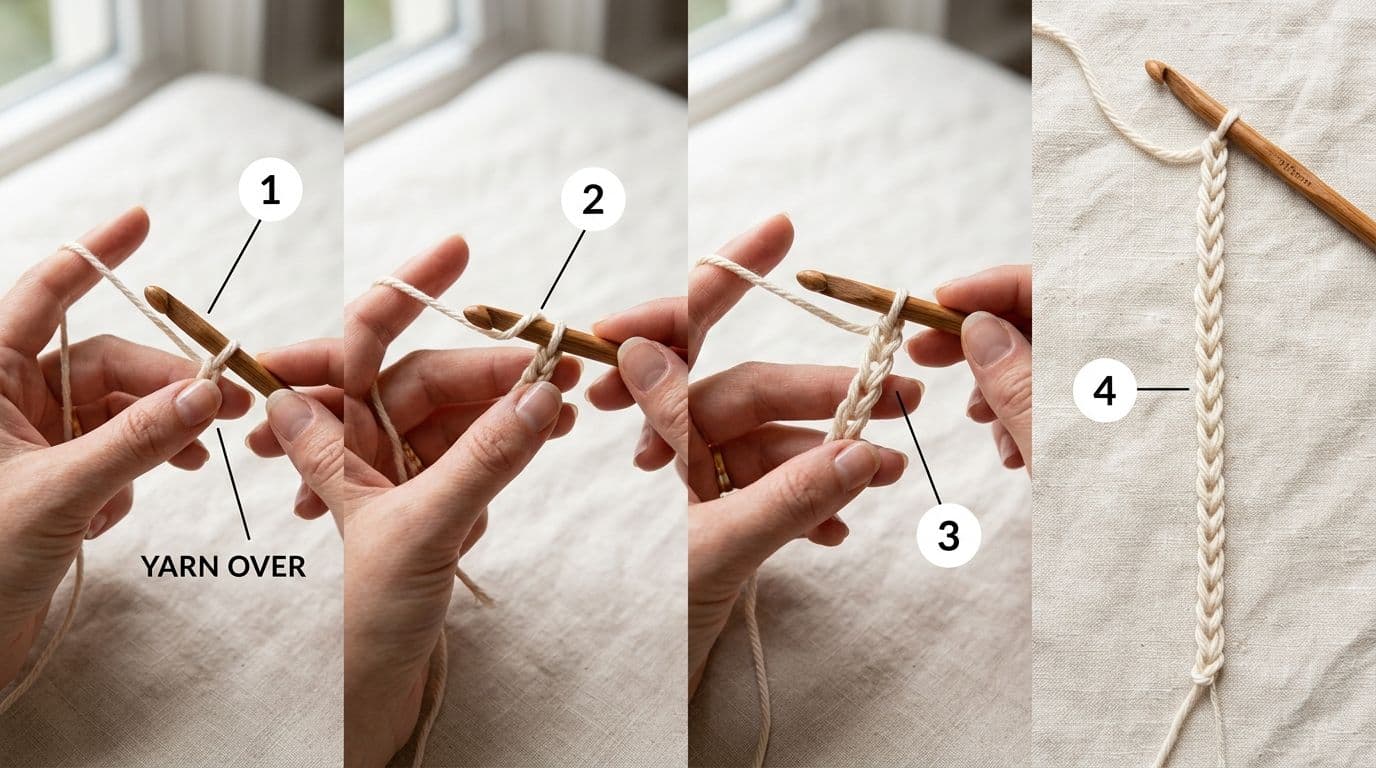
To make a chain: yarn over (wrap your working yarn over the hook from back to front) and pull that wrapped yarn through the loop already on your hook. That's the entire motion, one repeated action, over and over, to build your foundation chain to whatever length your project calls for.
Counting Your Chains Correctly
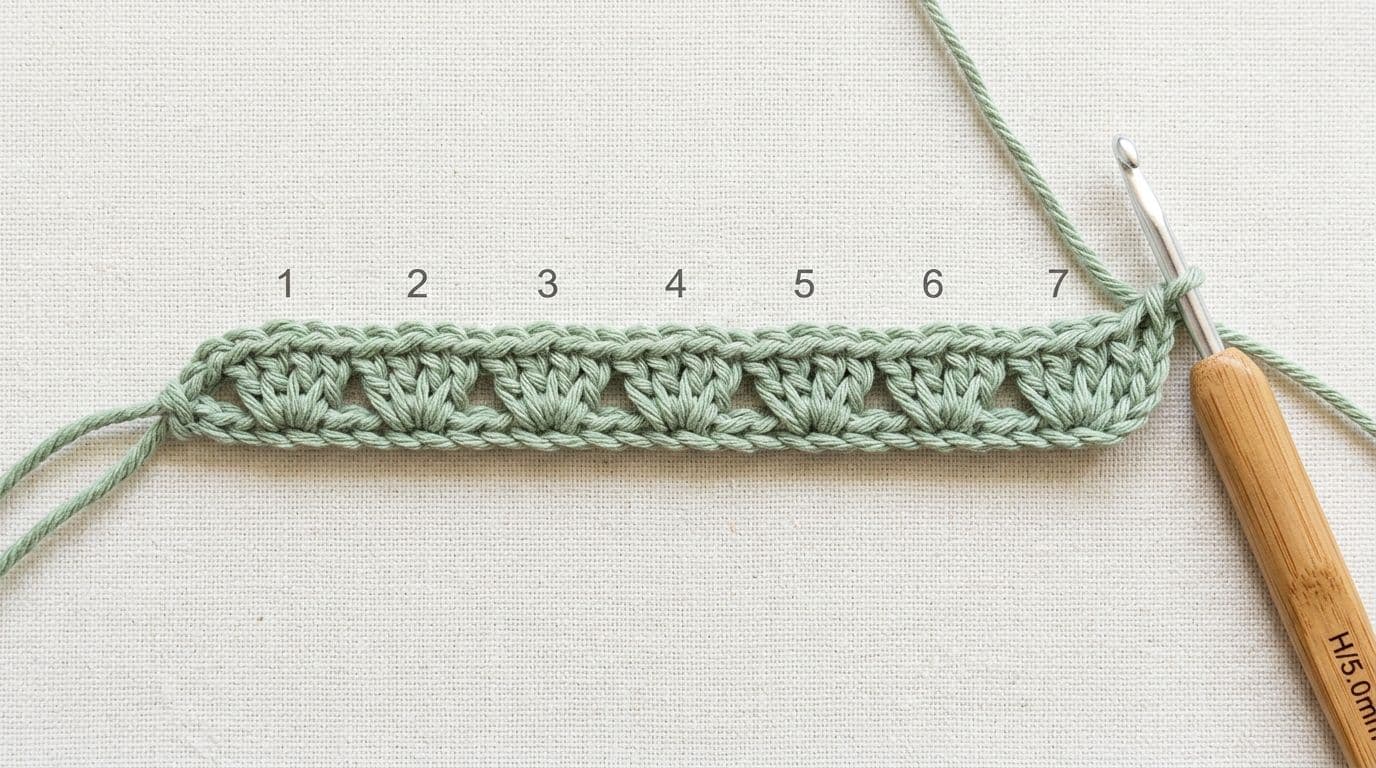
Here's the single most common point of confusion for anyone learning how to crochet a chain: does the loop currently sitting on your hook count as a chain, or not?
It doesn't. The loop on your hook is your working loop, it's not a finished stitch yet, it's what you're about to work with next. Count only the completed chains below that working loop. Each finished chain has a distinct V shape when you look at it from the front, that V is your visual counting marker. Lay your chain flat and count the Vs, not including whatever loop is currently active on your hook, and your count will be accurate.
Understanding Chain Parts
Once you've made a chain, look closely and you'll notice it actually has more than one workable part. From the top, you'll see the front loop and the back loop forming that V shape you just learned to count. Flip the chain over, and running along the underside, you'll find the back bump, a small ridge of yarn that most beginner patterns (including this one) will have you insert your hook into for your very first row of stitches.
Working into the back bump rather than the front or back loop keeps a neat, finished-looking edge along the bottom of your first row, which is why it's the standard beginner recommendation rather than an arbitrary choice.
Your First Stitch: Single Crochet
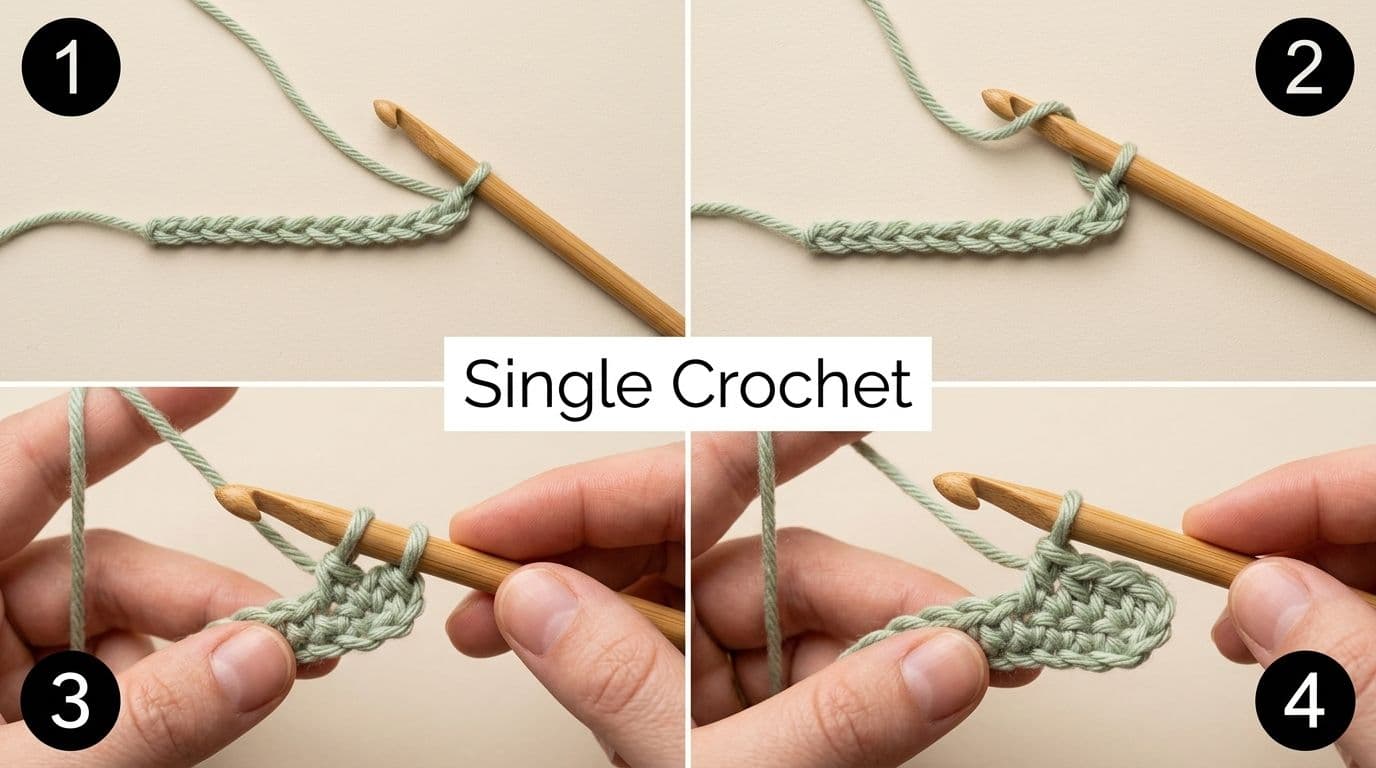
This is the moment most beginners actually start to feel like they're "crocheting" rather than just practicing chains. Single crochet is the single most-used stitch across beginner patterns, easily covering the vast majority of dishcloths, amigurumi, and simple beginner projects you'll come across.
Single Crochet Step-by-Step
Starting from your foundation chain (working into the back bump of the second chain from your hook):
1. Insert your hook into the chain (or, on later rows, into the next stitch).
2. Yarn over, and pull that loop back through just the chain or stitch, you should now have two loops sitting on your hook.
3. Yarn over again, and pull through both of those loops at once. One loop remains on your hook, and you've just completed one single crochet stitch.
4. Repeat this same sequence into each remaining chain across your foundation row.
The two mistakes that show up constantly at this stage: accidentally skipping a stitch (usually the very first or very last one in a row, since they're easy to miss) and accidentally working two stitches into the same spot. Both are easy to catch if you count your stitches at the end of every row, and both are just as easy to fix once you spot them.
Turning Your Work and Starting Row 2
Once you reach the end of your first row, you need a turning chain before you can start row 2, this is simply one chain stitch, worked before you turn your piece around to head back in the other direction. That turning chain brings your hook up to the correct height to start the next row's stitches evenly.
A stitch marker (or even just a small scrap of contrasting yarn looped through your first stitch) is genuinely useful here, especially on your first few projects, since it's easy to lose track of exactly where a row starts and ends until the rhythm becomes automatic.
Beyond the Basics: Next Steps
Once single crochet feels steady rather than effortful, that muscle memory transfers directly into two very common next stitches: half double crochet and double crochet, both taller variations on the same core yarn-over-and-pull-through motion you've already learned. You'll also start seeing references to a magic circle as you branch into projects like amigurumi, an alternative starting method to a basic chain that avoids leaving a hole at the center of round projects.

Ready for Your Next Stitch? Look up any stitch abbreviation instantly, with a definition and photo, in our free Stitch Dictionary.
What to Practice Before Moving Ahead
Resist the urge to chase a new stitch every day. The single most useful thing you can do at this stage is make five to ten small practice squares, roughly 4 inches by 4 inches each, using nothing but single crochet. This deliberately boring repetition is what actually builds even tension and consistent stitch size, the two things that make the biggest visible difference between "looks handmade" and "looks a little rough," far more than knowing more stitches does.
Troubleshooting Common Beginner Problems
Every single beginner runs into some version of the problems below. None of them mean you're doing something wrong in some deeper sense, they mean you're learning a physical skill, and physical skills take repetition to smooth out.
Why Are My Chains Too Tight
This is, by a wide margin, the number one beginner complaint, and it's almost always a tension issue rather than a technique mistake. If your chains are so tight you can barely fit your hook back into them, try wrapping your working yarn around your pinky finger instead of relying only on your index finger for tension, the extra friction point often does more to loosen your grip than consciously "trying to hold looser" ever does. You can also simply go up half a hook size for your foundation chain specifically, then switch back to your working size for the rest of the piece. This genuinely improves with practice on its own, most crocheters find their chains loosen up naturally within their first few completed projects.
Common Stitch Mistakes and How to Fix Them
Skipping a stitch: count your stitches at the end of every row against what your pattern (or your own first row) calls for. If you're short, you likely skipped one, most often at the very start or end of the row.
Adding an extra stitch: the opposite problem, usually caused by accidentally working into the turning chain as if it were a stitch, when it isn't meant to be one in basic single crochet.
Frogging (pulling out your work to fix a mistake, named for the "rip it, rip it" sound) is not a failure, it's a completely normal, genuinely useful part of learning. Every experienced crocheter frogs constantly, it's less about avoiding mistakes forever and more about catching them early and fixing them without frustration. To pick up a dropped loop, simply reinsert your hook into the last correctly formed stitch and continue on from there.
Getting Your First Project Started
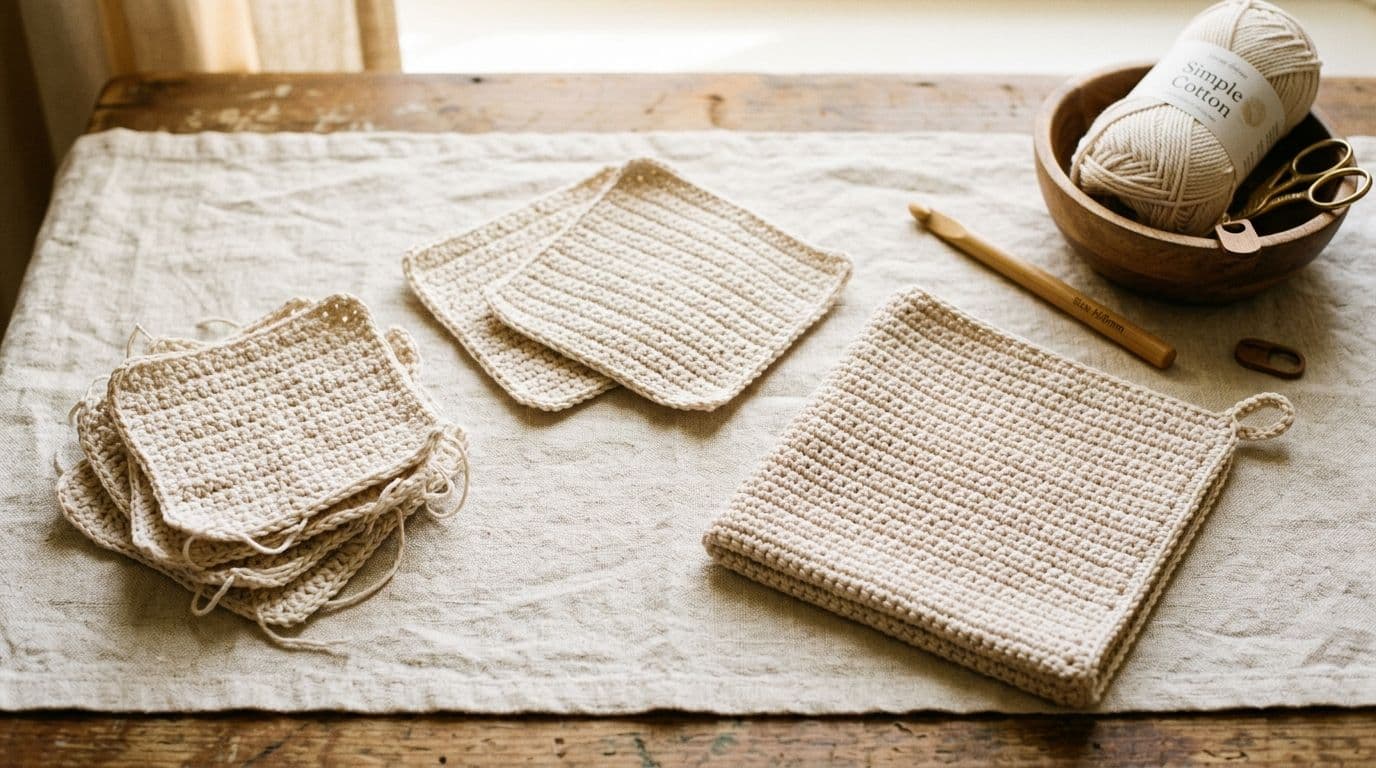
Once you've got single crochet feeling steady across a few practice squares, you're genuinely ready to turn that skill into something real.
Choosing Your First Project
Start small and start flat. A dishcloth, a simple washcloth, or a short scarf worked entirely in single crochet are the classic first projects for a real reason: they use only the skills you already have, they finish quickly enough to keep your motivation up, and a slightly uneven edge on a dishcloth is a feature, not a flaw, on your very first finished object. Avoid anything with shaping, color changes, or unfamiliar stitches for this first piece specifically, those are worth chasing once single crochet is genuinely comfortable, not before.
If you'd like a real, guided first pattern rather than winging it entirely on your own, our free Crochet Heart Basket Pattern uses exactly the chain-and-single-crochet skills covered in this guide, and it's an easy way to turn today's practice into a finished, useful object.
Conclusion
Every crocheter you've ever admired started exactly where you are right now, holding a hook for the first time, unsure if their hands would ever figure out the rhythm. They did, and you will too, mostly through repetition rather than talent. Slip knot, chain, single crochet, in that order, are genuinely the whole foundation. Everything else in crochet is a variation on that same basic motion. Practice your squares, don't rush past the tension-building stage, and give yourself permission to frog and try again as many times as it takes.
Frequently Asked Questions
Neither is more correct than the other. Try both for a few minutes each, knife hold (gripped like a table knife) and pencil hold (gripped like a writing pencil), and use whichever feels less awkward. Most crocheters settle into one naturally within their first few sessions.
Share this page
 X / Twitter
 Facebook
 Reddit
Related articles
Bernat Yarn Substitutes: What to Use Instead of Blanket, Maker, Pipsqueak & Bundle Up

How to Crochet a Pumpkin: Free Patterns for Fall & Halloween Decor
How to Read Crochet Patterns: A Beginner's Guide

Yarnzy: #1 Crochet & Knitting App
Track knitting and crochet projects with a timer & row counter, Import Patterns from Anywhere, Manage Stash & more all in one place.


Free to start · iOS, Android & Web
Scan to Download the App

Start your next project with confidence