
 Download the App
Free Crochet Heart Basket Pattern (Easy, Beginner Friendly)
11 Aug, 2026
This crochet heart basket pattern gets there with nothing fancier than single crochet, half double crochet, and a handful of well-placed increases. It works up small, about an inch tall, perfect for a ring dish or a pinch of stitch markers with no mosaic colorwork and no advanced stitches. If you can chain and single crochet, you can make this.
Quick Facts About This Pattern
| Skill level | Beginner |
|---|---|
| Stitches used | Chain (ch), single crochet (sc), half double crochet (hdc), slip stitch (sl st), increase (inc), 3-sc increase (3 sc inc), double crochet decrease (dc2tog), front loop only (flo) |
| Construction | Flat heart base shaped with increases across 5 rows, then 3 rounds build the walls |
| Color changes | None, single color throughout |
| Hook size | 4.0mm |
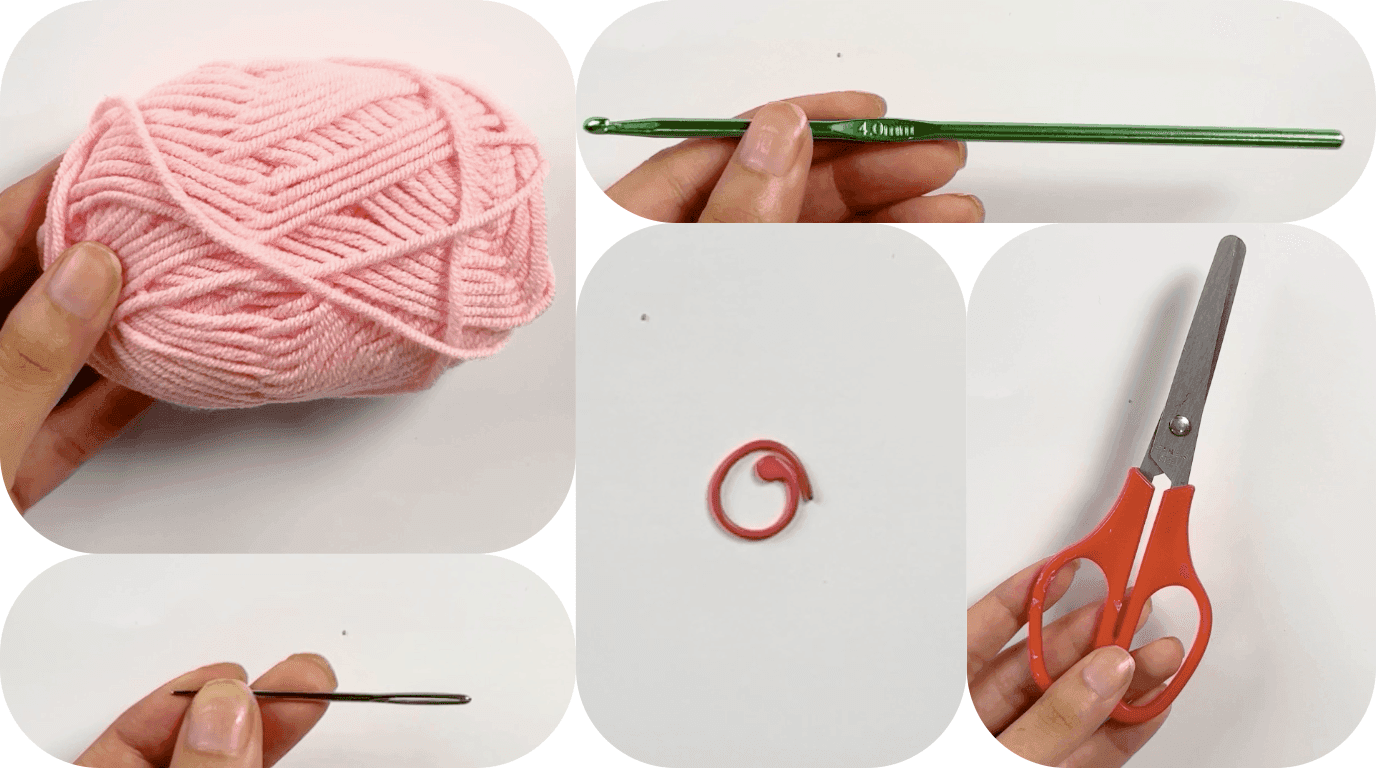
| Yarn | Worsted weight (4), cotton or acrylic |
| Notions | Stitch marker, tapestry needle, scissors |
| Finished size | Approx. 1 inch tall |
Get this pattern and hundreds more free in the Yarnzy app.
 Download Yarnzy
What You'll Need for This Crochet Heart Basket Pattern
Nothing here is unusual, and that's the point, this crochet basket pattern for beginners doesn't ask you to hunt down anything specialty:
• Worsted weight (4) yarn, cotton or acrylic
• 4.0mm crochet hook
• Stitch marker
• Tapestry needle
• Scissors
Finished size: approximately 1 inch tall at this gauge, small enough to sit in your palm, which is exactly why it works so well as a jewelry dish or trinket catch-all rather than a full storage basket.
If "worsted weight (4)" doesn't mean anything to you yet, the Craft Yarn Council's yarn weight standard is the reference chart most patterns build from, including several of the ones we checked while researching this post. And if you're not sure 4.0mm is the right hook for what you've got in your stash, our Hook & Needle Chart will confirm it in about ten seconds.
Crochet Abbreviations Used in This Pattern
| Abbreviation | Meaning |
|---|---|
| CH | Chain |
| SC | Single crochet |
| HDC | Half double crochet |
| SL ST | Slip stitch |
| INC | Increase (2 sc in the same stitch) |
| 3 SC INC | Work 3 sc in the same stitch |
| DC2TOG | Double crochet decrease |
| FLO | Front loop only |

Look Up Any Stitch Instantly Our Stitch Dictionary has every abbreviation used in this pattern, with a quick definition and photo for each, no need to scroll back up.
Pattern Notes Before You Start
Four things worth knowing before your hook touches yarn:
• Written in US crochet terms.
• The base is worked in joined rounds, join each round with a slip stitch unless the pattern tells you otherwise.
• Stitch counts in parentheses tell you what you should have at the end of a row. Actually check yours against them. It takes five seconds and it's the difference between catching a mistake on row 3 versus unraveling back to it from row 6.
How to Crochet the Heart Base (Step by Step)
Here's the part that actually makes this a heart basket crochet pattern and not just a basket: the whole shape comes from a single foundation chain, worked on both sides, with increases placed at exactly the same spots row after row. That repetition is what builds the two rounded lobes at the top of the heart, miss the spot even once and you'll feel it later, which is why the mistakes section below spends real time on this.
Foundation & Row 1: Starting the Heart
Foundation: Ch 17.
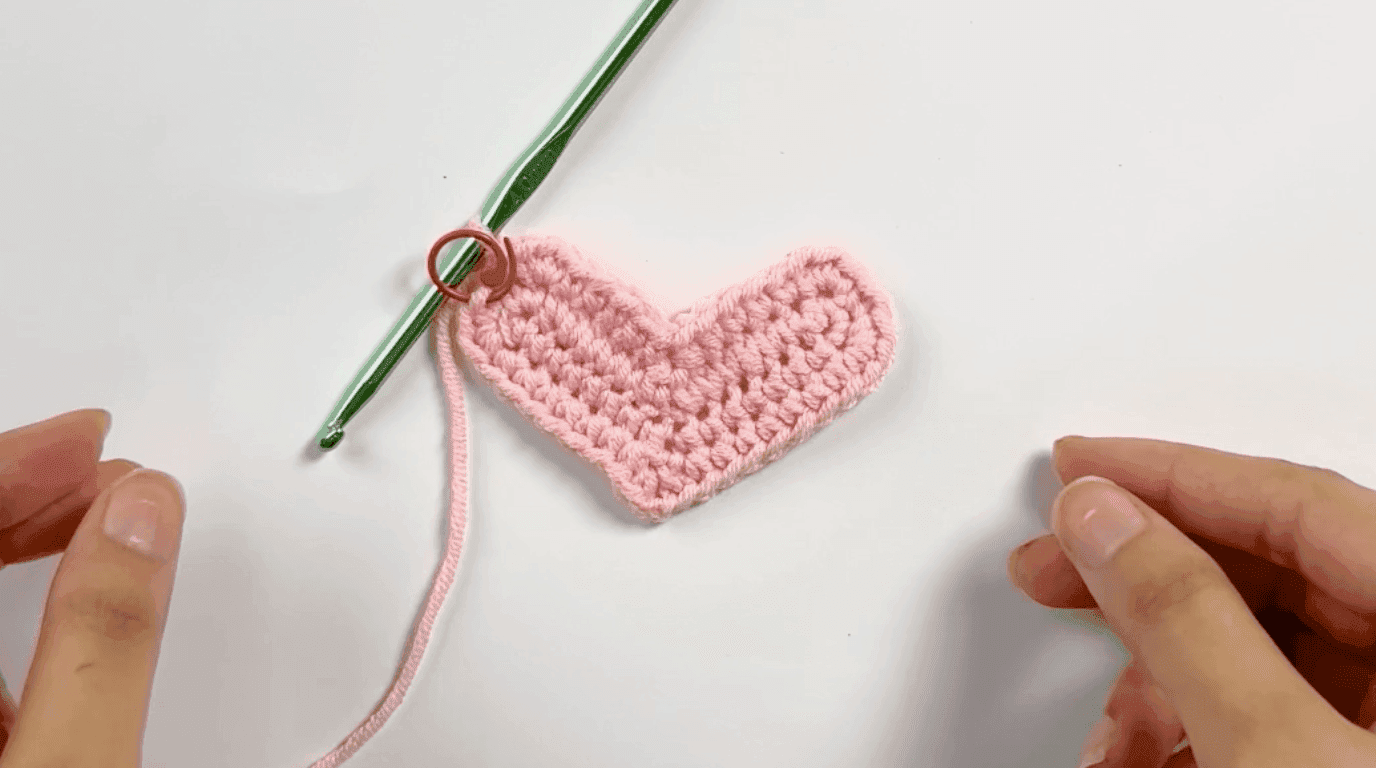
Row 1: Starting in the second chain from the hook: 8 sc, ch 2. Working along the opposite side of the foundation chain: 7 sc, 3 sc inc in the last chain, 6 sc, skip next 2 sts, 6 sc, inc in the last st.
What this does: working both sides of a single chain, rather than starting a new one, is what gives the heart its two mirrored halves from a single unbroken piece of foundation. The ch-2 at the top marks the future dip between the two lobes, and the 3-sc-increase at the far end is what starts rounding the bottom point of the heart instead of leaving it square.
Rows 2–5: Shaping the Heart with Increases
Row 2: 3 sc inc, 7 sc, sc in the first ch of the ch-2 space, ch 2, sc in the second ch of the ch-2 space, 7 sc, 3 sc inc, sc, 3 sc inc, 5 sc, turn, 5 sc, 3 sc inc, sc. (40 sts)
Row 2, broken into a stitch-by-stitch sequence:
1. Work 3 sc into the very next stitch (all three land in that one spot). This is your first 3 sc inc, and it rounds out the top of lobe 1.
2. Sc plainly into each of the next 7 stitches. No shaping here, just a steady single crochet.
3. Sc into the first chain of the ch-2 gap left by row 1.
4. Chain 2. These two new chains become the gap that row 3 will work into.
5. Sc into the second chain of that same ch-2 gap. Steps 3–5 together close the last row's gap and reopen a fresh one directly above it.
6. Sc plainly into each of the next 7 stitches.
7. Work 3 sc into the next stitch (your second 3 sc inc). This rounds the top of lobe 2.
8. Sc into the next stitch, just one.
9. Work 3 sc into the next stitch (your third 3 sc inc). This one shapes the bottom point of the heart.
10. Sc plainly into each of the next 5 stitches.
11. Turn your work. This is the only spot in rows 2–5 where you change direction instead of continuing around.
12. Now working the turned side: sc plainly into each of the next 5 stitches.
13. Work 3 sc into the next stitch (your fourth and final 3 sc inc for this row).
14. Sc into the last stitch to close the row.
Count your stitches: you should have 40.
Row 3: 3 sc inc, 11 sc, ch 2, 11 sc, 3 sc inc, sc, 3 sc inc, 6 sc, skip next 2 sts, 6 sc, 3 sc inc, sc. (48 sts)
Row 3, broken into a stitch-by-stitch sequence:
1. Work 3 sc into the next stitch (3 sc inc), rounding the top of lobe 1. Notice there's no "turn" instruction anywhere in this row, from here on you're working straight around the whole piece in one continuous direction.
2. Sc plainly into each of the next 11 stitches (four more than row 2's 7, since the lobe is wider now that the heart has grown).
3. Chain 2, working straight across the last row's ch-2 gap. Unlike row 2, this row doesn't sc into two separate chains first, it simply chains 2 fresh stitches directly over the gap.
4. Sc plainly into each of the next 11 stitches.
5. Work 3 sc into the next stitch (3 sc inc), rounding the top of lobe 2.
6. Sc into the next stitch, just one.
7. Work 3 sc into the next stitch (3 sc inc), shaping the bottom point.
8. Sc plainly into each of the next 6 stitches.
9. Skip the next 2 stitches entirely. Don't work into them at all, just pass over them and move on. This is the first row where "skip" appears.
10. Sc plainly into each of the next 6 stitches.
11. Work 3 sc into the next stitch (3 sc inc), your final increase for this row.
12. Sc into the last stitch to close the row.
Count your stitches: you should have 48.
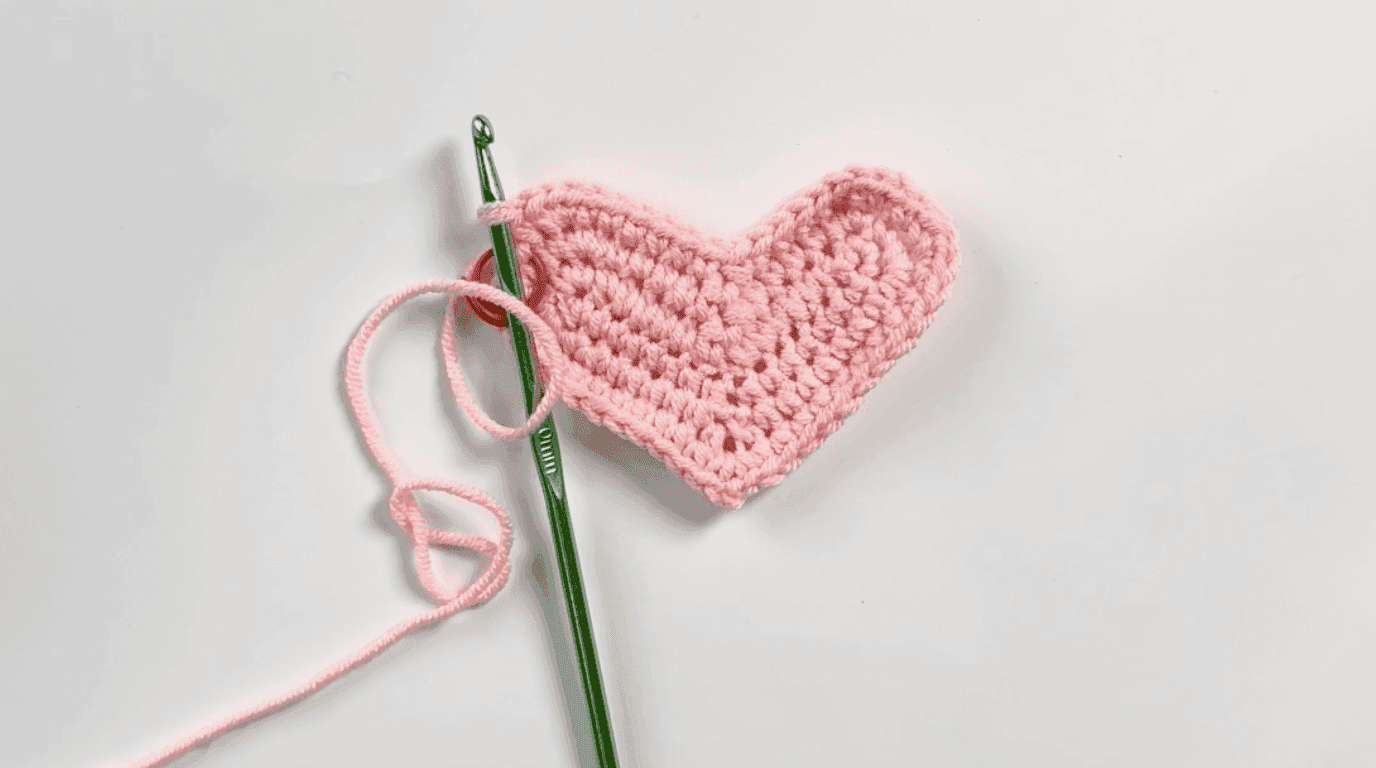
Row 4: 3 sc inc, 14 sc, ch 2, 14 sc, 3 sc inc, sc, 3 sc inc, 7 sc, skip next 2 sts, 7 sc, 3 sc inc, sc. (56 sts)
Row 4, broken into a stitch-by-stitch sequence:
Same 12-step shape as row 3, just wider at every plain stretch:
1. 3 sc inc (top of lobe 1).
2. Sc plainly into the next 14 stitches (three more than row 3's 11).
3. Chain 2 over the gap.
4. Sc plainly into the next 14 stitches.
5. 3 sc inc (top of lobe 2).
6. Sc into 1 stitch.
7. 3 sc inc (bottom point).
8. Sc plainly into the next 7 stitches.
9. Skip the next 2 stitches.
10. Sc plainly into the next 7 stitches.
11. 3 sc inc (final increase).
12. Sc into the last stitch.
Count your stitches: you should have 56.
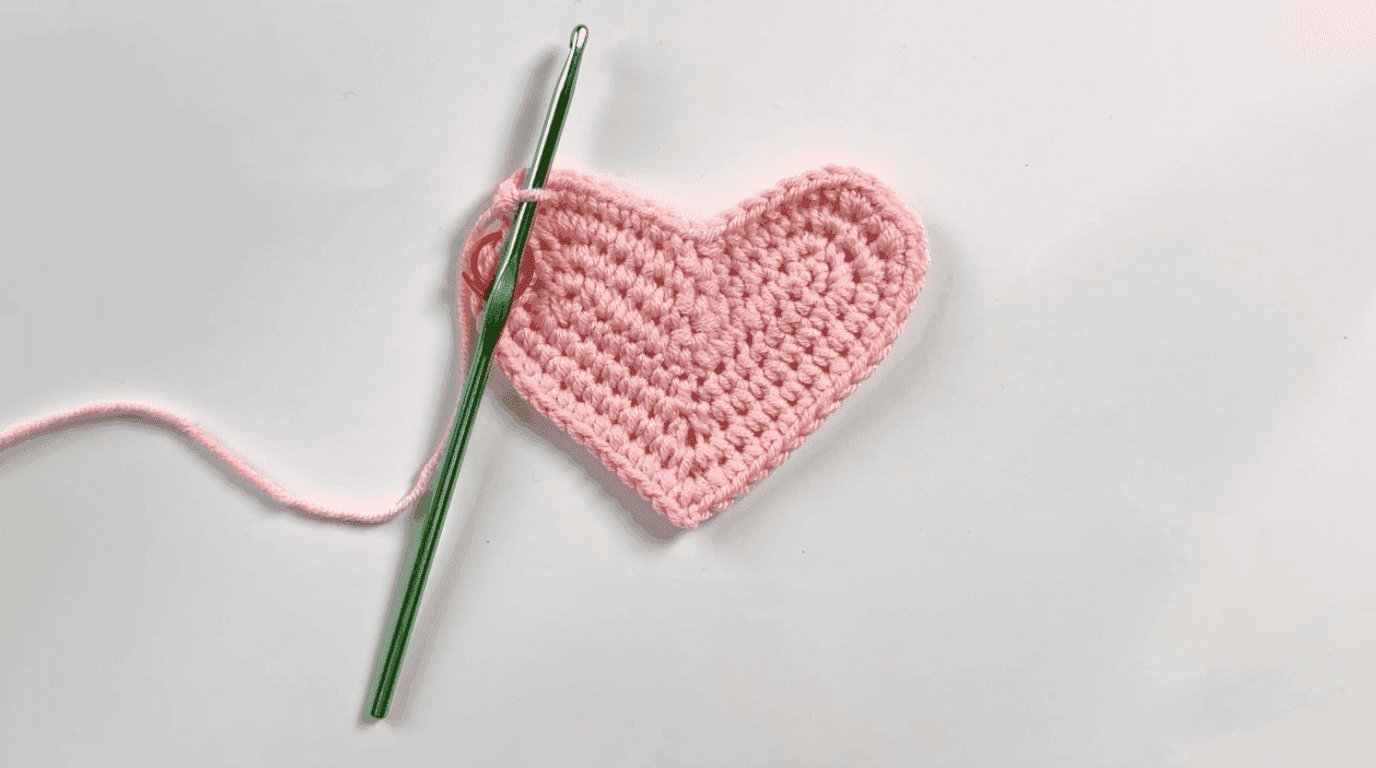
Row 5: 3 sc inc, 17 sc, ch 2, 17 sc, 3 sc inc, sc, 3 sc inc, 8 sc, skip next 2 sts, 8 sc, 3 sc inc, sc. (64 sts)
Row 5, broken into a stitch-by-stitch sequence:
The exact same 12-step shape one more time, at its widest:
1. 3 sc inc (top of lobe 1).
2. Sc plainly into the next 17 stitches.
3. Chain 2 over the gap.
4. Sc plainly into the next 17 stitches.
5. 3 sc inc (top of lobe 2).
6. Sc into 1 stitch.
7. 3 sc inc (bottom point).
8. Sc plainly into the next 8 stitches.
9. Skip the next 2 stitches.
10. Sc plainly into the next 8 stitches.
11. 3 sc inc (final increase).
12. Sc into the last stitch.
Count your stitches: you should have 64. This is the widest the heart gets, everything from row 6 onward stops increasing and just builds height on top of what you've shaped here.
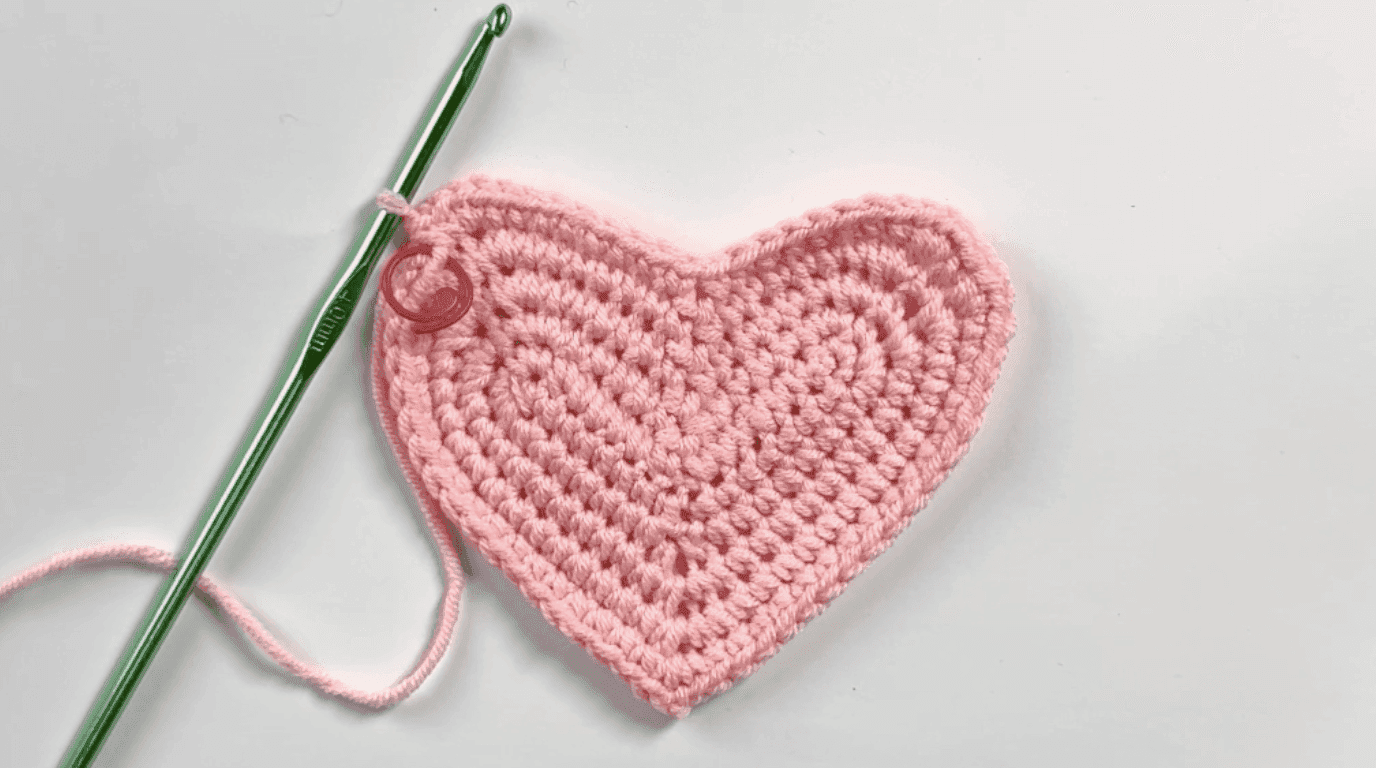
What these rows are actually doing: notice the pattern repeating in each row, a 3-sc-increase at the top of each lobe, a plain stretch of sc along the sides, another 3-sc-increase at the bottom point, and a chain-2 space at the very top that keeps growing the gap between the lobes. Every row adds exactly 8 stitches, which is what keeps the heart symmetrical as it widens. If your stitch count doesn't land on 40, 48, 56, then 64, stop before you start row 6, the shaping only works if these four rows are accurate.
Building the Basket Sides
This is where the pattern stops shaping and starts building height, the shift from a flat heart motif to something that actually holds things.
Row 6: Turning the Corner with FLO & a Decrease
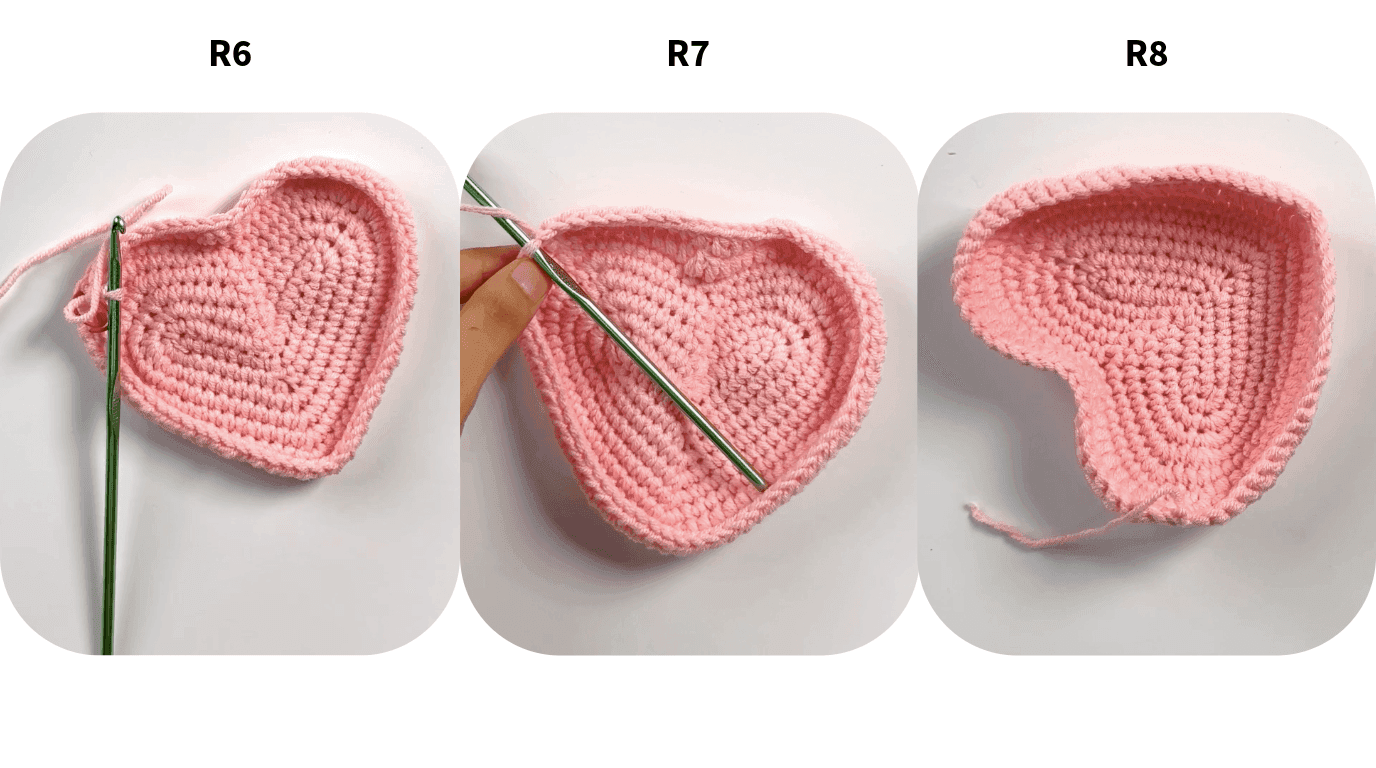
Row 6: Hdc in each stitch around. At stitches 54 and 55, work dc2tog. Continue working hdc in FLO to the end of the round. (63 sts)
What this does: this is the corner-turning round, half double crochet is taller than the single crochet you've been working, and that height is what lifts the wall up off the flat base. The single dc2tog at stitches 54–55 pulls in one stitch at the center dip specifically, tightening the indentation right where the two lobes meet. Working the rest of the round in the front loop only leaves the back loops exposed as a visible ridge, that ridge is your visual marker for exactly where the base ends and the wall begins.
Rows 7–8: Finishing the Walls
Row 7: Hdc in each stitch around through both loops. Join with sl st to the first stitch. Ch 1. (63 sts)
Row 8: Sc in each stitch around. Join with sl st to the first stitch. Ch 1. Fasten off. (63 sts)
What this does: row 7 goes back to working through both loops, which closes over that exposed ridge from row 6 and gives the wall a smooth, solid face rather than an open-weave texture. Row 8 caps everything with a plain sc round, which is what gives the top edge a clean, finished lip to fasten off on rather than leaving the taller hdc stitches as the exposed edge.
Why the construction changes here, and why it matters mid-project: rows 1–5 are shaping rows every increase is doing work to round out the heart. Rows 6–8 stop shaping entirely and just build straight up. If you were expecting more increases at row 6 the way you saw them in rows 2–5, you'd be right to notice their absence; there aren't any here, and that's correct. The shape is locked in by row 5; everything after that is just wall height.
Finishing: Defining the Heart Shape
Thread the long yarn tail onto a tapestry needle. Locate the center indentation at the top of the heart, between the two rounded lobes. Using the yarn tail, make several small in-and-out stitches through this center point. Gently pull the yarn until the indentation is well defined, creating a crisp heart shape.
Secure the yarn on the inside of the basket, weave in all remaining ends, and trim any excess yarn.
Your crochet heart basket is now complete.
Why this step matters: the dc2tog at row 6 gets the dip started, but it's this hand-tacking step that actually locks it in place. Skip it, and the top edge will slowly relax toward a rounder, less heart-like curve the more the basket gets handled; this is what keeps the shape crisp long-term.
Customizing Your Basket: Size, Yarn & Hook
Want a simple large crochet heart pattern free of major modifications? The easiest way to scale this pattern is to extend or shorten the foundation chain and adjust your increased placement to match.
A few things worth knowing before you go changing things:
• Swap the yarn weight or hook size and you change the finished size, not just the texture. This sample comes out around 1 inch tall in worsted weight on a 4.0mm hook, a bulkier yarn and larger hook will scale it up noticeably, since the same 8-stitch-per-row growth pattern applies at any gauge.
• Lengthen the foundation chain and you change the proportions, not just the size, extend it evenly on both sides or your heart will lean.
• Add more rounds after row 8 if you want a taller basket. This doesn't touch the heart shape at all, since every bit of shaping happens back in rows 1–5.
Using something other than worsted weight (4)? Find a substitute that matches the gauge with our Yarn Substitution tool, then run it through our Yarn Calculator so you're not guessing at how much to buy.

Swapping Your Yarn or Hook? Use our Yarn Calculator and Substitution guide to pick a close match and estimate yardage before you cast on.
Common Mistakes to Avoid
These are the things that actually derail people on heart-shaped baskets not hypothetical mistakes, but the ones that show up over and over in reader comments across this niche:
• Stitch counts drift off in rows 2–5. Because every row repeats the same increase-then-plain-then-increase pattern, a single missed or extra stitch in row 2 compounds through row 5 without necessarily looking wrong yet. Check your count against the parenthetical (40, 48, 56, 64) at the end of every row; don't wait until row 6 to notice something's off.
• The dc2tog in row 6 lands in the wrong spot. This decrease only appears once, at stitches 54 and 55, and it's doing real work it's what defines the center dip of the heart. Count carefully to that exact spot rather than estimating "somewhere in the middle."
• Working row 6 in both loops instead of front loop only. It's an easy detail to miss mid-round, especially since row 7 immediately switches back to both loops. If you lose track, that turning ridge between base and wall disappears and the basket reads more like a bowl than a heart.
• Skipping or rushing the finishing tack. The dc2tog gets the indentation started, but the hand-stitching in the Finishing step is what actually holds it there permanently. A rushed or skipped finishing step is the single biggest reason a "heart" basket softens into more of a rounded shape after a few weeks of handling.
If your first attempt comes out a little lopsided, that's not a sign you did something wrong. Heart shaping is genuinely one of those techniques that clicks on the second try, not the first.
What to Store in Your Crochet Heart Basket
At about an inch tall, this isn't a laundry-basket-sized project; it's a ring dish, a coin catch, a spot for the earrings you take off before bed. These heart shaped baskets are made for exactly that kind of small, everyday holding:
• Rings, studs, and small jewelry you take off daily
• Loose stitch markers, buttons, or tiny craft notions
• A pinch of potpourri or a small wrapped candy or two
• A quick, personal gift box for something equally small
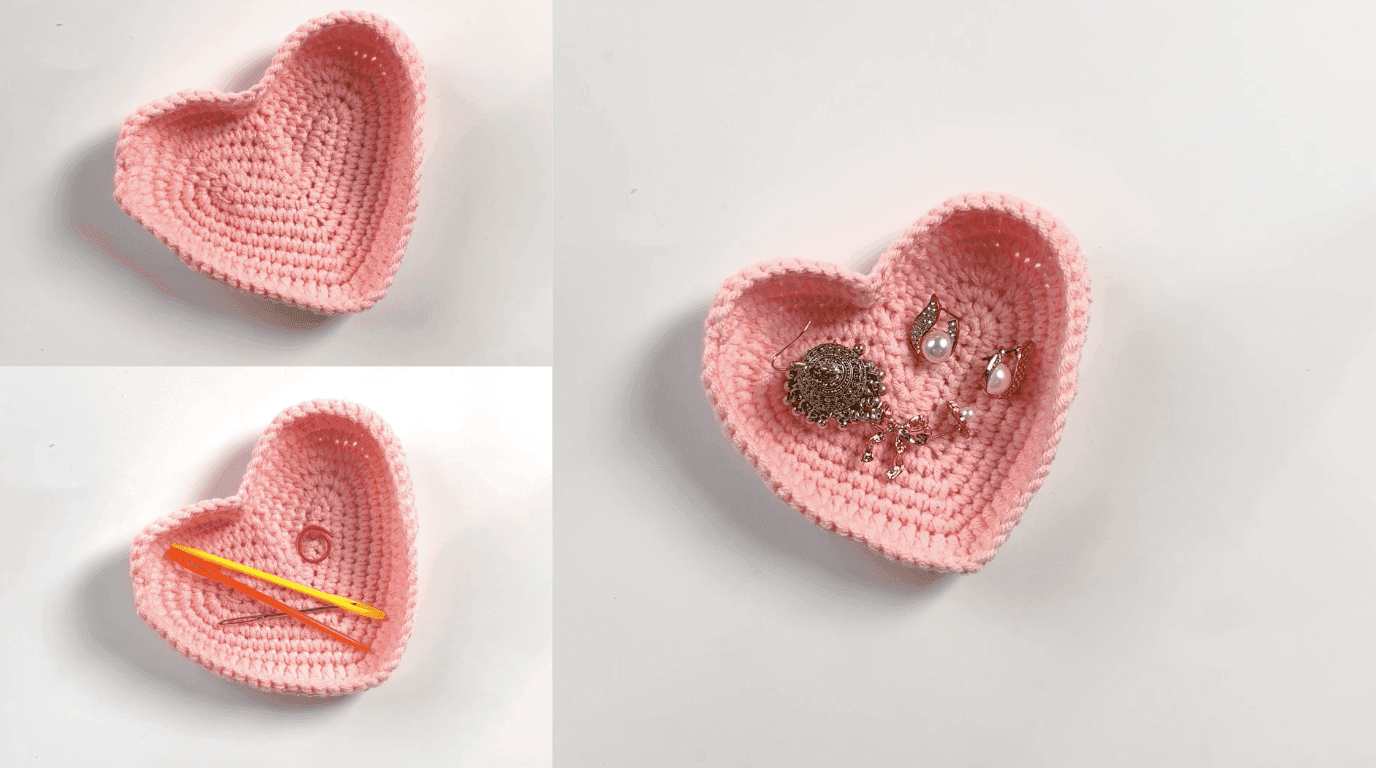
Crocheted baskets at this scale also make a fast, personal gift you'll have one finished well before you'd finish most other crochet home decor.
Conclusion
What you end up with here is a basket that looks like it took more skill than it did. A single foundation chain turns into a fully shaped, inch-tall heart in just 8 rows, no advanced techniques required anywhere along the way. Use it as a ring dish, a stitch marker catch-all, or a tiny gift box for something equally small. If your first one comes out a little uneven, make a second; this is a pattern that gets noticeably easier the moment your hands learn where the increases go.
Frequently Asked Questions
At this small, 1-inch scale, you'll use a modest amount well under a full skein for most standard yarn put-ups. Run your yarn through our Yarn Calculator for a precise estimate if you want to be sure before you start.
Share this page
 X / Twitter
 Facebook
 Reddit
Related articles
Bernat Yarn Substitutes: What to Use Instead of Blanket, Maker, Pipsqueak & Bundle Up

How to Crochet a Pumpkin: Free Patterns for Fall & Halloween Decor
How to Read Crochet Patterns: A Beginner's Guide

Yarnzy: #1 Crochet & Knitting App
Track knitting and crochet projects with a timer & row counter, Import Patterns from Anywhere, Manage Stash & more all in one place.


Free to start · iOS, Android & Web
Scan to Download the App

Start your next project with confidence