
 Download the App
Crochet Sunflower Pot Coaster: A Complete Beginner-Friendly Tutorial & Free Pattern
29 Jul, 2026
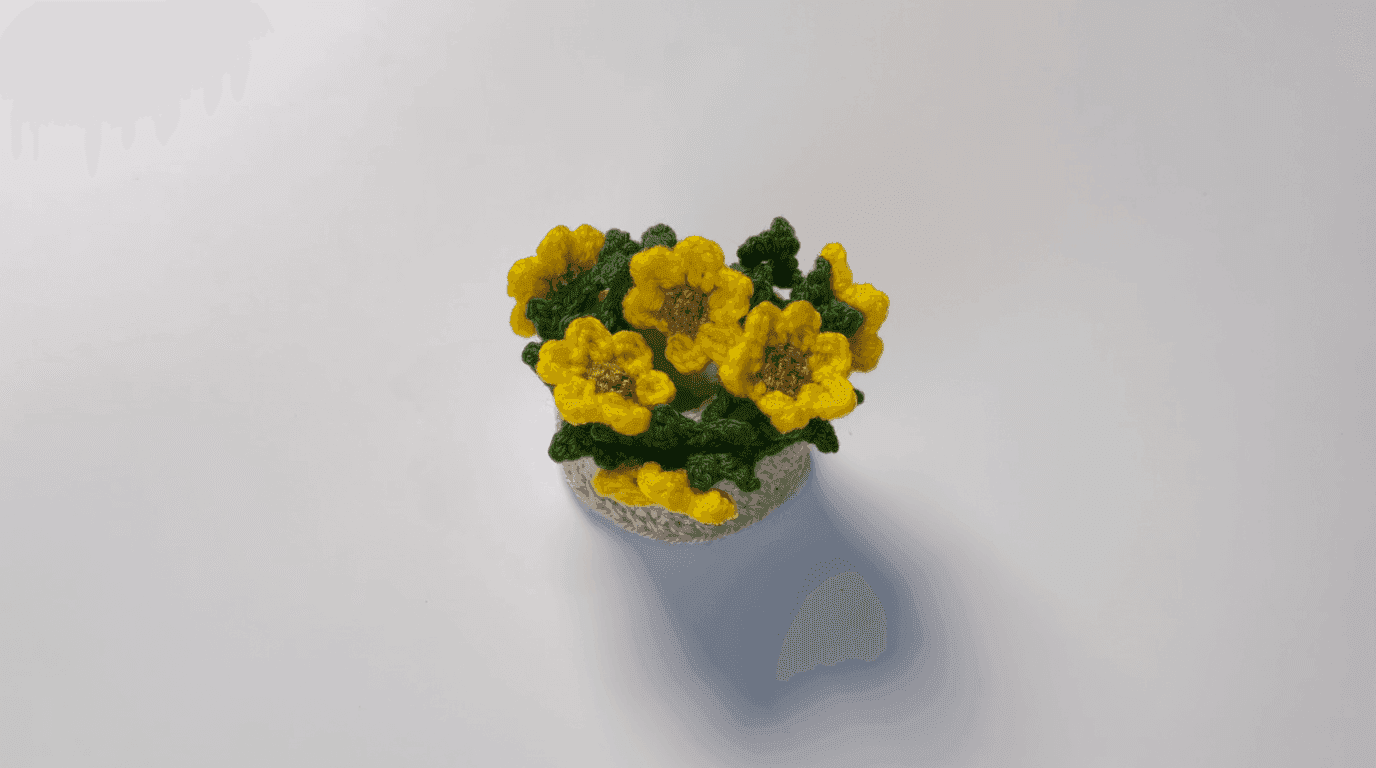
This free crochet sunflower coaster pattern makes a full three-piece set: a coaster with built-in leaves, a matching crocheted pot, and six mini appliqué sunflowers that glue onto the pot's exterior. No sign-up is required, the complete pattern, plus a full explanation of every technique used, is below. If you've made basic crochet coasters before, this is a comfortable next step up in skill.
Your next pattern is one tap away
 Download the Yarnzy App
What Is a Sunflower Pot Coaster?
A sunflower pot coaster set isn't a single piece, it's three components worked separately and then assembled: a flat coaster, a small pot, and six mini sunflower appliqués. The sunflower coaster crochet pattern has leaves worked directly into its edge using back-loop-only (BLO) stitches, so there's no separate leaf piece to sew on afterward. The crocheted pot is worked in joined rounds, and the six mini sunflowers (a brown core plus yellow petals) are glued around the pot's exterior once everything is finished.
The result works two ways: as a practical coaster set stored inside its own matching pot, or as a decorative accent the pot alone stands on its own as a small piece of tabletop décor even when the coasters are in use elsewhere.
Most sunflower coaster patterns available online are the flat coaster only, with no matching pot to store or display it in. This pattern gives you the full set in one place.
Know This Before You Start Crocheting
The skills, techniques, and tools that make this pattern come together smoothly.
Skill Level & What You'll Learn
This pattern is beginner to easy-intermediate. If you already know chain, single crochet, double crochet, and increase, you have the stitch vocabulary you need. The step up here is technique, not stitch difficulty:
• Working in joined rounds instead of a continuous spiral, tracking a stitch marker and rejoining at the end of every round.
• Back-loop-only (BLO) crochet, used twice: once for the coaster's built-in leaf edge, once for the pot's base ridge.
• Working a new stitch directly into an existing piece instead of making it separately and sewing it on.
Crochet Techniques Used in This Pattern
• Front loop vs. back loop: the two halves of a stitch's top edge. Working into just one half instead of both creates a visible ridge or seam line. Used on the coaster's leaf edge and the pot's base ridge.
• Magic circle (MC): an adjustable center-start loop that cinches the center hole fully closed after your first round, so there's no gap in the middle of the coaster, pot, or sunflower cores.
• Increase (INC): two stitches worked into the same stitch, which widens each round so the piece grows outward into a flat circle.
Materials & Tools You'll Need
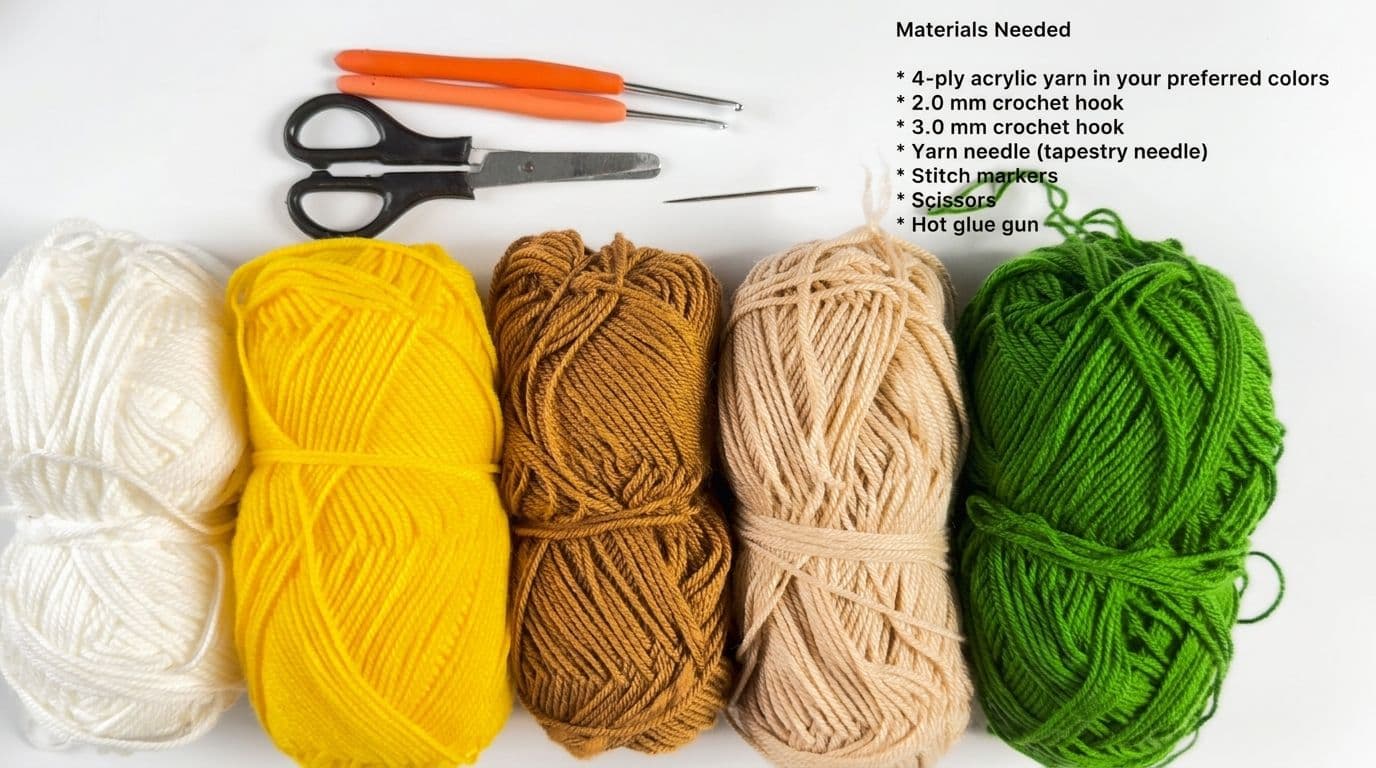
• Green yarn, for the built-in coaster leaves
• Yellow yarn, for the sunflower petals
• Brown yarn, for the sunflower centers
• Beige yarn, for the pot
• 3.0mm crochet hook, coaster and pot
• 2.0mm crochet hook, mini sunflowers
• Stitch marker, to mark the first stitch of each round
• Scissors
• Yarn needle, for weaving in ends
• Hot glue gun, for assembly
Not sure exactly how much of each color you'll need? Yarnzy's yarn calculator works out yardage per color based on your gauge, worth doing upfront on a four-color project so you're not guessing at skein counts.
Abbreviations Used in This Pattern
| Abbreviation | Stitch |
|---|---|
| CH | Chain |
| SL ST | Slip Stitch |
| SC | Single Crochet |
| DC | Double Crochet |
| INC | Increase (2 SC in same stitch) |
| BLO | Back Loop Only |
| MC | Magic Circle |

Not sure what a stitch means? Look up any stitch or abbreviation and get the full how-to, right when you need it.
Browse the Stitch Dictionary
A few pattern-wide notes before you start:
• Use a stitch marker to mark the first stitch of each round. This pattern is worked in joined rounds, not a spiral, so losing track of the starting stitch is the most common source of miscounts.
• Join rounds with a slip stitch unless otherwise stated.
• Stitch counts are shown in parentheses at the end of each round. Check your work against these before moving on.
• Maintain consistent tension throughout the project.
• Weave in all yarn ends before assembly, not after.
Gauge & Finished Size
Exact gauge matters less here than in a garment, but a rough finished size still helps you judge scale before you start.
• Estimated finished size, based on the stitch counts in this pattern with typical worsted-weight yarn and a 3.0mm hook:
• Coaster diameter: approximately 3.5 to 4 inches (9 to 10cm), smaller than many standard crochet circles since a 3.0mm hook is tighter than the 5mm hook worsted weight usually pairs with.
• Pot: approximately 2.5 inches in base diameter, standing roughly 2 to 2.5 inches tall.
Your finished measurements may vary depending on your personal tension. For an exact size, crochet the coaster base (Rounds 1 to 4) as a quick test swatch first.
How to Crochet the Sunflower Coaster (Step by Step)
Making a Magic Ring
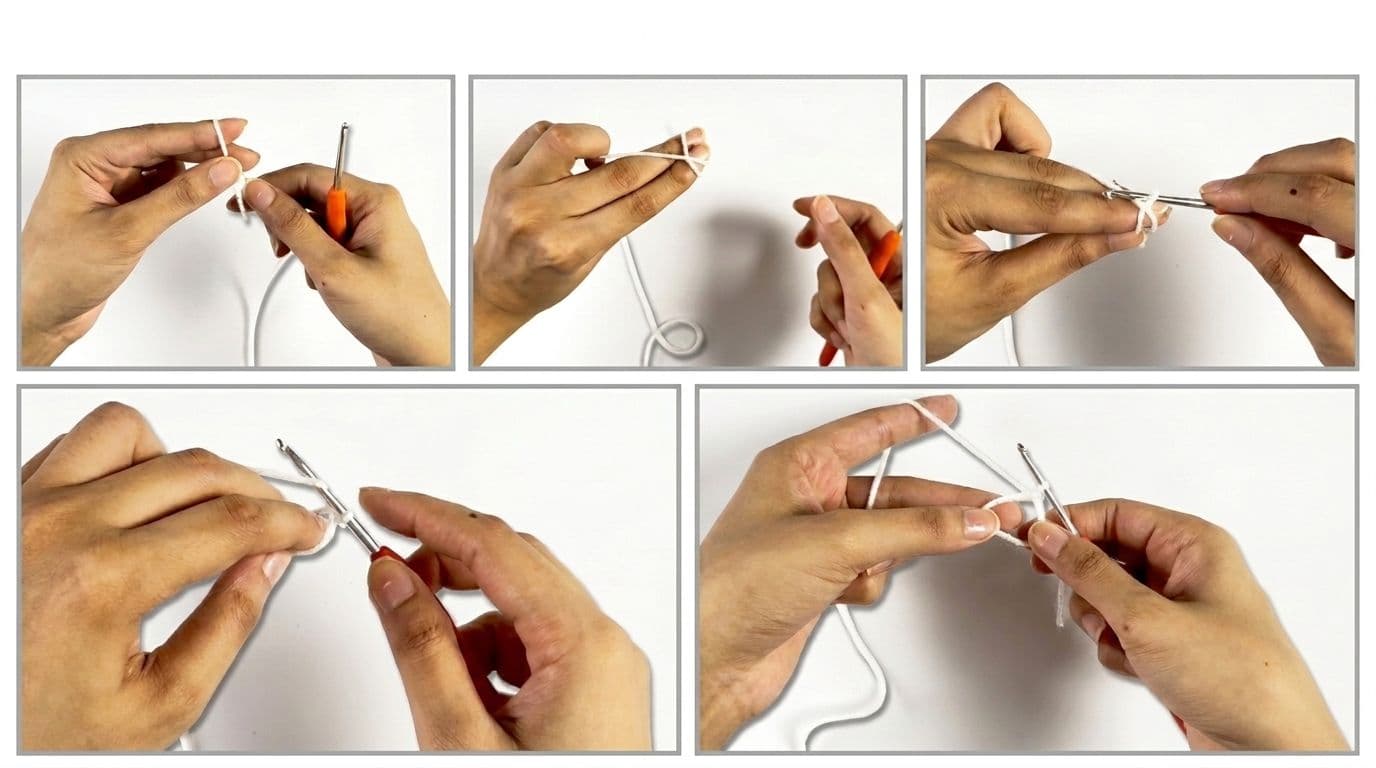
Start with your 3.0mm hook. Wrap the yarn around two fingers so it forms a loop, then hold the point where the strands cross so it doesn't slip apart. Slide your hook underneath the first strand, catch the second strand with the hook, and pull it back through, that's your first loop on the hook. Yarn over once more and pull through to chain one, which locks the ring in place so it won't unravel as you work.
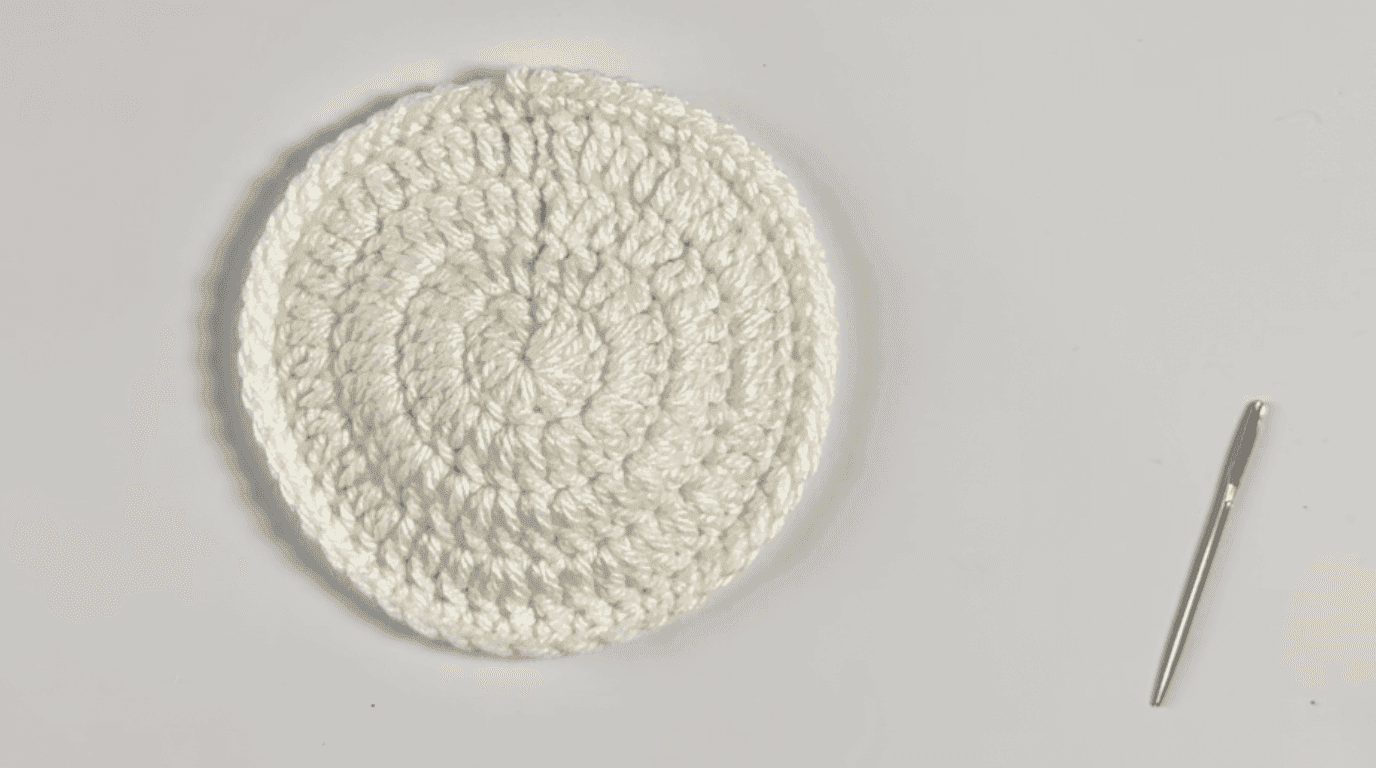
Coaster Base (Rounds 1–5)
The beginning ch-3 counts as a stitch in Rounds 1 and 2; in Rounds 3 and 4, it does not worth flagging since it's easy to assume the convention stays the same throughout the piece.
Round 1: Create a magic circle. Chain 3 (this counts as a double crochet). Work 11 double crochet into the magic circle, and slip stitch into the top of chain 3 to join
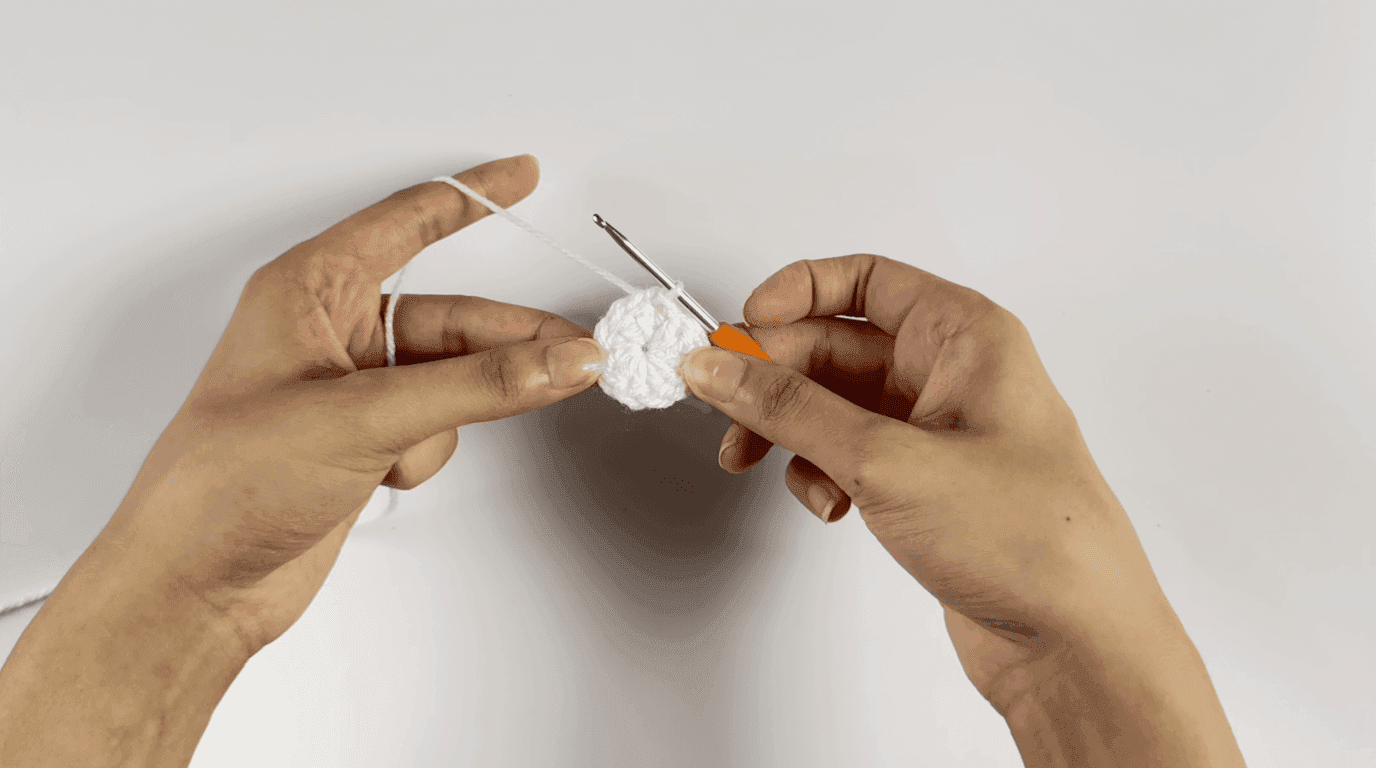
Round 2: Chain 3 (this counts as a double crochet). Work a double crochet increase (2 double crochet in the same stitch) in each stitch around, and slip stitch into the top of chain 3 to join.
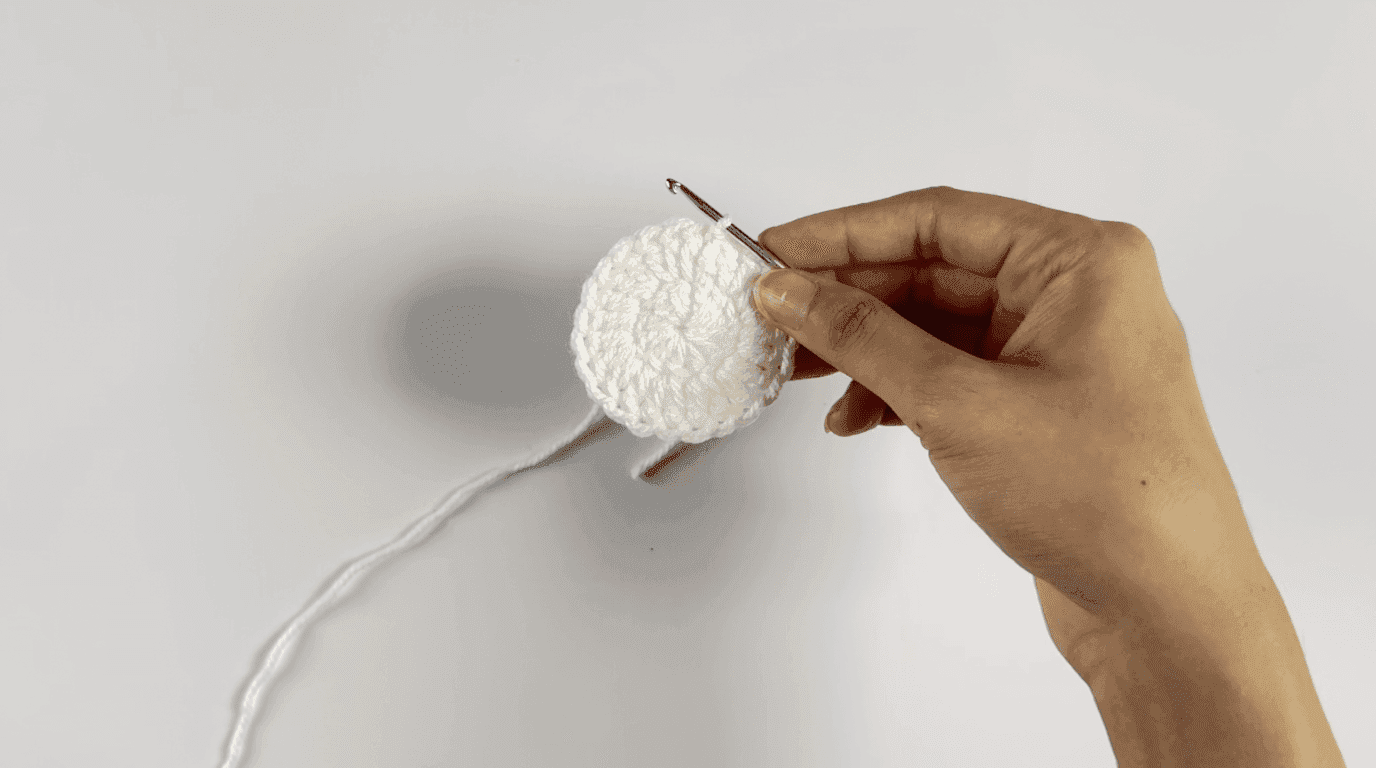
Round 3: Chain 3 (this does not count as a stitch in this round). Make 1 double crochet, then 1 double crochet increase, repeat this sequence 12 times around, and slip stitch into the top of chain 3 to join.
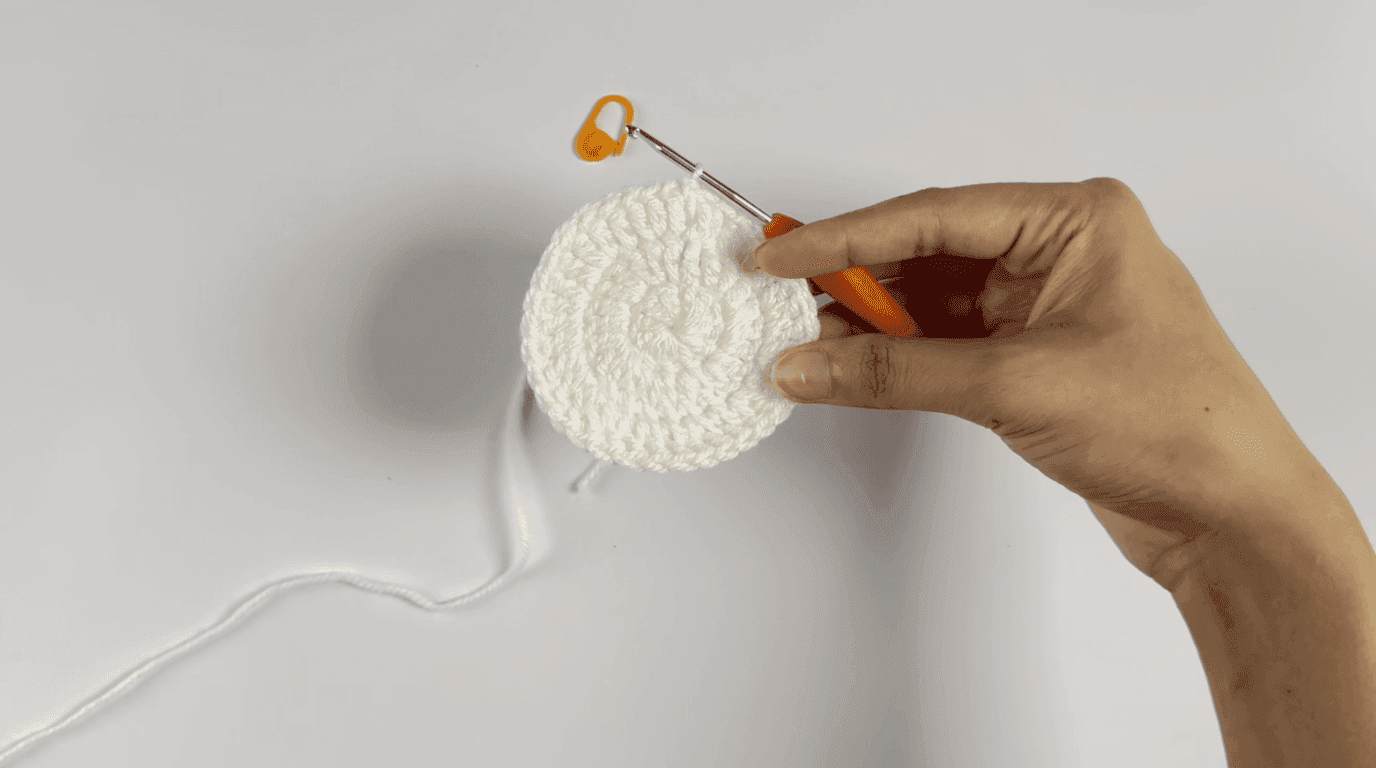
Round 4: Chain 3 (this does not count as a stitch in this round). Make 2 double crochet, then 1 double crochet increase, repeat this sequence 12 times around, and slip stitch into the top of chain 3 to join.
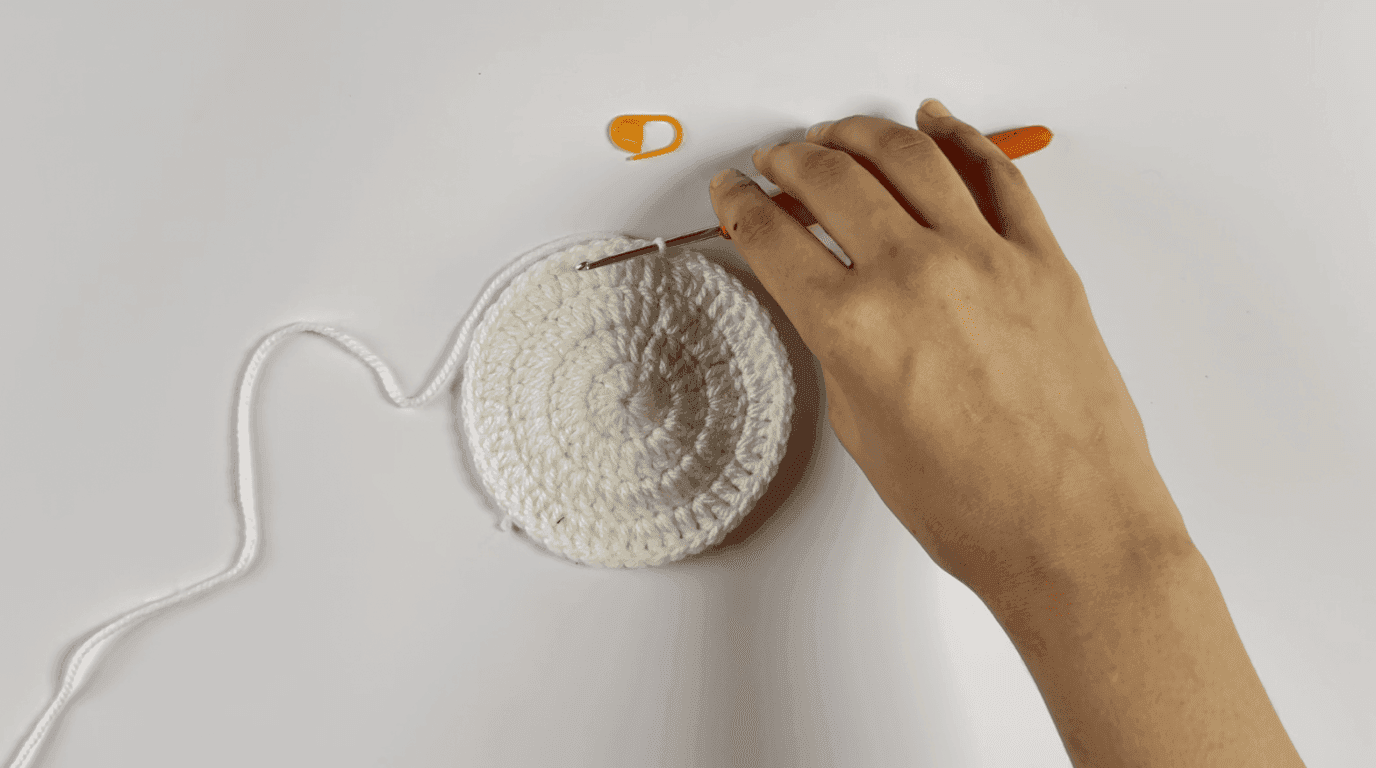
Round 5: Chain 1. Work 1 single crochet in each stitch around, keeping your stitches loose, and slip stitch to join.
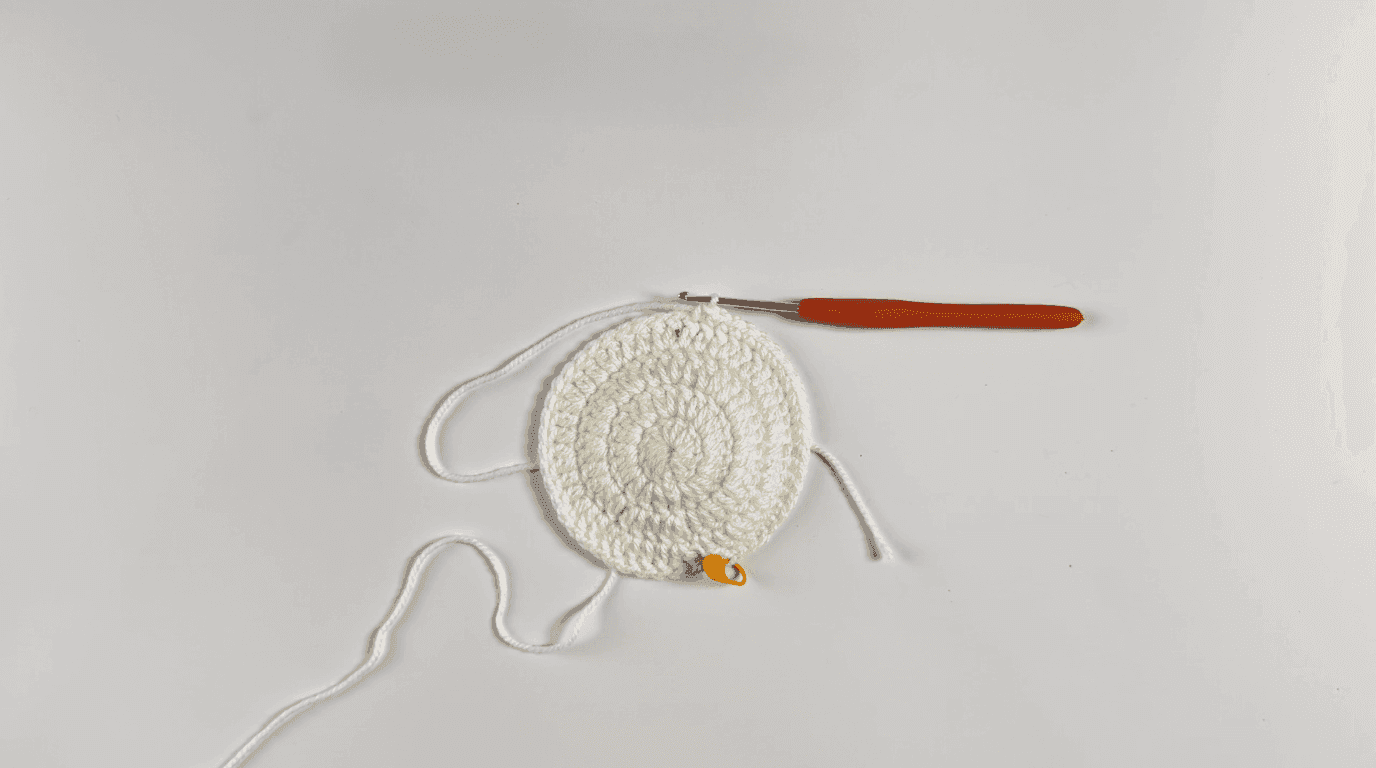
Rounds 1–2 use the ch-3 as a stitch, while Rounds 3–4 don't, that's the convention change flagged above. Each round's increase sequence adds 12 stitches, growing the coaster outward in an even circle. Round 5 doesn't increase at all; it just adds a plain sc round, worked loosely, that becomes the foundation the leaves attach into next.
Round 5's "keep it loose" instruction isn't a stylistic suggestion you can skip, this is the round where a too-tight tension most often causes the finished coaster to cup instead of lying flat, since it's also the round the leaves will be worked into next.
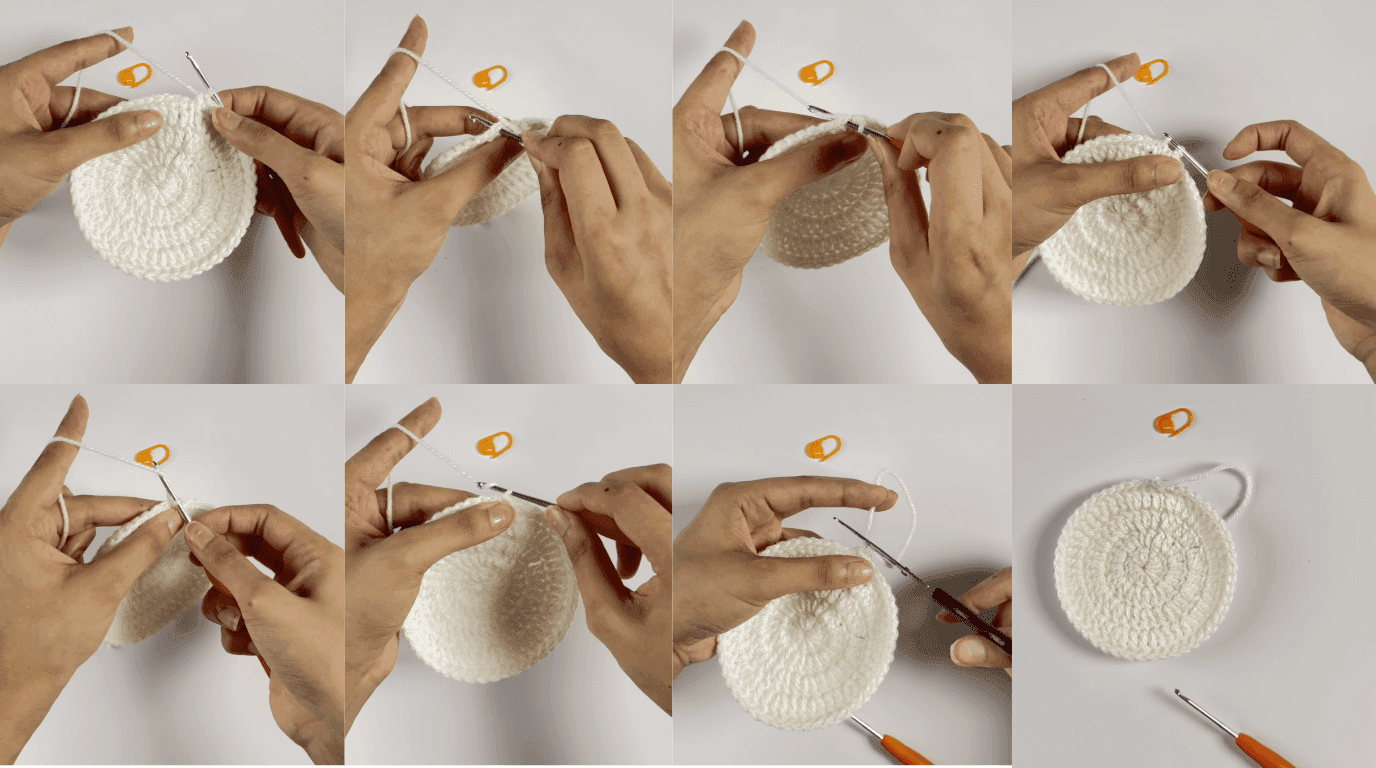
Closing the Round Slip stitch into the very first stitch of the round to join it, then fasten off. This locks the last round in place so it won't unravel.
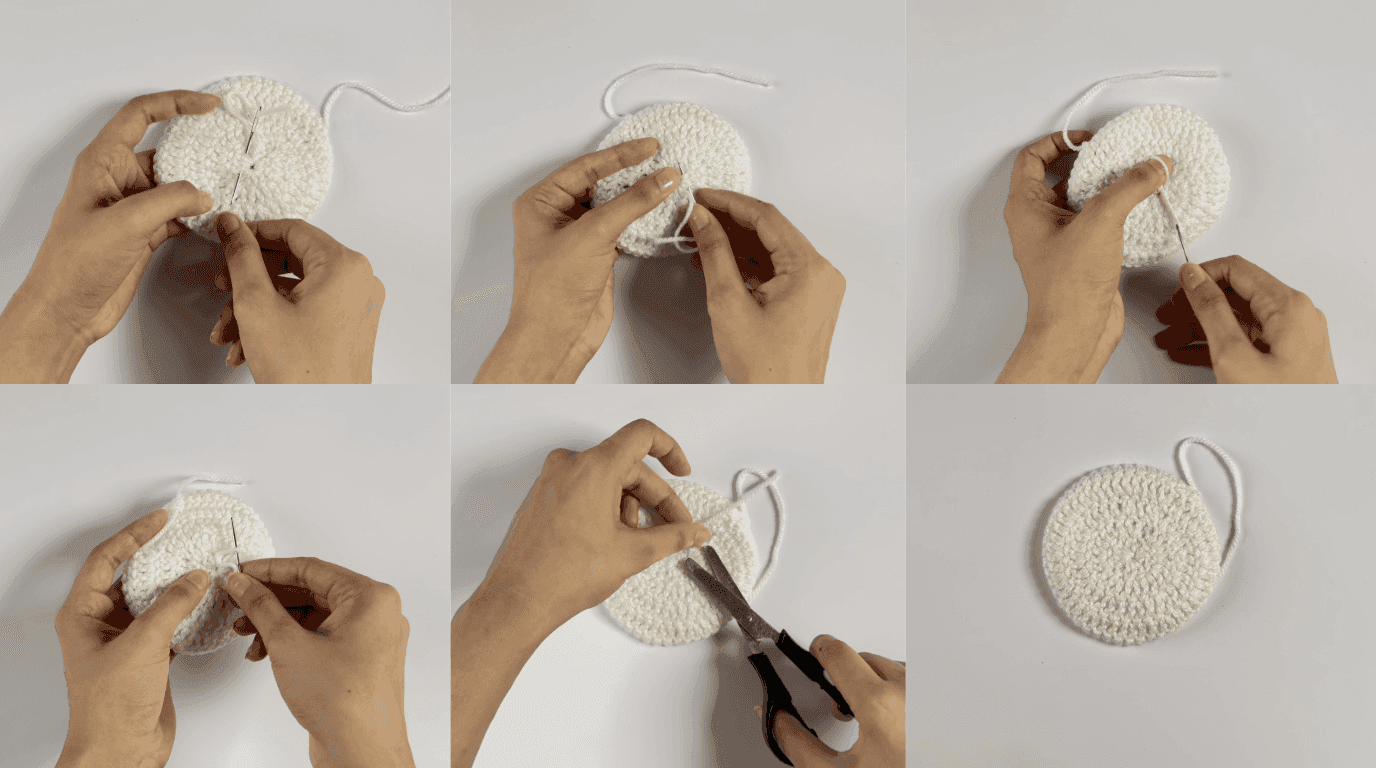
Weaving in the Tail Thread the leftover yarn tail onto a yarn needle and weave it through several stitches on the back side of your work, securing it well so it stays put through regular use.
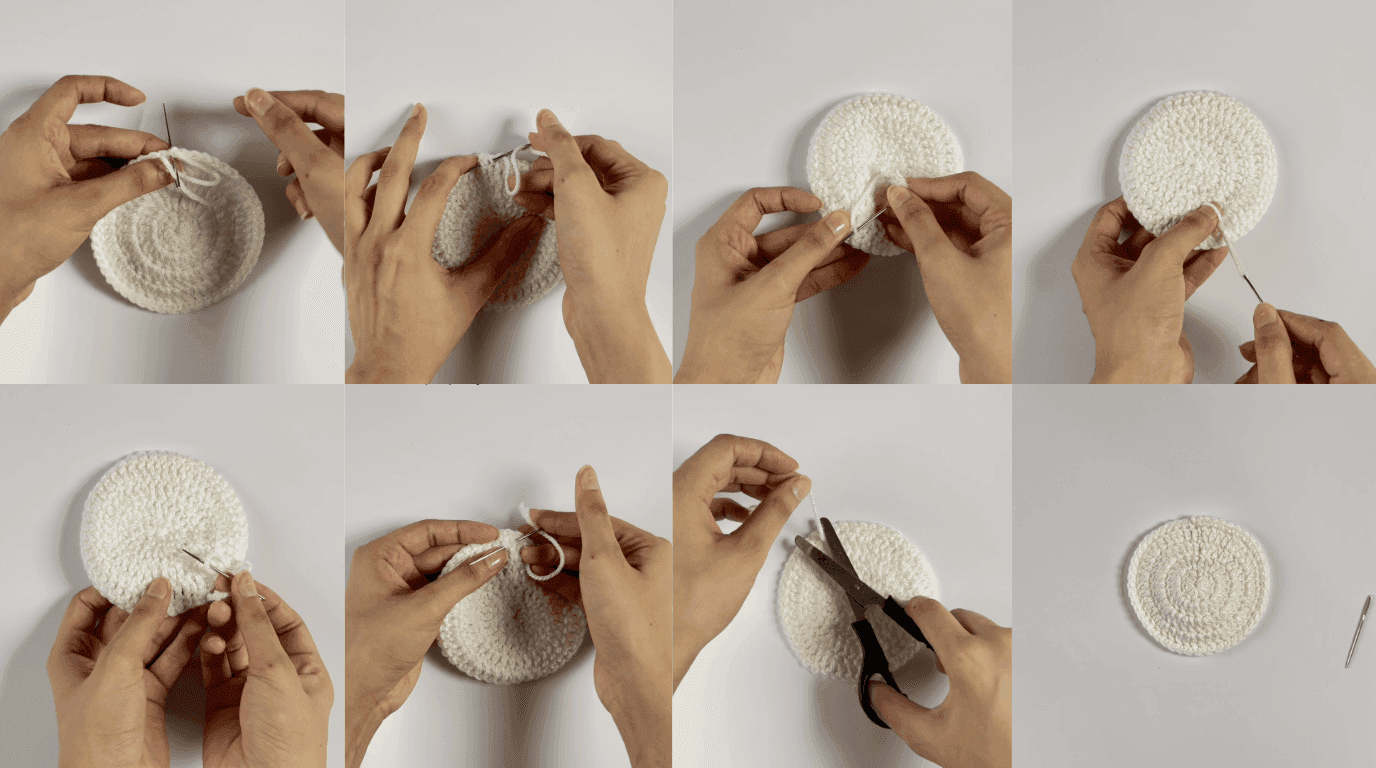
You're Done That's your base complete and ready to build on.
Built-In Leaves (Rounds 1–2)
Rather than crocheting separate leaves and sewing them onto the finished coaster, this pattern works the leaves directly into the coaster's outer edge using back-loop-only stitches, a genuine differentiator from most competitor patterns, which either skip leaves entirely or attach them as separate sewn-on pieces.
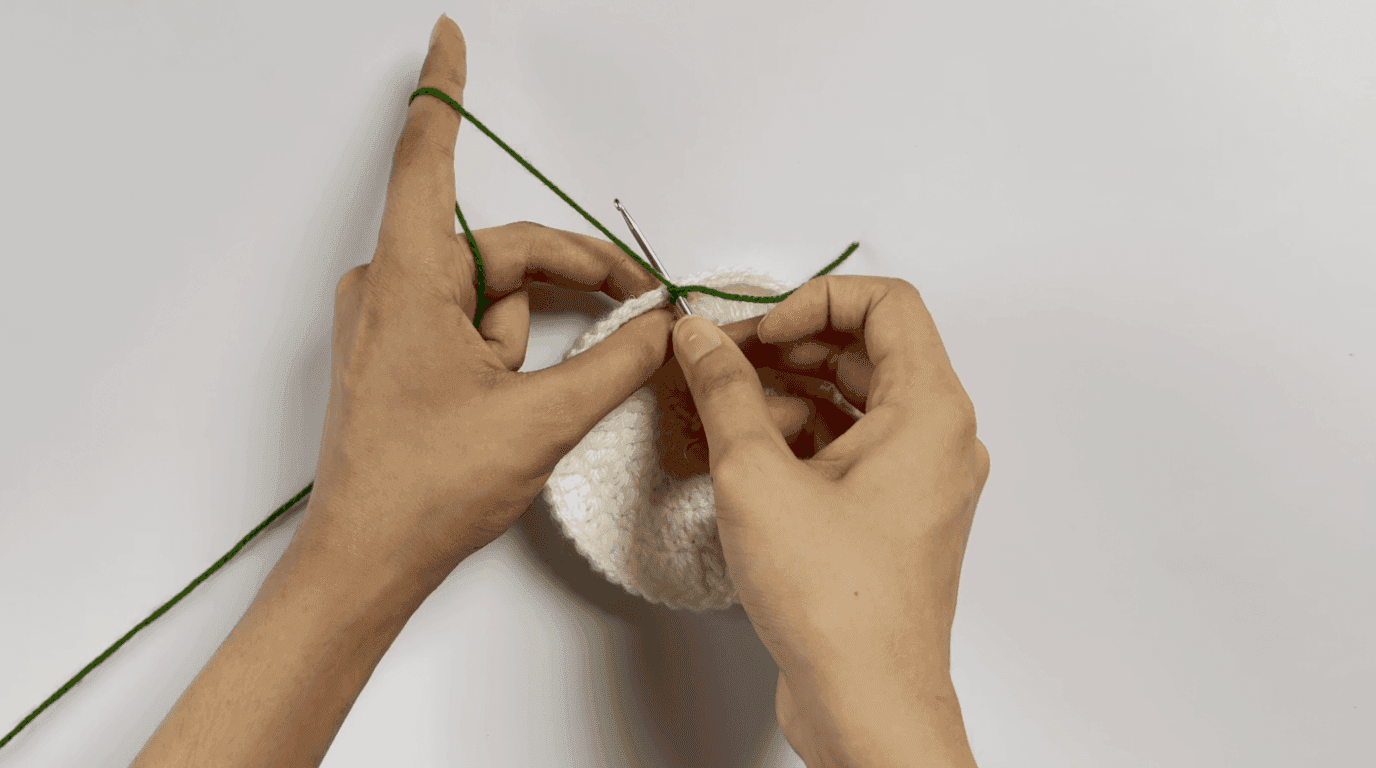
Round 2, Leaves: Work into each chain-4 space from the previous round.
• Leaf 1: Chain 3, slip stitch in the 2nd chain from the hook, single crochet in the next chain, then slip stitch back into the chain-4 space.
• Leaf 2: Repeat the same sequence in the same space chain 3, slip stitch in the 2nd chain from the hook, single crochet in the next chain, then slip stitch back into the chain-4 space.
Each chain-4 space should contain 2 leaves. Move to the next space using slip stitches across the double crochet stitches and spaces as needed until you reach the next chain-4 space. Repeat the leaf pattern in every chain-4 space around. Join with a final slip stitch, fasten off, and weave in all ends.
The ch-4 spaces from the previous round are exactly where the leaves get built. In each space, you make two small leaf shapes (ch 3 → sl st → sc → back into the space with a sl st) this creates a small V-shaped leaf. The two leaves in one space together form a "cluster," and you slip-stitch across to the next space until leaves have been worked all the way around the coaster.
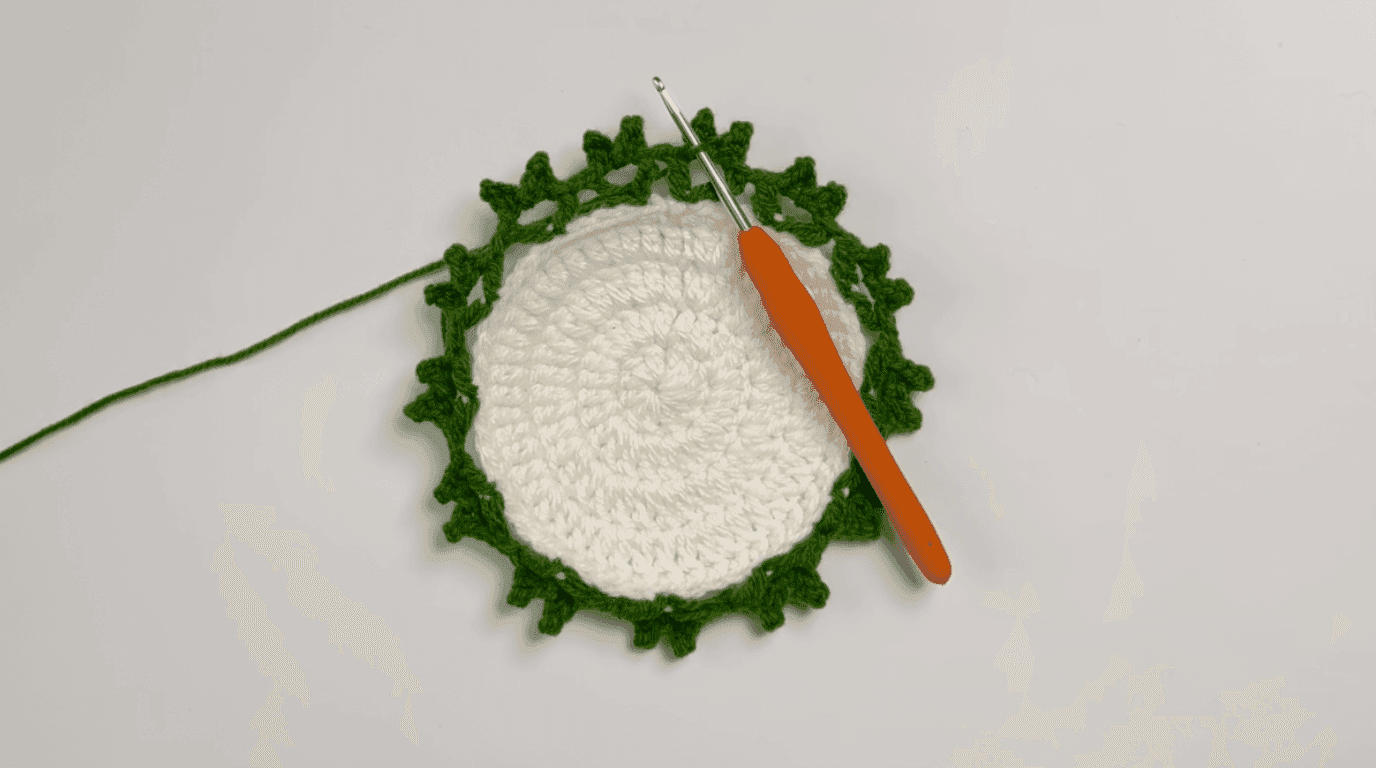
Pattern notes for this section:
• Work all green stitches into the back loops only of the previous round.
• Each ch-4 space forms one leaf cluster consisting of 2 leaves.
• Use loose slip stitches when moving between leaf clusters to maintain flexibility and shape.
How to Crochet the Flower Pot
Using a 3.0mm hook and beige yarn, worked in joined rounds:
Round 1: Make 6 single crochet in the magic circle, and slip stitch to join.
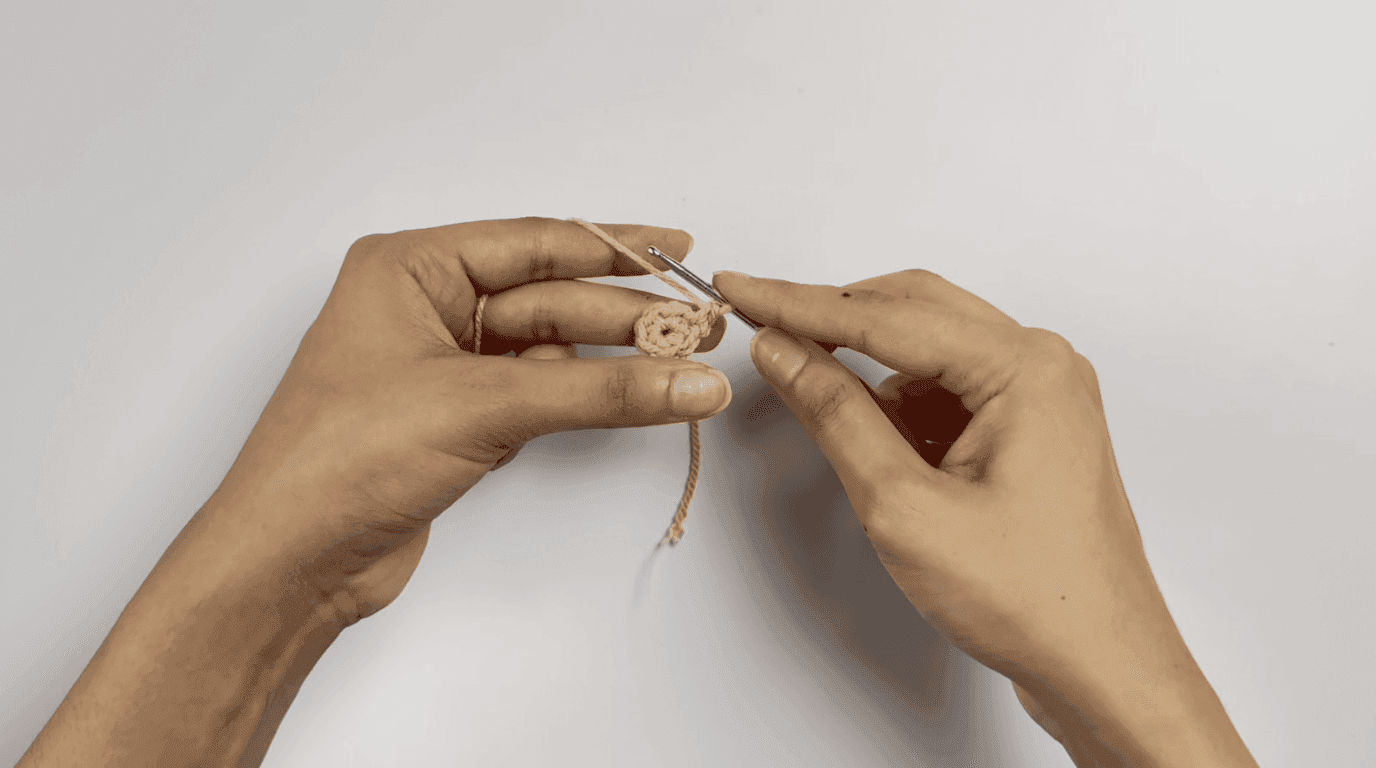
Round 2: Chain 1, then work an increase (2 single crochet in the same stitch) in each stitch around, and slip stitch to join.
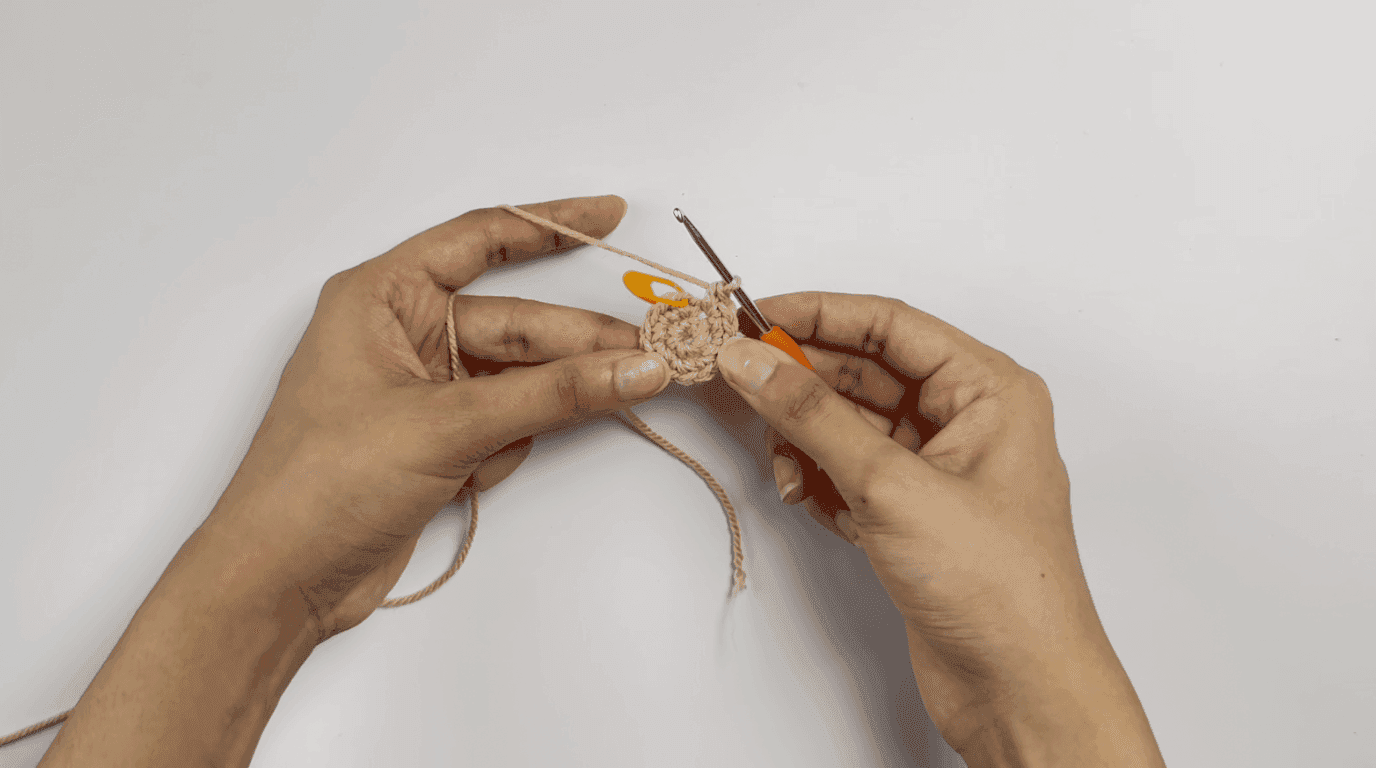
Round 3: Chain 1, then make 1 double crochet followed by 1 increase, repeat this sequence 6 times around, and slip stitch to join.
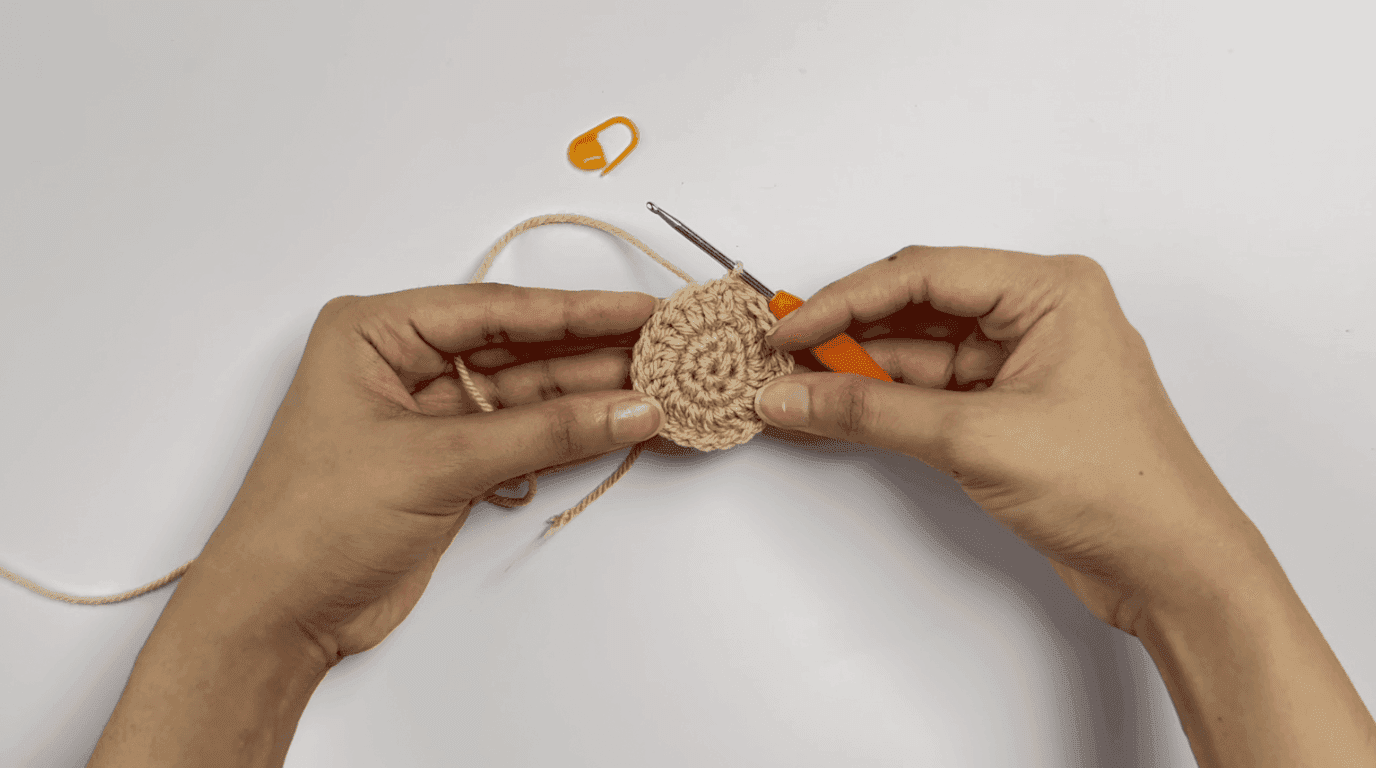
Round 4: Chain 1, then make 2 double crochet followed by 1 increase, repeat this sequence 6 times around, and slip stitch to join.
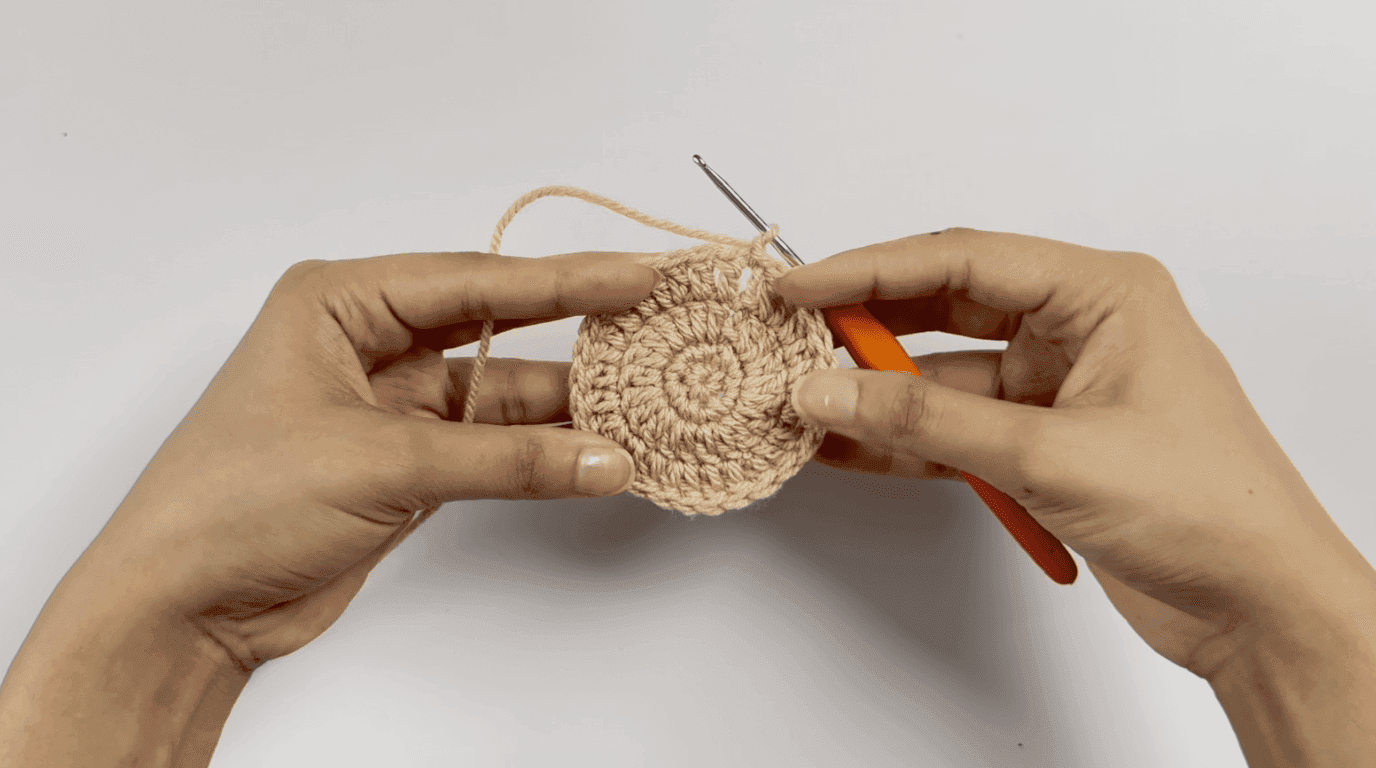
Round 5: Chain 1, then work 24 single crochet into the back loop only around, and slip stitch to join.
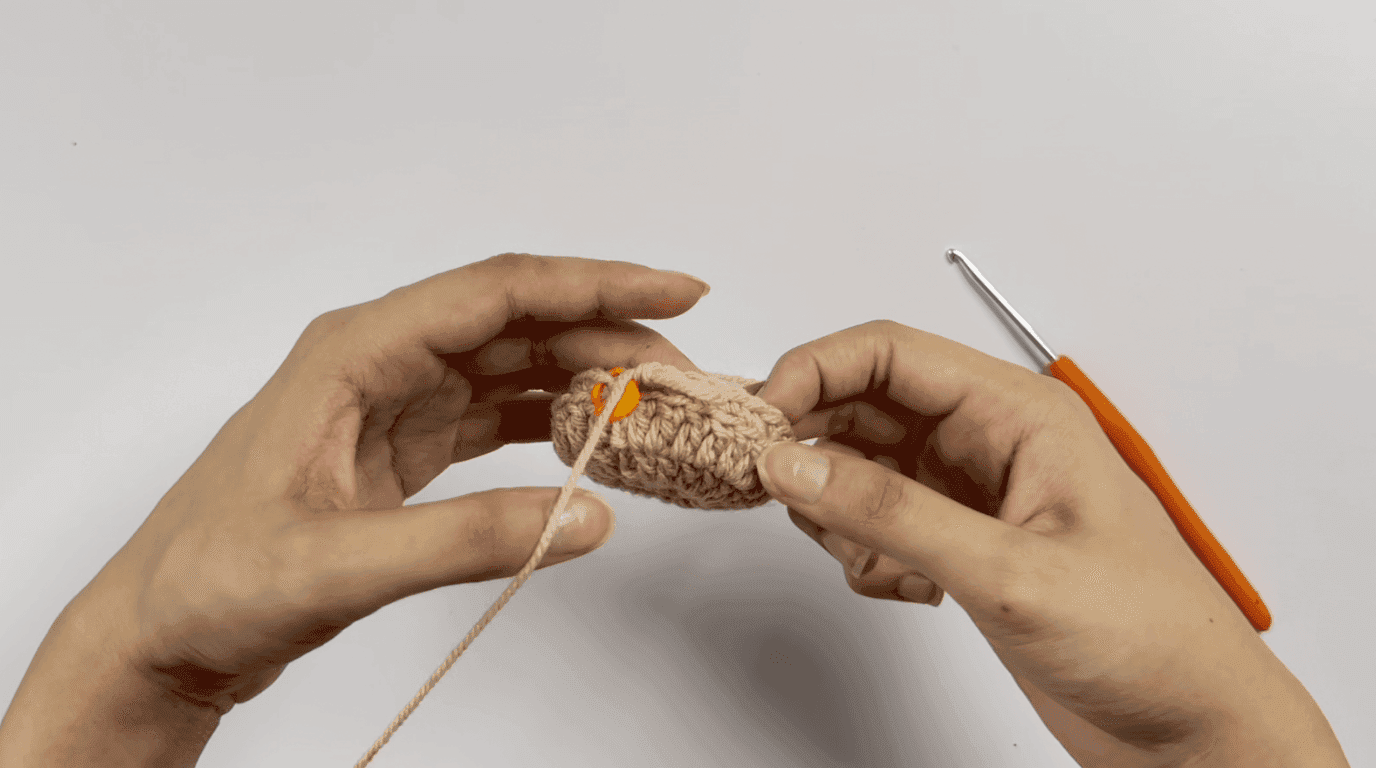
Rounds 6–11: Chain 1, then single crochet in each stitch around, and slip stitch to join. Repeat this round six times in total to build the pot's height.
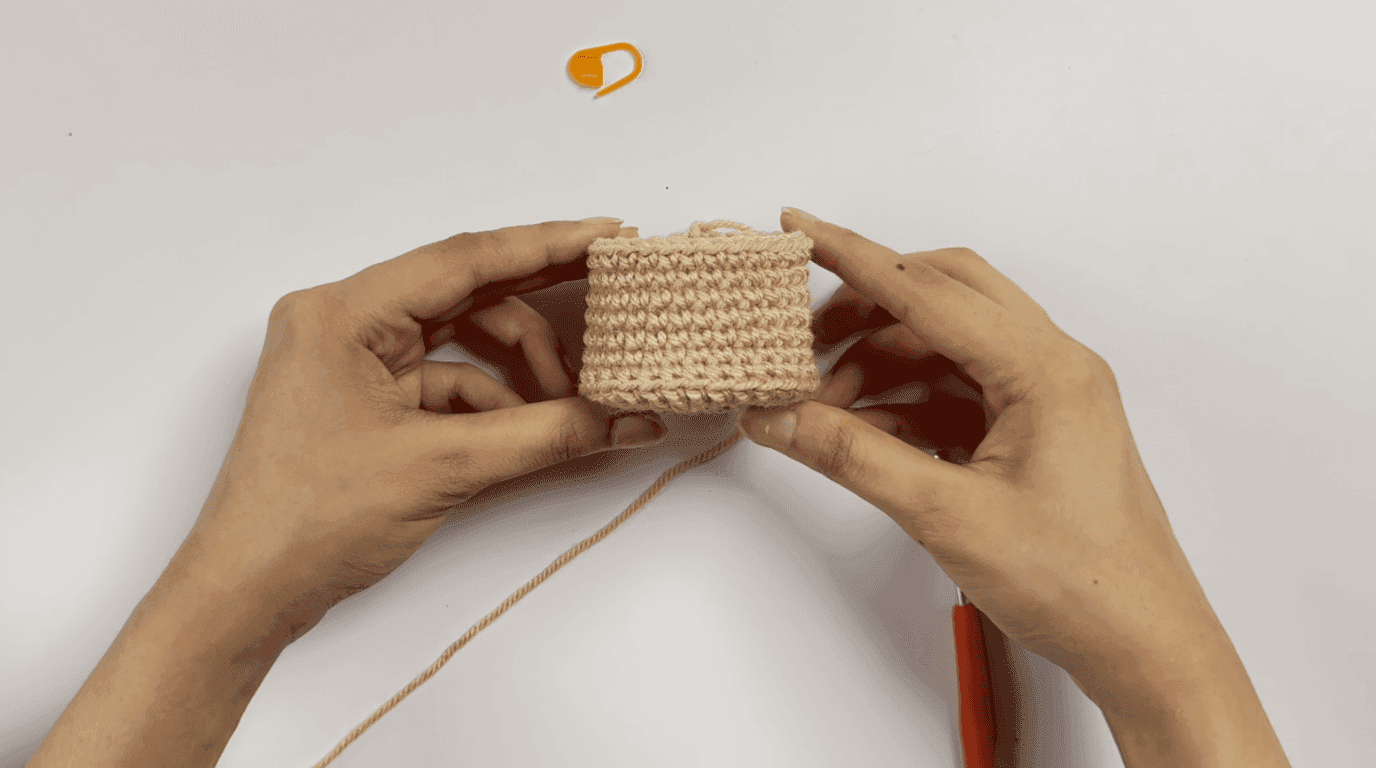
Round 12: Slip stitch in each stitch around, then fasten off and weave in the ends.
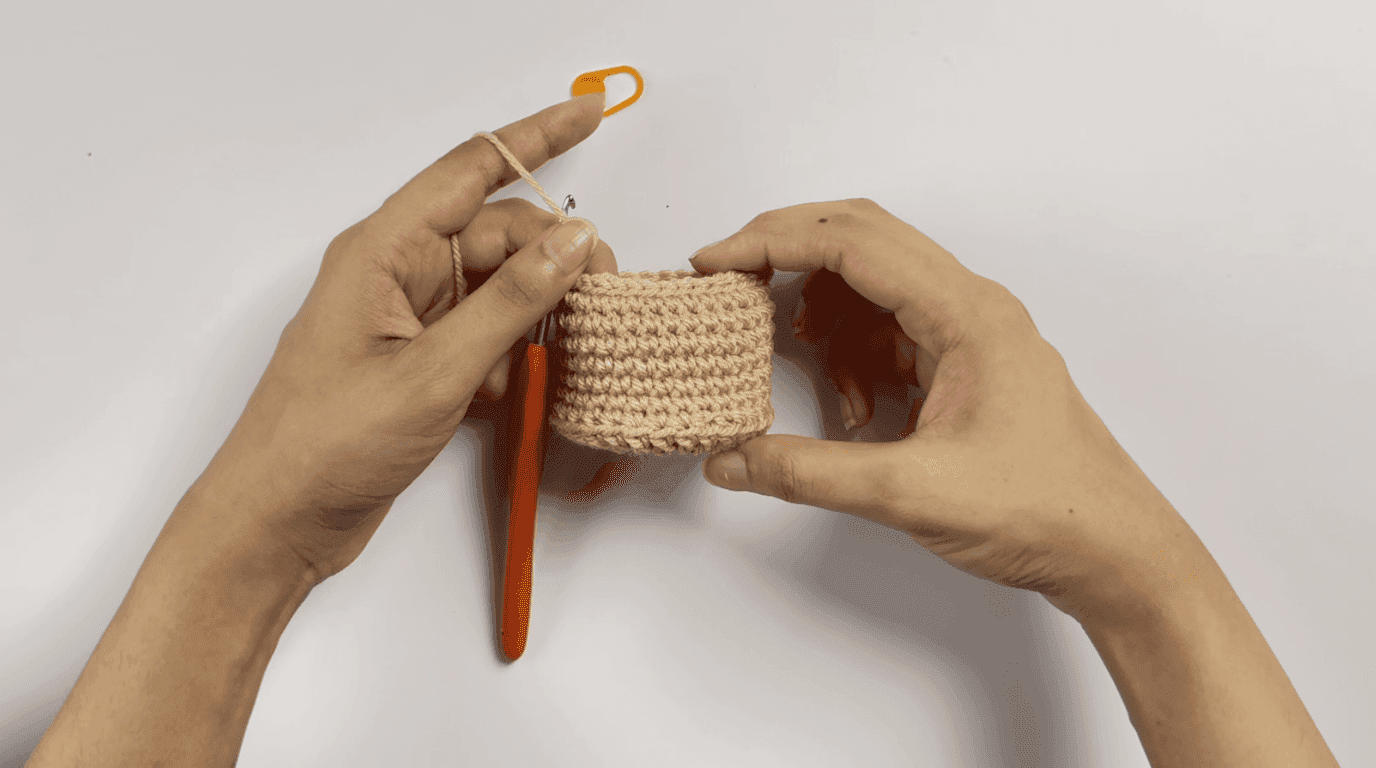
Round 5's back-loop-only round is what creates the visible ridge where the pot's base meets its straight sides a small detail, but it's what gives the finished pot a clean, defined shape rather than a smooth taper.

Not sure how much yarn you'll need? Figure out exactly how much of each color to buy before you start no guessing, no leftover skeins.
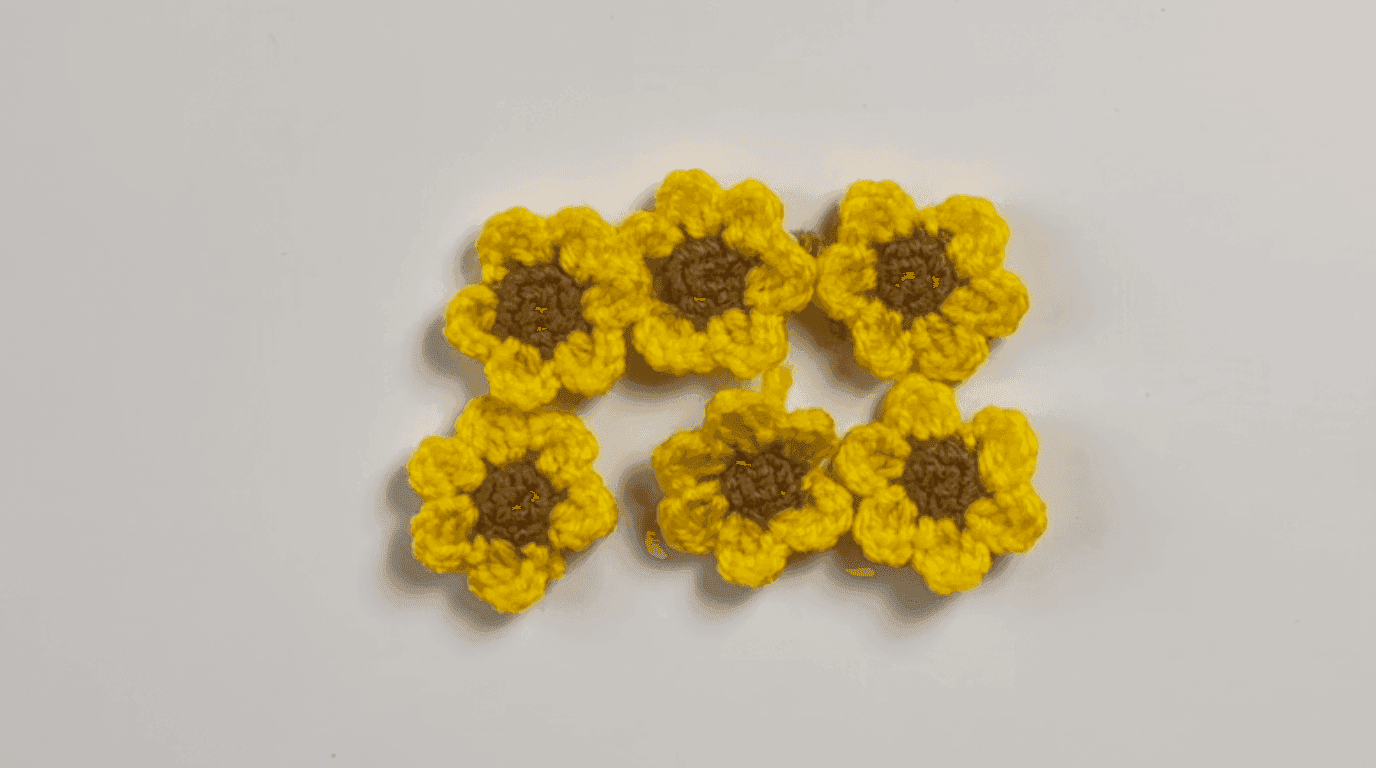
How to Crochet the Mini Sunflowers (Make 6)
You'll need six of these in total to fully decorate the pot's exterior.
Sunflower Core
Using a 2.0mm hook and brown yarn:
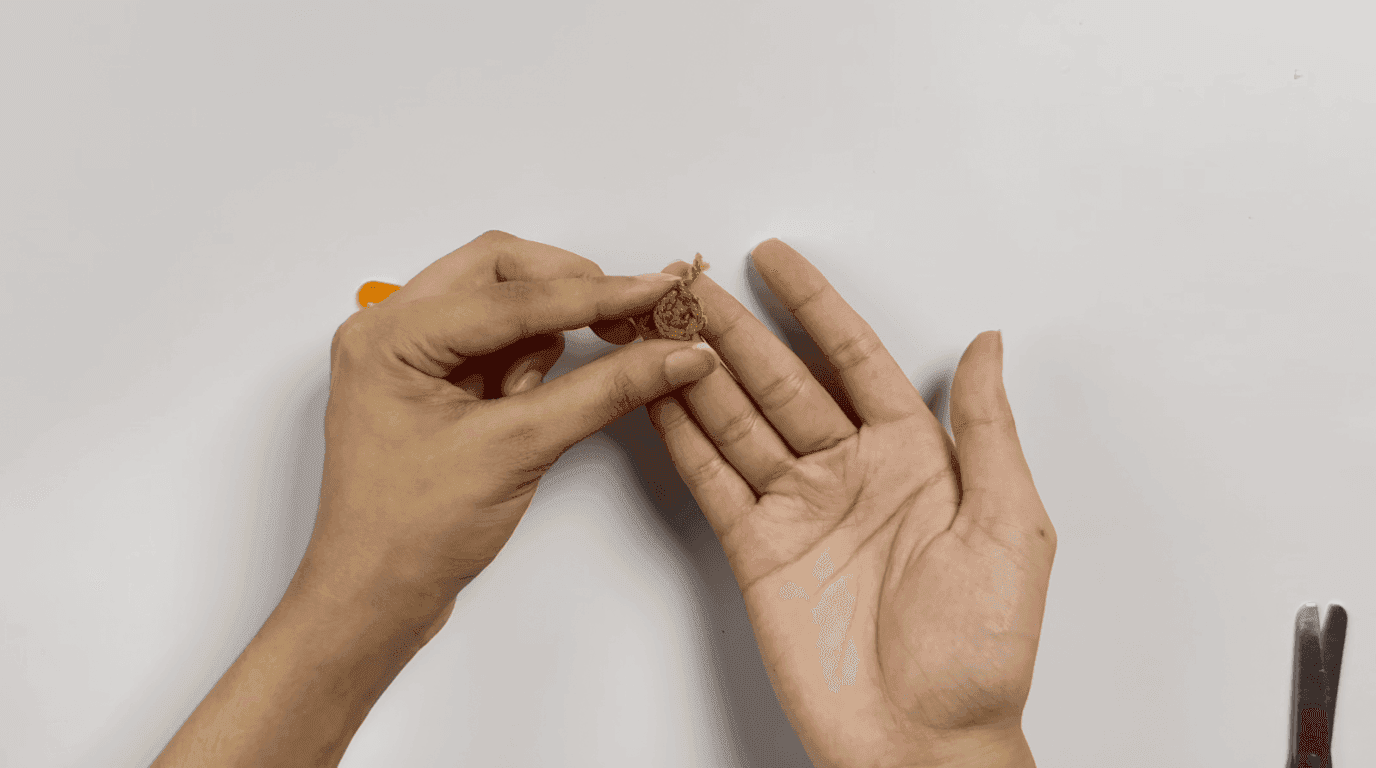
Round 1: Make 4 single crochet in the magic circle, and slip stitch to join.
Round 2: Chain 1, then make 1 single crochet followed by 1 increase, repeat this sequence 2 times around, and slip stitch to join.
Fasten off the center yarn if changing colors for the petals.
Sunflower Petals
Attach yellow yarn with a slip knot. Repeat the following sequence 6 times around: chain 2, double crochet in the same stitch, chain 2, then slip stitch in the next stitch. Fasten off and weave in all ends.
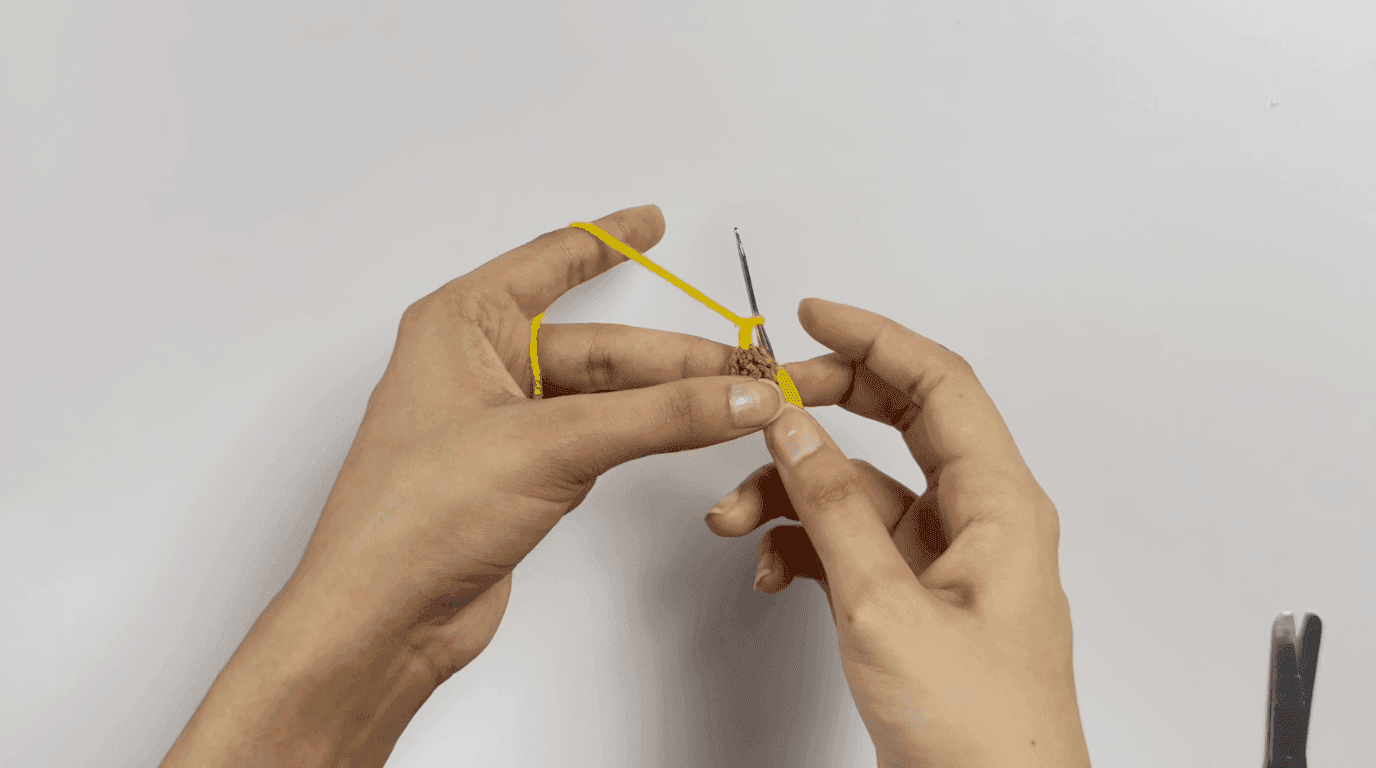
Make 6 sunflowers in total before moving on to assembly.
Assembling Your Sunflower Pot Coaster Set
• Weave in any remaining loose ends on the coaster and pot before you start gluing it's much harder to tuck in ends around glued-on appliqués afterward.
• Apply a small amount of hot glue to the back of each sunflower a thin, even amount rather than a thick blob, which can seep out around the edges once pressed.
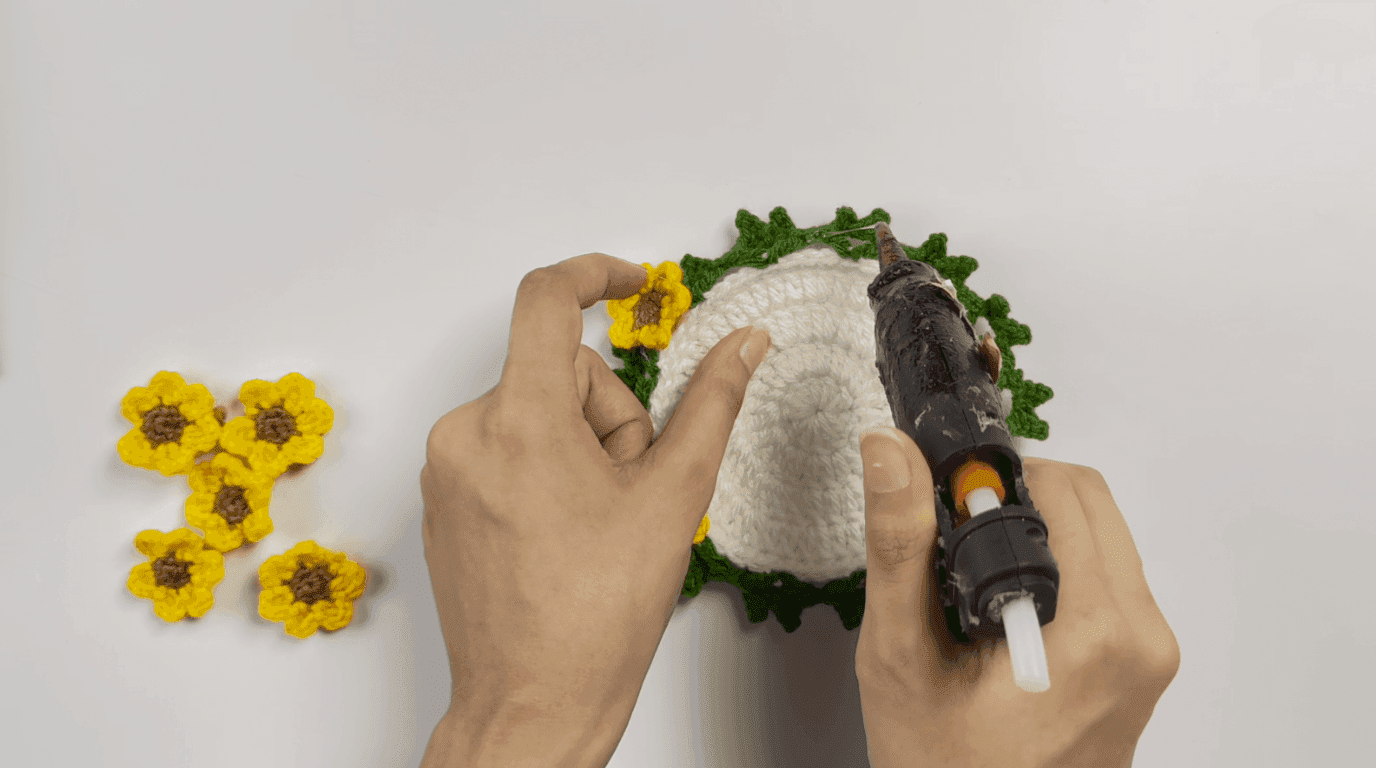
• Position the flowers evenly around the pot base. Leave approximately one flower-width of space between each sunflower for a balanced, evenly spaced appearance, rather than eyeballing gaps as you go, which tends to leave an uneven final gap.
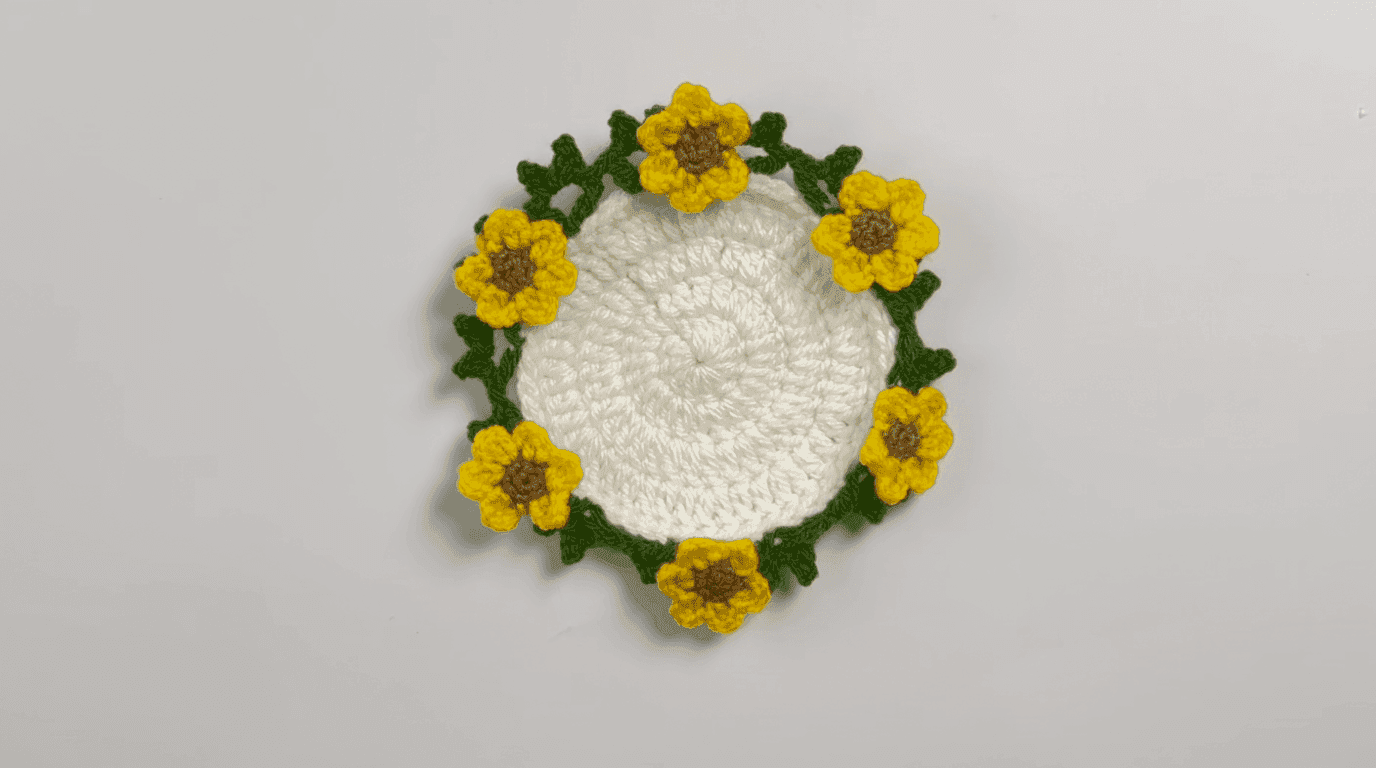
• Press gently and allow the glue to dry completely before handling the pot further.
Presentation & Styling Ideas
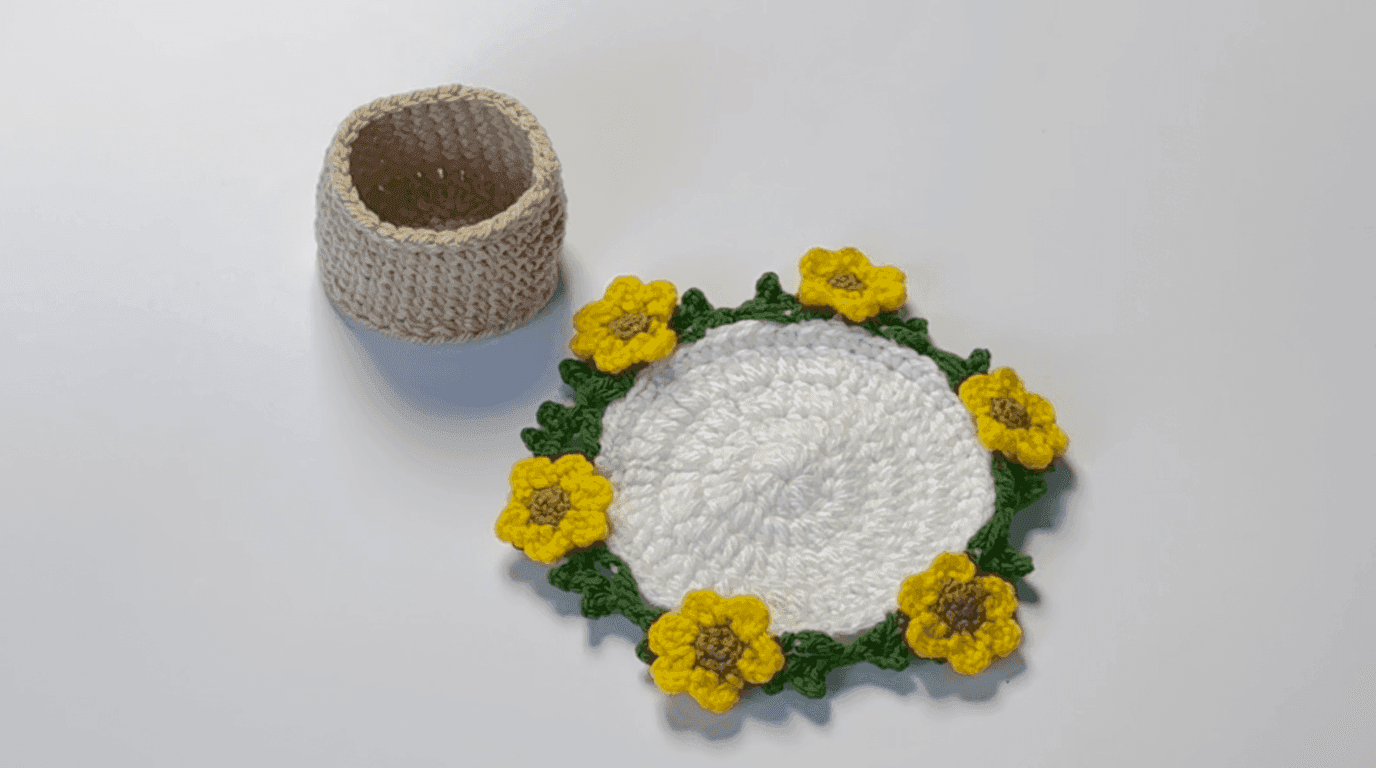
Once assembled, the pot works as a small standalone piece of table décor even when the coasters are stored elsewhere or in active use. A few ways to style the finished set:
• Stack the coasters flat inside the pot when not in use, so the set doubles as both a functional coaster holder and a decorative planter-style accent on a coffee table or kitchen counter.
• Because the coaster's built-in leaves sit around the full edge, the piece reads as a complete "potted flower" shape even before the mini sunflowers are added to the pot; the two pieces are designed to visually echo each other.
• Vary the yarn colors across the six mini sunflowers slightly (a mix of warm yellows, for instance) for a more natural, less uniform look, since real sunflowers rarely match in exact shade.
Bringing It Together
This pattern's three pieces each teach something slightly different: the coaster is a straightforward increase-round exercise with one detail to watch (the ch-3 convention change between rounds), the leaves are your first time working BLO stitches into an existing piece rather than from scratch, and the pot and sunflowers are simple joined-round shapes that come together quickly once you've got the coaster's rhythm down. None of the individual pieces are difficult on their own; the set just takes patience across three separate builds before assembly.
Once you've made one full set, the same coaster base and leaf technique are easy to repeat in other colors for a different flower entirely, so it's a pattern worth keeping even after your first sunflower set is finished.
Tips for a Beginner-Friendly Finish
• Keep Round 5 of the coaster loose, exactly as the pattern notes, this is the round most likely to pull tight and cause cupping if your tension runs snug, and it's also the round the leaves attach to.
• Watch the ch-3 convention carefully. It counts as a stitch in Rounds 1–2 but not in Rounds 3–4. Miscounting here is an easy way to end up one stitch off without noticing until the round doesn't join evenly.
• Use a stitch marker on every round, not just when you remember to this pattern joins each round rather than spiraling continuously, so losing track of your starting stitch is the easiest way to end up with a lopsided join.
• Common hot-glue mistakes: too much glue causes visible overflow around the edges of each sunflower; too little and the flower lifts at the edges over time. A thin, even amount in the center of the core, pressed and held rather than just set down, avoids both problems.
• If your finished coaster isn't lying flat, it's almost always a tension-consistency issue in Rounds 1–4 rather than a stitch-count error.
Frequently Asked Questions
Crochet the coaster base (Rounds 1–5) with built-in BLO leaves worked into the final round, crochet a separate pot in joined rounds, then make six mini sunflower appliqués to glue around the pot's exterior. Full round-by-round instructions for all three pieces are above.
Share this page
 X / Twitter
 Facebook
 Reddit
Related articles
Bernat Yarn Substitutes: What to Use Instead of Blanket, Maker, Pipsqueak & Bundle Up

How to Crochet a Pumpkin: Free Patterns for Fall & Halloween Decor
How to Read Crochet Patterns: A Beginner's Guide

Yarnzy: #1 Crochet & Knitting App
Track knitting and crochet projects with a timer & row counter, Import Patterns from Anywhere, Manage Stash & more all in one place.


Free to start · iOS, Android & Web
Scan to Download the App

Start your next project with confidence