
 Download the App
Crochet Increase and Decrease: The Complete Beginner Guide
3 Sep, 2026
A decrease stitch crochet technique combines two stitches into one, narrowing your fabric; an increase does the opposite, working two or more stitches into a single spot to widen it. Both are how a flat circle becomes a bowl, how a straight edge becomes a sleeve, and how a granny square gets its corners. This guide covers how to increase in crochet and how to decrease in crochet across single, half double, and double crochet, the invisible decrease amigurumi makers swear by, and the actual math behind spacing your increases and decreases so they don't leave a visible line up your work.
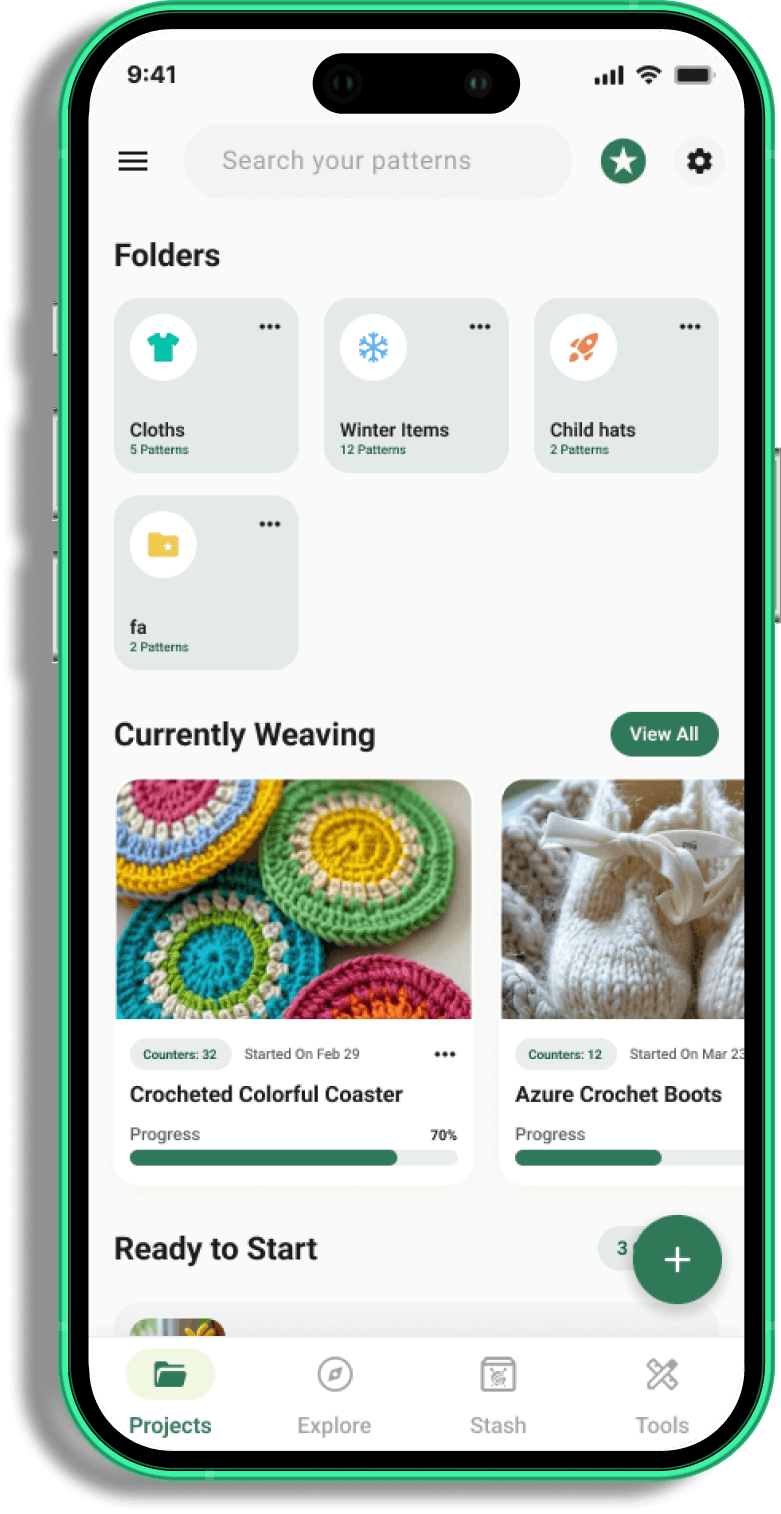
Keep Learning With Yarnzy
 Download Yarnzy
What Does It Mean to Increase and Decrease in Crochet?
Increase and decrease are the two tools crochet uses to change fabric width mid-project, and understanding both takes about thirty seconds.
To increase, you work more than one stitch into the same stitch or space, most commonly two stitches where the pattern would normally call for one. Each extra stitch adds one stitch's worth of width to that row or round.
To decrease, you work two (or occasionally more) stitches together as a single unit, so two stitches' worth of yarn produces only one stitch's height. Each decrease removes one stitch's worth of width.
Everything else in this guide, single crochet increase, double crochet decrease, the invisible method, even spacing, is a variation on these same two moves. If you're new to the base stitches themselves, our Types of Crochet Stitches guide covers single, half double, and double crochet from the ground up before you tackle increasing or decreasing them.
How to Increase in Crochet
An increase stitch crochet technique is mechanically the same across every stitch height: instead of moving to the next stitch after you finish one, you work a second stitch into that exact same spot. That's the entire concept. The differences between stitch types are just in how tall each individual stitch is, not in the increase logic itself.
Single Crochet Increase
A single crochet increase is the version you'll use most as a beginner, and it's the simplest to see happening as you work it.
1. Work a single crochet into a stitch as normal, insert your hook, yarn over, pull through, yarn over again, pull through both loops.
2. Without moving your hook to the next stitch, insert it into that exact same stitch again.
3. Work a second complete single crochet into that same spot.
4. Continue to your next stitch as normal.

You've now turned one stitch into two, and your row or round has gained one stitch of width at that exact point.
How to Increase Stitches Evenly (Row or Round)
A single increase widens your work by one stitch. A whole row of increases, spaced randomly, widens it unevenly and often leaves a visible pucker or a lopsided shape. The fix is a stitch multiple: instead of increasing at random, you increase every Nth stitch, evenly distributed around your row or round.
This matters most when you're working a flat circle, the classic amigurumi or coaster base, where each round needs a consistent number of increases to stay flat rather than curling into a bowl or ruffling at the edges. Round 1 typically starts with 6 stitches, round 2 doubles that to 12 (increasing in every stitch), round 3 increases in every other stitch, and the pattern continues stretching the gap between increases as the circle grows. Working out that spacing by hand for a custom stitch count gets tedious fast; our Increase & Decrease Calculator does that math instantly for any starting count.

How to Decrease in Crochet
How to decrease in crochet follows the same logic in reverse: instead of adding a stitch, you're merging two into one. The mechanic changes slightly by stitch height, since a taller stitch (double crochet) has more loops on the hook to manage than a shorter one (single crochet), but the core idea, working two stitches together as a single unit, stays constant.
Single Crochet Decrease
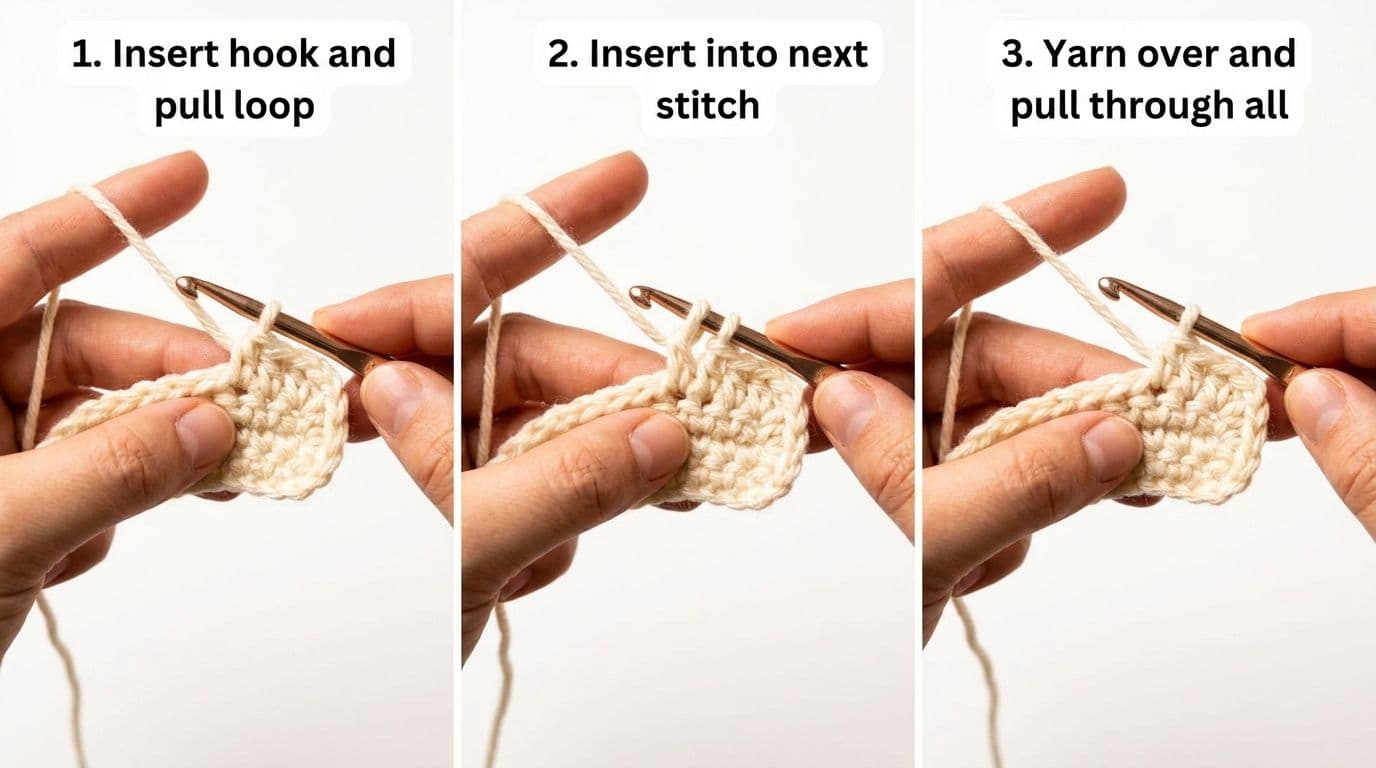
This is the standard single crochet decrease, commonly abbreviated sc2tog (single crochet 2 together) in patterns.
1. Insert your hook into the next stitch, yarn over, and pull up a loop. Two loops now sit on your hook.
2. Without finishing that stitch, insert your hook into the following stitch, yarn over, and pull up another loop. Three loops now sit on your hook.
3. Yarn over one final time and pull through all three loops at once.
You've merged two stitches into one, and your row has lost one stitch of width at that point. This standard method can leave a small bump or gap where the two stitch tops merge, worth knowing before you reach the invisible decrease section below, which solves exactly that.
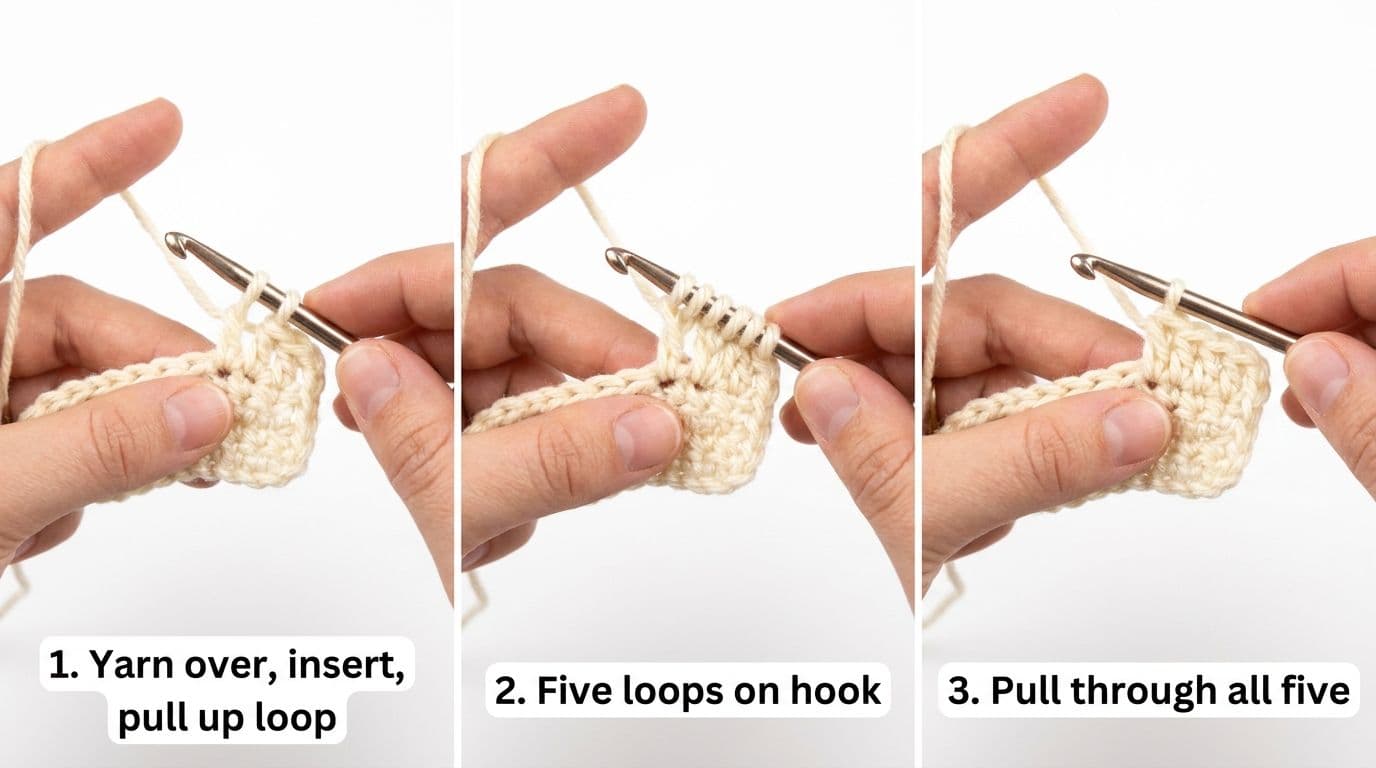
Half Double Crochet Decrease
How to decrease half double crochet works the same three-loops-then-pull-through logic, adjusted for the extra yarn over a half double crochet starts with.
1. Yarn over, insert your hook into the next stitch, yarn over, and pull up a loop. Three loops now sit on your hook.
2. Yarn over again, insert your hook into the following stitch, yarn over, and pull up a loop. Five loops now sit on your hook.
3. Yarn over one final time and pull through all five loops in a single motion.
Pulling through five loops at once takes a bit more hand strength than the single crochet version, don't be surprised if your first few feel awkward, that's normal and eases up with repetition.
Double Crochet Decrease
A double crochet decrease (also written decrease double crochet) is the tallest of the three, and it's worked in two halves before joining.
1. Yarn over, insert your hook into the next stitch, yarn over, and pull up a loop. Yarn over and pull through just the first two loops, two loops remain on your hook.
2. Yarn over, insert your hook into the following stitch, yarn over, and pull up a loop. Yarn over and pull through just the first two loops again, three loops now sit on your hook.
3. Yarn over one last time and pull through all three remaining loops together.
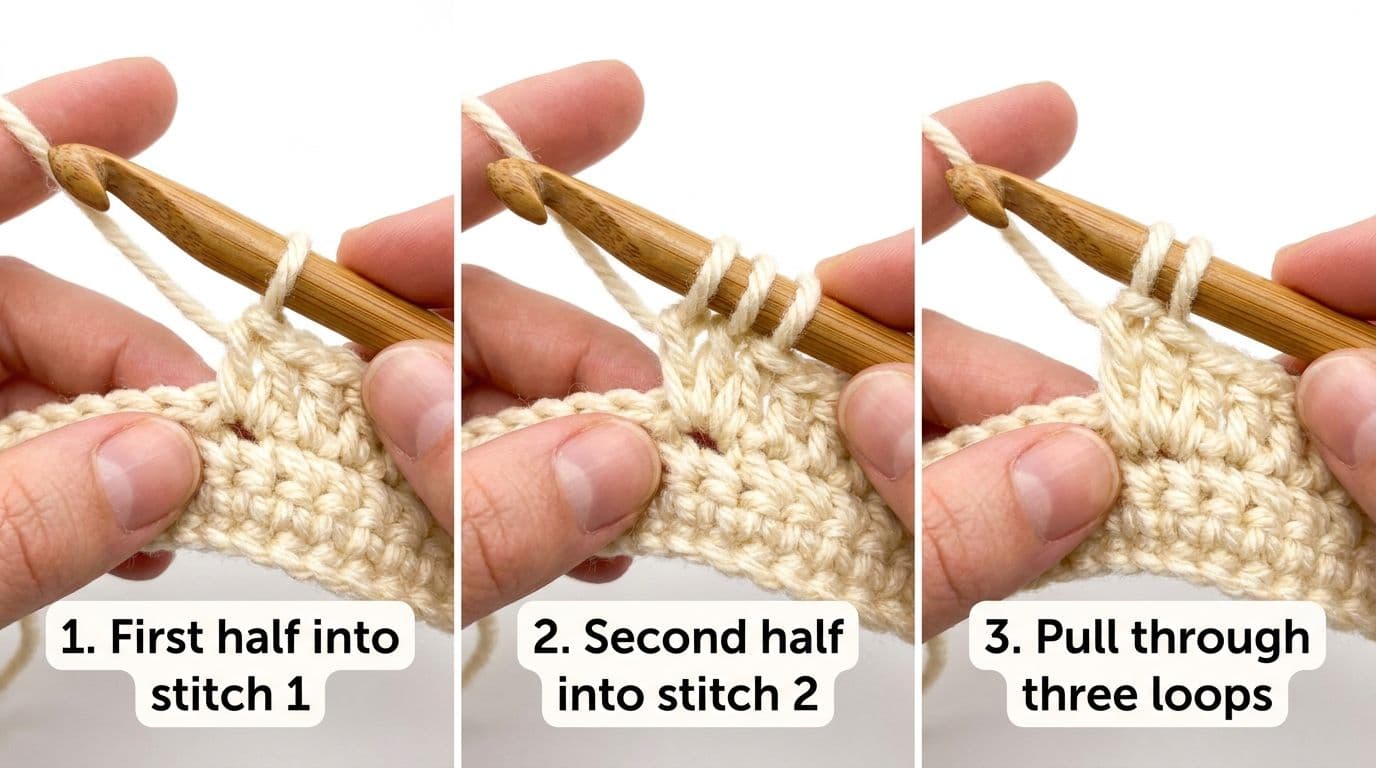
This double crochet decrease stitch is the tallest and most visible of the three, which is exactly why the invisible method below is worth learning if a clean decrease line matters for your project.

Skip the Manual Math Space your increases and decreases evenly across any stitch count with our free Increase & Decrease Calculator.
Invisible Increase and Invisible Decrease
If you've noticed a small bump or hole where your decreases sit, especially in amigurumi, you're seeing exactly the problem the invisible decrease was designed to solve, and it's popular enough in the amigurumi world that it's often credited back to the crochet designer known as Planet June, who helped popularize the technique.
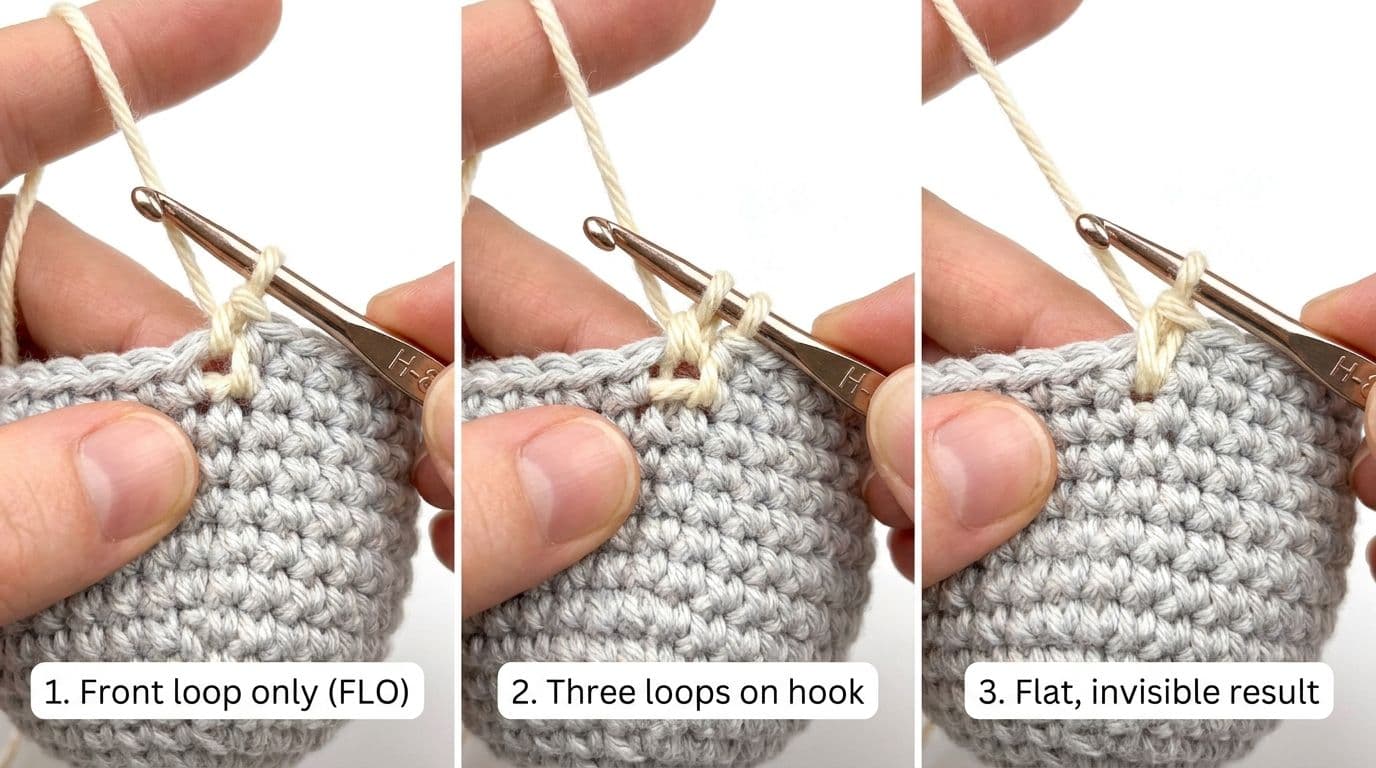
The standard decrease works into both loops of each stitch. The invisible decrease (sometimes shortened to Inv Dec in patterns) works into the front loop only (FLO) of each of the two stitches instead:
1. Insert your hook into the front loop only of the next stitch, then the front loop only of the following stitch. Three loops now sit on your hook (your working loop plus the two front loops).
2. Yarn over and pull through just the first two loops, front loop and front loop, leaving two loops on your hook.
3. Yarn over and pull through the remaining two loops to finish.
Because you're only ever working through the front loops, the resulting stitch sits flatter and more uniform than a standard decrease, with no visible bump or gap. This is why the invisible decrease is the default choice for amigurumi, where every stitch is visible on a small, stuffed shape and a lumpy decrease line stands out immediately. An invisible increase follows the same front-loop-only logic in reverse, working two stitches into the front loop of a single stitch rather than merging two together.
How to Space Increases and Decreases Evenly
This is the part almost every beginner tutorial skips entirely, and it's genuinely the difference between a project that lies flat and one that ruffles or cups no matter how correctly you've worked each individual stitch.
The underlying formula is simple once it's written out: take your total stitch count, divide by the number of increases or decreases you need to add or remove, and that tells you how many plain stitches to work between each one. Twenty-four stitches with four evenly spaced decreases, for example, means six plain stitches between each decrease, not four decreases bunched together at one point in the round.
This same spacing logic is what creates a zigzag or chevron shaping effect when increases and decreases are paired in the same row, and it's the exact math behind building a flat circle without curling. Working this out by hand for a nonstandard stitch count or an odd number of increases is exactly the kind of tedious arithmetic our Increase & Decrease Calculator was built to eliminate, enter your stitch count and how many increases or decreases you need, and get exact placement instantly rather than sketching it out on paper mid-project.

Never Guess Your Spacing Again Enter your stitch count and let our free calculator tell you exactly where each increase or decrease goes.
Common Increase and Decrease Abbreviations
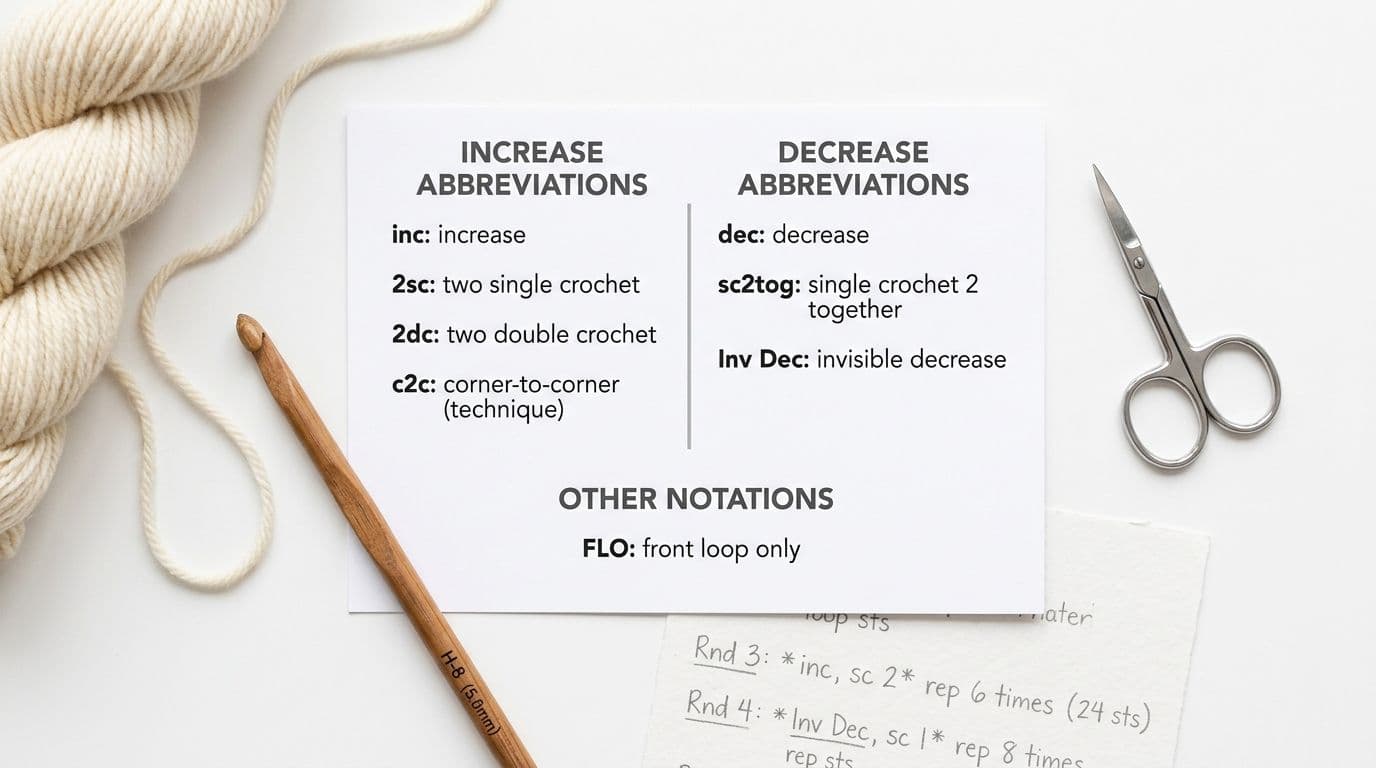
Crochet patterns lean heavily on shorthand, and increase and decrease notation is some of the most common you'll run into. Here's what the main ones mean:
| Abbreviation | Meaning | What does it mean when a pattern uses it? |
|---|---|---|
| inc | Increase | Work 2 (or more) stitches into the same stitch |
| dec | Decrease | Work 2 stitches together as one |
| sc2tog | Single crochet 2 together | The standard single crochet decrease |
| 2sc / 2dc | 2 single crochet / 2 double crochet | Shorthand sometimes used interchangeably with "inc" for that stitch type |
| FLO | Front loop only | Work into just the front loop, the basis of the invisible decrease |
| Inv Dec | Invisible decrease | The front-loop-only decrease method covered above |
| c2c | Corner-to-corner | A specific crochet technique that relies on increases and decreases to build and then shrink a diagonal grid |
What does inc mean in crochet? It means work an increase, typically two stitches into one, exactly as covered in the Single Crochet Increase section above.
What does dec mean in crochet? It means work a decrease, merging two stitches into one, as covered in the decrease sections above.
For a fuller shorthand reference beyond just increase and decrease notation, our Crochet Abbreviations guide covers the complete list. If you want the official word on US crochet terminology and stitch naming standards, the Craft Yarn Council is the industry reference point most designers write patterns against.
Conclusion
Increase and decrease aren't separate skills from the stitches you already know, they're the same stitches, just worked in a different spot or combined together. Once the mechanic clicks for single crochet, half double crochet and double crochet decreases follow the exact same logic with a couple more loops to manage. The part that actually takes practice isn't the stitch itself, it's the spacing, and that's math you never have to do by hand again once you know the calculator's there.
Want to keep building on this? Lion Brand's beginner crochet lesson series is a solid next stop if you want a broader course beyond this one technique, and our Crochet Abbreviations guide covers every shorthand term you'll run into beyond inc and dec.
Frequently Asked Questions
An increase adds width by working more than one stitch into the same spot, most often two. A decrease removes width by merging two stitches into one. They're opposite tools for the same job, shaping fabric that isn't just a flat rectangle.
Share this page
 X / Twitter
 Facebook
 Reddit
Related articles
Bernat Yarn Substitutes: What to Use Instead of Blanket, Maker, Pipsqueak & Bundle Up

How to Crochet a Pumpkin: Free Patterns for Fall & Halloween Decor
How to Read Crochet Patterns: A Beginner's Guide

Yarnzy: #1 Crochet & Knitting App
Track knitting and crochet projects with a timer & row counter, Import Patterns from Anywhere, Manage Stash & more all in one place.


Free to start · iOS, Android & Web
Scan to Download the App

Start your next project with confidence